Showing posts with label cine camera. Show all posts

Sunday, 10 August 2025

Yashica 8T-2

Yashica 8T-2 double-8 camera

Following my experiences with the Bolex B-8VS, I wanted a compact 2x8mm camera to replace it, and for similar reasons–something small enough that could go in my camera bag alongside still film cameras. There are numerous all-mechanical and all-manual 8mm cameras from the same era as the Bolex which have a similar design; slightly earlier 8mm cameras were often less streamlined-looking, such as the Bell & Howell turret cameras, or simply bigger and more boxy, like the early Kodaks with their huge internal sprocket wheel; the design of the compact Bolex 8mm camera must have inspired the first generation of post-war 8mm cameras, as many compact double-turret cameras appeared looking rather similar around the same time.

One camera that came up in my research was the Yashica 8T-2; there were four different initial Yashica 8mm models before the Yashica T3. This features a three-lens turret and makes for a larger camera with a redesigned body. The features of the two-lens turret models are very similar to the Bolex in compact size, shape and layout. I may have been alerted to the Yashica 8T-2 by the video on the Film Photography Project's YouTube channel; similar to the Bolex B8VS, I bought the camer before a trip abroad, to Belgium this time. There are a few evolutionary differences from the earlier Yashica 8mm cameras: the original Yashica 8 from 1957 has a different shutter release and single frame setting (more like the contemporary Bolex) and a different door catch; there then was a single lens Yashica 8S from 1958, and the 8T and 8T-2 from the same year; Yashica triple-lens turret cameras began the following year. There seems to be little difference between the 8T and 8T-2: the cameras have simply "yashica-8" embossed on the door (from reading the Yashica TLR website, the distinction between the two is unclear: the impression I get is that the Yashica 8T was actually the same camera as the 8T-2 but offered with one lens only at the time of purchase).

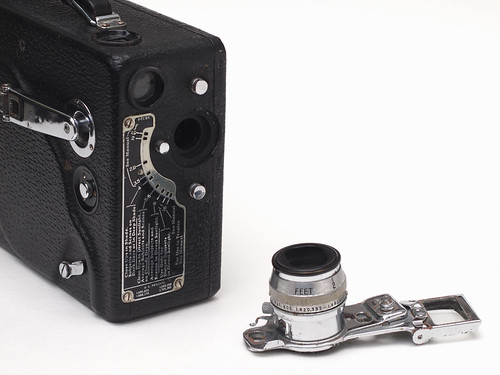
The first Yashica 8mm model came with Zunow lenses; my camera arrived with a Yashinon f1.4 13mm lens, with the Yashinons featuring an almost identical desgin to the equivalent Zunow lenses from which they must have derived. For the pictures on this post I fitted a Cinetor one-and-a-half inch lens from a different camera, which incidentally has a stuck focus ring–when using the camera I used the 38mm Bolex Kern Paillard lens for a long lens option (which is quite compact compared to the Cinetor, nearly as short as the Yashinon 13mm lens). As the lens mounts on the turret are a standard D-mount, there are many interchangeable lenses that can be fitted to the camera. The Yashinon f1.4 13mm lens does not focus quite as close as the equivalent on the Bolex, but it does focus to 1 foot; focus is manual and not reflected in the viewfinder of course. The 13mm lens stops down to f22, useful for bright subjects when shooting faster contemporary emulsions.

One difference from the Bolex B8 is the mechanism for framing viewfinder to different focal lengths. On the Yashica there is a slider on the side with adjusts the viewfinder from 6.5mm, through 13mm and 25mm to 38mm lenses–unlike the Bolex, the wide angle lens doesn't require an adpator for the wide angle lens. It also has a set of markings with very small numerals inside at the bottom of the scale alongside the word "SCOPE". This was for a set of animorphic lenses, which, when combined with an animorphic adaptor on the viewfinder gave a widescreen projection–various widescreen aspect ratios becoming popular in the cinema, in part as a means to compete with the developing television market. The animorphic 'scope' lenses did require an adaptor which slipped over the front of viewfinder to mask it for the correct aspect ratio; these lenses appear to be very rare now. There was also an early zoom lens produced for the camera which had a mechnical arm which connected the lens barrel to the viewfinder slider, thus providing the correct angle of view when adjusting the focal length.

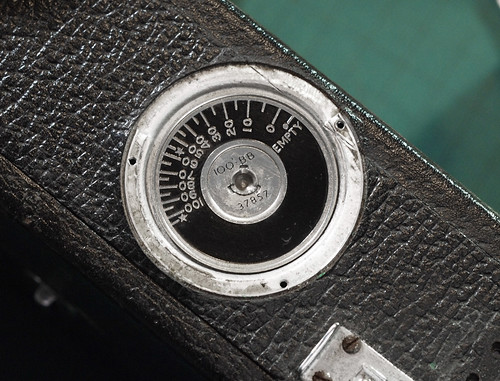
Loading the Yashica 8T-2 is a little simpler than the Bolex: the camera opens with a latch that lifts up and turns. Inside, the pressure plate does not have to be opened as a separate operation: it is sprung to open automatically when the camera itself is opened: an angled linear spring inside the door pushes the pressure plate into place when the camera is closed again. Unlike the Bolex, the lower spindle inside the camera does have the four teeth at its base to ensure that the 8mm spool is correctly oriented; the original Yashica spool which came with the camera is both numbered for sides 1 and 2 and has a different colour for each side too. The film path is marked with white lines with arrows for the correct threading and loop forming of the film. At the bottom right of the camera interior is a sprung pin which resets the footage counter when released: this is in a small round window on the back of the Yahsica 8T-2 in a very similar position to that of the Bolex B8. There is also a tripod socket on the base, offset presumably to balance the weight and motion of the srping motor; it also doubles as an attachment point for a hand strap, which my camera came with. Timed without film, at 16fps, the camera's motor runs for a full 30 seconds on one complete wind.

Without the Bolex's variable shutter, the controls on the side of the camera feel a little less cluttered. There is the shutter speed dial above the winding key, and the shutter release, changed from earlier iterations of the Yashica 8 appears very much like what one might see on a typical stills camera of the period. It has a recessed port for a cable release; on the front of the camera is a sliding switch with R for run and L for lock; while running, this switch can slide into the lock position to keep the camera running without the need for any pressure on the shutter release. There is also a second cable release port in a very similar position to that of the Bolex, with the same function: this provides the single frame setting for stop motion and animation purposes.

The shutter speed dial has seven marked positions for 8, 12, 16, 24, 36, 48, and 64fps, with 16 picked out in red for normal operation. There is however an eighth position between 12fps and 16fps. This has a definite click-stop on the dial as is common with all of the speed settings. Online, and on the Yashica TLR website–from which much of the historical information fof which this post is derived–there are models where this is marked TV: this appears to be a setting for filming from a television screen and evidently a shutter speed designed to be compatible with the scanning of the cathode ray television screen, a function useful decades before the home video recorder. As to why the marking was removed but setting kept on the Yashica 8T-2–or at least my model, as it appears that some 8T-2 cameras were produced with the setting marked–can only be speculated on.

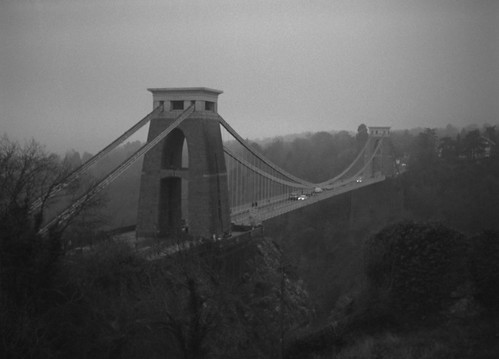
After my experiences with the Bolex B-8VS–although the Yashica 8T-2 doesn't have a variable shutter which caused the problems with that camera–I did a test of a short length of very old Fortepan film in the camera before using it for anything important. The test looked fine; to date, I've only shot one full roll of Orwo UN54 with the Yashica 8T-2 around Belgium a couple of years ago. I had wanted to make something in Bruges in response to some ideas around the book Bruges-la-Morte by Georges Rodenbach; Bruges la Morte, famously the first novel to be illustrated by photographs, inspired the crime fiction D'entre les morts by Boileau-Narcejac on which Alfred Hitchcock's Vertigo was based. The unhealthy Symbolist atmosphere of Bruges in the novel was very difficult to square with the reality of Bruges thronged with tourists on a hot early summer's day. I shot some film of the canals mostly, thinking that it could be put together some how, but as a work, I still haven't resolved it; one short shot of swan down floating on black water gives some sense of what I wanted to achieve, although the resolution isn't quite up to it perhaps.

I subsequently discovered an issue with my camera which I hadn't anticipated: dutifully locking the shutter release when putting the camera away in my bag, I discovered on taking it out again that the motor had run down and it appeared–and was obvious when I got the film developed–that the motor had been running inside the bag. On examination, with the run switch in the lock position there is a bit of resistance when the shutter release is depressed, but if one pushes hard enough the shutter release depresses fully, but–as the switch is in the lock position–the motor then runs continuously. I reasoned that had I not locked the shutter, I may possibly have wasted less film with the release springing back instead of running until the motor stopped. I also botched flipping the film to shoot side 2, as I thought I was sufficiently confident to do this in a dark bag, with the intention of getting as much usable film as possible from not exposing the end of the film to light when turning it over. I didn't load it correctly however, and I thought I was shooting a lot of footage on the second side of the reel around Antwerp before I realised the film itself wasn't going through the gate and onto the take up reel; like the Bolex, the footage counter on the Yashica 8T-2 measures the turning of the take-up reel rather than the amount of film on it, as is the case with some cameras, so this counter can be going up even if the film itself is not actually moving through the camera. The short loop below represents almost everything I actually shot in Antwerp.

Overall, the Yashica 8T-2 gives the impression of a well-designed and constructed 8mm camera, comparable to the Bolex B8, but perhaps a little more elegant, a little more curved than the solid B8, with the Yashica's design details adding to its aesthertics, such as the vertical ribs on the sides of the body, the diagonal slash of the exposure table, and its muted metallic grey, offest by the dark grey accents around the viewfinder, motor wind and exposure table–this coming from a time when cameras all suddenly began to become grey as deviation from the standard black. It also belongs to the period in the 1950s before plastic started to be comonly used in camera construction and as such–issues with the lock lever on my camera notwithstanding (I have thought it should be possible to fashion a small guard or sleeve to fit around the shutter release when not in use instead of relying on the lock switch)–it gives a confidence in the hand, and in use, at nearly seventy years old the Yashica 8T-2 is one of the better compact, all-manual 8mm cameras around.

Sources/references
The Yashica 8 ciné cameras on Yashica TLR
Yashica 8T2 manual
Yashica 8T2 on Anna & Terry Vacani Binocular and Cine Collection
Yashica 8T2 Overview on Film Photography Project 

Saturday, 29 April 2023

Ciné-Kodak Model K

Ciné-Kodak Model K 16mm camera
A leader for years, Ciné-Kodak, Model K, is deservedly still the favorite 16mm. motion picture camera of thousands of home movie fans. Moderately priced, Model K possesses such outstanding features as 100-foot film capacity, Kodak Anastigmat f/1.9 lens–easily interchangeable with a wide selection of accessory lenses, half speed and normal speed, eye-level and waist-height finder, and locking exposure lever.
Cine-Kodak 8mm and 16mm Home Movie Equipment, 1940

In my post on the Ciné-Kodak Model BB Junior, I summarised the evolution of Kodak's range of 16mm cine cameras, from the (retrospectively named) Model A, followed by the Model B, which represents a significant design rethink, and then the BB (and its derivative, the BB Junior), taking the general layout of the Model B, but, by using a smaller capacity spool, making the camera smaller and lighter. The next model, introduced in July 1930, was the Ciné-Kodak Model K. This represented a change in the Kodak ciné cameras' naming conventions, with the previous models named in something approaching a logical sequence. Possibly, the use of the letter 'K' is from Kodak itself, indicating that, when introduced, the Ciné-Kodak Model K was seen as the definitive design iteration of Kodak's 16mm ciné cameras; Kodak manufactured the Model K for 16 years, until 1946, longer than any of the other 16mm models (the next longest production run–15 years–was the Ciné-Kodak Special) and, as a result, ninety years on, the Model K is not a rare camera.

Ciné-Kodak Model BB Junior (front) and Model K (back)
Taking the general design and internal layout from the Ciné-Kodak BB, with a slightly longer and taller body, the Model K was designed for the larger-capacity 100ft daylight-loading spool–used in the first two Kodak 16mm cameras–that the BB had sacrificed for compactness. This would mean around 4 minutes of footage at the camera's normal running at 16 frames per second. With aspects of the BB's design, the Model K is smaller than the Model B, but with comparable specifications. After my initial experiences with the Ciné-Kodak BB Junior, I subsequently had an eye on the Model K for its capacity to take daylight-loading 100ft spools, rather than the BB Junior's 50ft spools; apart from the spool size, most of my caveats about contemporary use of the BB Junior apply to the Model K, particularly that it takes double-perforated 16mm film. However, I saw a Model K offered for sale on a well-known auction website for a starting price of just €3.50–from Germany. With postage this was just over £20 in total and no-one else placed a bid on the camera (this was in late 2020, before the UK left the EU, and before prices when buying from the EU went up considerably as a result). The Model K came with the f1.9 25mm Anastigmat lens, which was the higher-priced variant; it could also be bought with a lower-value f3.5 25mm lens. The camera came in its original case, which has space for a second lens, with mounting pins to secure it, and two rolls of film. It also had the key for the case's lock, attached to the ribbon inside.
 
Ciné-Kodak Model K in original case
Other than taking 100ft spools, the main difference from the BB Junior is that the Model K has interchangeable lenses. My version came with the standard 25mm f1.9 anastigmat lens (the Model K could also be bought cheaper with a f3.5 25mm lens); other lenses do show up from time to time, but seem to be rare. As a viewfinder camera, the interchangeable lenses each had a front viewfinder attached to the mount, so changing a lens also changes the viewfinder (the rear sight on the body remains). The Model K also has a waist-level viewfinder on the body, next to the lens, but the angle of view for this is unaffected by changing lenses. There was a wide range of lenses provided for the Model K: by 1940, there were 7 available in additional to the standard 25mm, from a wide-angle 15mm lens to a 152mm/6 inch lens. Early in 1940, Kodak abandoned the aperture plate guide around the lens with descriptions of lighting conditions and subjects as by then there was a wider range of film stocks available with a range of speeds, thus making too many exceptions; my camera evidently dates from before this, and did not later have its aperture plate replaced, as was offered as a service (it does intriguingly have two marks in the leather on one side which look as though it may had something taped to the side of the camera, which looks as though it could have been the new exposure guide which replaced the aperture plate, consisting of a dial with the aperture numbers and a slot for a card which came with each film, detailing the conditions and subjects particular to its emulsion).

Ciné-Kodak Model K with lens removed
The lenses are removed by a button twist bayonet lugs plate with Each lens came with the front folding viewfinder element attached to the mount, in order that the viewfinder showed the correct angle of view for the corresponding lens. The rear viewfinder remained on the body of the camera: its lens can slide down out of the sighting aperture. This is for when the 15mm wide angle lens is mounted. As with the BB Junior, the viewfinder has parallax marks for the top of the frame at distances of 6ft and 2ft. 

Ciné-Kodak Model K detail of the standard 25mm lens and waist level finder
The Ciné-Kodak Model K also has a waist-level viewfinder built into the body, offset to the right of the lens from the operator's position. This has no parallax indications, and doesn't change with lenses of the different focal lengths. Evidently it was provided to facilitate using the camera held at a lower height, possibly against the body–very much like one might hold a Kodak Brownie. In addition, it's reversed laterally, which makes it less intuitive to use; after explaining laboriously how to follow a moving subject with the waist-level finder, Making the Most of Your Ciné-Kodak does offer the following encouragement: "Bearing this in mind, you will quickly master the trick and be able to keep up with the action. The reflecting finder will be found very convenient when taking pictures of children, pets and all subjects that are at waist level or lower." The waist-level finder does very much feel like it has been transplanted from a contemporary still camera, with Kodak's early ciné cameras being conceived in many of the same terms, functionally at least.

Ciné-Kodak Model K showing winding lever, shutter release and slow speed button
As with the BB Junior, the shutter release lever has two positions: pushed down lightly and the camera runs; push down further and the lever locks in the run position. At 16 frames per second, the effective shutter speed would be 1/32nd of a second, as close as 1/30th as practical. There is also a button on the side of the camera above the shutter lever which, when depressed, reduces the frame rate to 8fps, with an equivalent shutter speed of 1/16th. This has to be kept held down at the same time as the shutter lever, and does not itself lock. The reason for this slow speed is a result of the slow emulsions available at the time–Kodak's first 16mm film stock would have been around 10 ISO–Making the Most of Your Ciné-Kodak advises that "The half-speed feature is not intended for ordinary use, and should be resorted to only when the light is of such extremely poor quality that black and white pictures cannot properly be exposed at normal speed with the largest diaphragm opening (/.1.9 or /.3.5), or when it is desired to make Kodacolor pictures without direct sunlight." (It later states that it can be also used for comedy effects; with the projector only running at 16fps, any footage shot at 8fps would therefore by projected at twice its speed). The motor is wound by a handle which tucks into the body with a recess for its rotating knob when not in use. In comparison to the BB Junior's rather smaller key, the handle allows for the motor to be fully wound very quickly. When fully wound on my camera, the motor runs for about 40 seconds without film, audibly slowing towards the end of this. It runs twice as long at 8fps, as it's the revolutions of the sprocket wheel and pull-down claw–and therefore the number of frames itself–that determines duration.
Ciné-Kodak Model K opened for loading
Most of the description and comments in my post on the loading and use of the BB Junior apply equally to the Model K: the placement of full and empty spools is the same, opening the pull-down claw and sprocket clamps to feed the film through the gate and correctly form loops is exactly the same too, so there's no need to detail that here: one can refer back to the post on the BB Junior for a description of how to load the camera. There are just two differences with respect to loading the Model K to note: first, the lock on the Model K has two steps to open the camera: the button is rotated 180 before sliding into the open position to remove the side of the camera; the BB Junior's lock simply slides. Second, as the Model K accepts both 50ft and 100ft spools, there is a small lever to set a guide for the take up spool of the relevant capacity (one can of course use a 100ft take-up spool for a 50ft supply spool; vice-versa, one would end up with a lot of loose exposed film inside the camera). Opening my particular Model K, there is an engraved inscription "R.H.MACY & CO. INC."; interestingly, the serial number, normally visible on the crank arm when folded out has had the serial number removed with what looks to be the same tool.

There were a couple of small repairs which I made to the camera. When it arrived, the carrying handle was missing its fixing on one end. I made a replacement from a D-ring (usually used for hanging pictures), drilling two small holes for the screws and then trimming it down to the right size. At this point, I gave the camera a general clean, removing some fixings in the process, including the cover of the footage counter. The footage counter has numerals for every ten feet of film, with marks in between, with stars for loading for both 100ft and 50ft rolls. 

Ciné-Kodak Model K film counter
Underneath the cover, the footage counter has a serial number–possibly matching that removed from the handle–but also "100'-BB": possibly, during its initial production phase, the camera was known as the 100ft BB camera, and only named the Model K when marketed on introduction–which only appears on the footage counter cover itself in relatively small letters. The counter has a movable pointer, moved by the round knob with the milled edge, which should be aligned with the start position when each film is loaded for accuracy, a feature which appears to have been dropped later in the production run.
 
Ciné-Kodak Model K footage counter with cover removed
The other repair was to the rear sight: the mechanism by which it clicks into place, either flat, folded against the body, or upright, in use, is a flat metal tongue the end of which sits under the hinge of the sight. This is fixed to the base of the sight with a small rivet, which sheared off relatively soon after I got the camera (in the BB Junior, this part is fixed by a small screw). To repair the camera, I replaced the rivet with a bolt, drilling out the rivet, then drilling a matching hole in the camera body to fix the bolt through.

My reason for acquiring the Ciné-Kodak Model K was for its 100ft capacity in comparison to the BB Junior, as well as the possibility of using interchangeable lenses; as with the latter camera, there was a notion that I could convert it for single perforated film, which would mean being able to use a wider range of film stocks still available–although most of the 16mm I've shot so far has been old double-perforated stocks of various types. This I have yet to do: for one reason or another, I have used the Model K very little, less than the BB Junior. I have also not found additional lenses at a reasonable price, at least in comparison to the low price I paid for the camera itself. The first short test roll I shot in the camera was Ilford Fast Pan film on an overcast winter's day, shot fairly wide open as a result.

Ciné-Kodak Model K test with Ilford Fast Pan film
Developing the film (above), the pressure plate has a square and round hole, which is some form of identification mark when the film is exposed (the BB Junior has three circular holes, two of which are joined). I did use the Model K to make a very short three-colur process film with the Ilford Fast Pan film again, right at the end of a roll. This was made in the same manner as in my post Three Colour Process 8mm Film, holding each red, green, and blue filter over the lens as the camera ran. I shot two sequences, one inside, with the filter factor, needed the lens wide open at 8fps; the second at the normal 16fps outside.

As with the previous three-colour film, I overlaid three versions of the black and white film and offset each so that the sections with red, green, and blue would synchronise, but without the complicated sequence of separation and repetition in the first film. The RGB colour rendition is less accurate than it might be as the blue filter has a different filter factor, but it was not practical to change the aperture during the exposure to compensate, as I wanted to film the sequence in one, rather than start and stop for each filter instead.

One wonders how the Ciné-Kodak Model K might have looked to a potential buyer looking for a home movie camera towards the end of its production run just post-war. The rate of technological development in just over twenty years since Kodak had introduced the 16mm format had meant that the Model K had begun to lose its purpose, I suspect: it no longer fitted any particular segment of the market. Kodak's introduction of the 8mm format in 1932 provided for a more cost-conscious entry into home-movie making, becoming the new standard; for convenience itself, the 16mm magazine format from 1936 took over from daylight-loading spools; for ambition–the 16mm format's direction after the introduction of 8mm, for the serious amateur, the artist, documentarist or educationalist–the Ciné-Kodak Special of 1933 had many more features than the Model K (in addition of course, Kodak's competitors were also developing numerous cameras for the film formats that Kodak had developed). Regardless, the Ciné-Kodak Model K's long production run attests to it durability and reliability as a design–Kodak had other 16mm cameras, the Model M and Model E, which came and went during that period–and as stated earlier, it's not an uncommon camera nearly eighty years after its production finished. Again, as mentioned at the beginning of this post, there are important caveats about its utility today as a 16mm camera, without modifications, but, given the relatively low prices that it fetches (usually less than a roll of new 16mm film in a typical used condition), it's also one of the more affordable entry point into 16mm.

Sunday, 24 April 2022

Ciné-"Kodak" Model BB Junior

Ciné-Kodak Model BB Junior with f1.9 lens
Before Kodak introduced the 16mm film format in 1923, there had been a number of other attempts to use smaller-gauge formats–for reasons of economy–to create an amateur market for moving pictures, but with Kodak's weight behind it, 16mm film was widely adopted and has persisted, in all its iterations, for a century (and, just like 35mm, beginning as a movie film format, it was also then recognised for its size, convenience and availability, and used for still cameras). Kodak's new amateur format was dependent on two essential innovations, aside from its smaller gauge: the cellulose acetate base–otherwise known as safety film (a phrase that persisted for decades, imprinted on film rebates), at the time when flammable 35mm nitrate film was the norm. Among the short-lived small-gauge formats prior to 16mm, 35mm film had been used, split in half to make 17.5mm film, with some systems using the existing perforations on one side, but one can imagine that Kodak deliberately chose the 16mm width with much smaller perforations–on both sides–so as to prevent any simple attempt to use cut-down nitrate stock. The other innovation was reversal processing, meaning that, instead of processing the film to a negative and then needing to make a separate positive print for projection, the same film could be processed–with extra steps–to create a positive, cutting material film costs in half. The reversal process also results in a finer-grained image, in comparison to a negative, beneficial to the smaller frame size in 16mm when compared to 35mm.

The first 16mm Ciné-Kodak camera of 1923 was hand-cranked, as were almost all 35mm cameras at the time: this only changed with the necessity of synchronising sound to image, which happened in the professional field a few short years after the appearance of the first 16mm camera. Constantly turning a handle to advance the film through the camera made hand-holding an impracticality, and a tripod was a necessity (initially, Kodak only sold the Ciné-Kodak as a complete package with tripod, projector, screen and splicer; although aimed at the amateur market, in 1923 this sold for the same price as a Model T Ford). Kodak introduced the Ciné-Kodak Model B two years later (with the first camera being retrospectively renamed the Model A); this featured a wind-up clockwork motor, allowing for the possibility of being used hand-held (the Model A was provided with an optional battery-driven motor, but this was only available for a short time, suggesting that, given the battery technology of the 1920s, this was not a great improvement: battery driven amateur ciné cameras only really dominated with the introduction of Super-8 in the mid-1960s). The design of the camera was also greatly changed to make it much more compact, notably by having the two daylight loading 100ft spools sitting parallel to each other inside the camera body, rather than one above the other as in the original Ciné-Kodak; the viewfinder was also placed atop the front and back of the body, consisting of an reverse-Gallilean type of finder and reciprocal eyepiece which fold down when not in use. It also had a waist level viewfinder not unlike the contemporary Brownie cameras: Kodak's own literature likens using the next version, the Ciné-Kodak Model BB to the simplicity of the Brownie.

Ciné-Kodak Model BB Junior: winding key and exposure lever side
The Ciné-Kodak Model BB followed in 1929, a further evolution towards a more compact camera. By keeping the same general layout of the Model B, but using smaller 50ft daylight loading spools (which had been available to the previous two cameras, along with the 100ft spools), the Model BB was also more economical with the space inside the camera body (as Douglas A. Kerr writes, the layout was “tightened up”). The Ciné-Kodak Model BB Junior is a distinct derivation of the Model BB, and dates to 1930. There does not appear to be much on the Model BB Junior specifically online–or at least there appears to be a not uncommon failure to differentiate these two models. Possibly the Model BB Junior originated with Kodak Ltd in the UK (where both my versions of the camera were made) as a simplified production variant of the Model BB. That the BB Junior originates from Kodak Ltd might explain why its name plate has "Kodak" in double-inverted commas, presumably to indicate that the word Kodak is an invented word or trademark, and used like a title, designated as such in British English rather than allowed to go unadorned in American English: the manual uses "Kodak" throughout, with single commas for the manual's title page (the illustration of the footage counter on page 15 does not have "Kodak" but also one cannot see the word 'Junior': this appears to be a photograph of the footage counter on the Model BB not the BB Junior). 

There are two key distinguishing features to separate the Model BB Junior from the BB: it does not have the slow speed button which reduced the frame rate to 8 frames-per-second (found just above the shutter release lever on the side of the body on the BB; it exposes at 16 frames per second, meaning its shutter speed is effectively around 1/30th), nor does it have the waist-level viewfinder. The Model BB Junior was available with either a fixed-focus f3.5 lens, or a focussing 25mm f1.9 Kodak Anastigmat. There were changes during the production runs of all Kodak's early ciné cameras, which can complicate identification: many initially were provided with slower, non-interchangeable fixed-focus lenses, and then gained faster, focussing lenses, and interchangeable ones. When I started researching the Model BB Junior, I did think that having non-interchangeable lenses was one of its distinguishing features, but, subsequently, I've seen examples online which do have interchangeable lenses. The move to faster lenses seems to be driven in part by the introduction of Kodak's first colour film from 1928, Kodacolor (not to be confused with or the later colour negative film of the same name), a lenticular film exposed through its base–like Dufaycolor–and needing a special filter. As a result, it required much more light to register an image; Kodacolor was on the market for a limited period, but one which coincided with advances in Kodak's ciné cameras.

Ciné-Kodak Model BB Junior: cover side with catch
I bought my first BB Junior on something of a whim: having used 2x8mm film for a few projects (and having bought a developing tank for 2x8mm, which would therefore take 16mm-wide film), and also having some 16mm film stock for use in 16mm still cameras, I was looking for a cheap 16mm camera, rather than investing in something more sophisticated which I might not use with any regularity. The Ciné-Kodak Model BB Junior is relatively common, and I bought my first camera for less than £30 online. There are two main considerations against choosing to use the Ciné-Kodak Model BB Junior (or the BB itself) in the present day: firstly, the camera uses double perforated (otherwise known as 2R) film; secondly, the camera takes 50ft daylight loading spools. With regards to the issue of double-perforation, there is some limited availability at the time of writing: Foma makes its R100 film in 16mm double perforation, and a number of double perforated film stocks are available from the Film Photography Project in the US; there is also the possibility of using old double-perforated film stock–which, at the time of writing, I've done exclusively. Less problematic is the 50ft daylight-loading spools: 16mm film hasn't been sold on 50ft daylight loading spools for many years, as far as I am aware (possibly since the 1960s), but although respooling from 100ft lengths (or longer) in the dark may be tedious, it's not difficult. One needs two spools of course, one for supply, and another in the camera for take up. My first camera arrived without any spools, and I spent nearly as much on two 50ft spools as on the camera itself, although, had I waited, no doubt I could have found cheaper spools–or a camera with spools. 50ft spools have a diameter of 7cm, compared to the mode common 9cm 100ft spools.


Ciné-Kodak Model BB Junior with cover removed
To load the camera, there is a catch on one side which simply slides from LOCK to OPEN, allowing the cover to then be entirely removed. As already mentioned, the side-by-side spool layout was first established in the Model B: inside the camera body, the take-up spool is uppermost. The supply spool is exactly parallel to this, located behind a hinged door. If there is a spool in the take-up position, this needs to be removed to open the door, which has a small catch at its lower right, seen just below the spool in the image above. 

Detail of pull-down claw held in the open position with the spring clip
Before loading, the manual recommends opening the pull-down claw, which has a metal spring clip to secure it in the open position (it has a semi-circular tab for handling), and opening the sprocket clamps, ensuring that the whole film path is now free for threading the film from the fresh or supply spool, around the sprocket, through the film gate, back around the sprocket again to the empty or take-up spool. The manual also recommends winding the motor a small amount to create tension for the pull down claw when loading. The sprocket clamps have a knurled grip on their pin heads: these pull up, allowing the clamps to pivot away from the sprocket itself, leaving space for the film to be threaded through either side of the sprocket.

Detail of sprocket with clamps in the closed position
Detail of sprocket with clamps opened
With the film path clear for threading, the door to load the new spool of film is opened, revealing the spindle inside. The 50ft spools are designed to fit in one orientation only: one side has a round hole for the top of the spindle, the other square, which fits the bottom of the spindle shaft. This would appear to be designed to prevent an exposed roll of film being accidentally double-exposed: once shot, the film is in the wrong direction on the spool to then be loaded into the supply position. There is also a thin sprung metal finger which is connected to the internal door's opening mechanism: when shut, this rests with some tension on the supply spool and is connected to the footage indicator on top of the camera underneath the handle.  

Ciné-Kodak Model BB Junior opened to show spindle for the new, unexposed film spool
The film peels off the spool 'backwards': it should be emulsion side in on the spool, then passes over the angled roller, emulsion side out for this side to be facing the lens. If the spool is correctly positioned on the spindle, the door will close and latch. The camera is provided with white lines for the correct size of the loops either side on the film gate: the film is threaded through the upper sprocket clamp and then through the film gate. The film gate is sprung against the square aperture behind the lens: the film threads between this and a plate behind, and then loops through the lower sprocket clamp. The upper and lower clamps should be closed in that order, ensuring that the perforations on the film are located on the sprocket teeth, with the right size of loops formed, but sometimes on loading, I've found that this does need adjusting, finding the right pair of perforations on which to close the clamps to get the loops the right size. Once through the film gate and both sides of the sprocket, the camera can be very briefly run and the pull-down claw will automatically disengage from the spring clip; the free end of the film then needs to be threaded through to the slot in the centre of the take-up spool in the direction of the curved arrow printed around the take-up spindle.

Ciné-Kodak Model BB Junior loaded with film
Once fully threaded, it's advisable to very briefly run the camera for a second just to make sure the film is running freely from supply to take-up, through both sides of the sprocket and through the film gate. The exposure lever pushes down to run the camera; pushing this further locks it into in the running position. Replacing the cover, there's a shallow semi-circular cut-out for the lens side for correct orientation, and the catch slides back to the Lock position. The cover will only lock if the film spools are properly seated on both spindles and the sprocket clamps properly closed. On both cameras that I currently have, the serial number, located on the camera's winding key, is also written in pencil inside the cover, partially hidden by its internal catch when in the OPEN position.

Serial number in pencil inside camera cover
As described above, the fact that the BB Junior takes double-perforated film is a consideration against using it today: there are other considerations, concerning the ease of use, in choosing such an early 16mm camera. It is entirely manual, without any later innovations–such as a reflex viewfinder for accurate focus and framing, or metering for exposure–as would assist the amateur user. The viewfinder is a relatively simple reverse-Gallilean type, consisting of a small eye piece at the back of the camera and a corresponding viewfinder at the front, both of which fold down to the body when not in use. 

Front and rear viewfinder, raised for use
Front viewfinder with parallax marks for 6ft and 2ft
The viewfinder has parallax marks for the top of the frame at 6ft and another at 2ft. As the viewfinder is directly above the lens, parallax is only a problem vertically, not horizontally. Focus on the 25mm f1.9 Kodak Anastigmat is manual, estimated, with marks in feet only, around the lens down to a close focus of 2 feet. The 25ft mark is picked out in red as a hyperfocal setting: the manual states that when set at this distance, with an aperture of f5.6 or smaller (the lens stops down to f16), everything from 8 feet to infinity will be in focus.

Kodak Anastigmat lens with focal distances in feet
For exposure, until 1940 Ciné-Kodak cameras were provided with a guide plate matching aperture settings to lighting and subject conditions, which align to a pointer on the aperture ring. When the first Ciné-Kodak appeared, this had a logic to it as there was only one single 16mm film available, so the descriptions of lighting and subject conditions were not complicated by different film speeds; very quickly however, Kodak introduced a Ciné-Kodak Panchromatic film (the original Ciné-Kodak safety film was orthochromatic), then Kodacolor film (soon discontinued), Super-sensitive Pan film, and Kodachrome, all of which required different exposure settings.
 
Ciné-Kodak BB Junior aperture guide plate
At the time the Ciné-Kodak Model BB Junior was introduced, the films available were Ciné-Kodak Panchromatic film, Super-sensitive Panchromatic film, and Kodachrome: the directions on the aperture plate are for the Panchromatic film; the manual advises with Super-sensitive Panchromatic film to use the next smaller aperture for the conditions described, while Kodachrome had its own exposure guide provided with the film. Kodak abandoned the aperture plate guides in 1940, announced in the March-April issue of Cine Kodak News: new cameras had a 'Universal Guide' on the side of the camera, a plate into which the user could insert a card, included with each roll of film, which could then be read against a dial aligning subject conditions to aperture setting. Owners of cameras produced before this point could have one of these new guides fitted, and at the same time the aperture plate would be removed and replaced with a plate usually featuring a name or logotype. Both of my BB Juniors have the original aperture plates however, possibly suggesting that they may not have been used much after this date–or simply that the original owners did not want the cameras altered.

For a first test, I shot a short roll of Eastman 4-X through the camera. Originally 500 ISO in daylight,  the film is more than three decades old as 4-X was discontinued in 1990. The film has lost a lot of sensitivity with age, and there is a lot of base fog, particularly along one edge. I nominally rated the Eastman 4-X film at 25, although I didn't meter for the exposure, which was simply light projected on a wall. This was developed in Ilfotec LC29, diluted 1+19 for 8 minutes at 18ºC. The results were pretty uninstructive, but the camera did appear to work.

Ciné-Kodak Model BB Junior first test
I then shot some double-perforated Kodak Plus-X. As described in 'Workers Not Leaving The Factory (Once More)', when fully wound, the clockwork motor runs for just over 30 seconds, although it does audibly begin to sound as though it is running slow after about 25 seconds, notably with film (when not loaded with film, there's less drag on the mechanism, so it runs more freely). I had planned a film with four uninterrupted shots of 30 seconds each to use a whole 50ft roll. This was filmed on the A104 Woodford New Road, showing the northbound and southbound lanes of the road both north and south of the junction with the A406 North Circular known as the Waterworks roundabout. I framed a narrow band of the road which used to feature a cattle grid, relatively recently removed, but discernible in the concrete edges of the shallow trench which formed the base of the grid. The cattle grids had been necessary due to a herd of cattle which had grazed freely on nearby Wanstead Flats, but also roamed between other grazing spots, sometimes along suburban streets. The cattle were removed around the time that the M11 Link Road was opened in the late 1990s. After filming the four scenes of 30 seconds each, there was still some film left from respooling. When the footage counter reaches the zero mark, the manual instructs the user to run the camera until a circular mark after zero is indicated, as provision for a trailer on the roll of film, ensuring that no footage is spoiled on unloading. Without the need to reload immediately, I could do this in complete darkness and use all the film on the roll, so filmed a few short scenes at the same location. I did try loading the camera in the dark, especially with short lengths of film for testing, but this makes it difficult to achieve the right-sized loops: too small and the loops are too tight, creating a 'jumpy' gate as the film pulls against it; too large, and the film can drag against the interior of the camera body.

Ciné-Kodak Model BB Junior Plus-X test
Before developing this film, I shot a very short test on the same Plus-X stock (from the roll as used on Expired Film Day in 2020, dating to 1992) to check my exposure and developing times were right. This was loaded in the camera in the dark with some difficulties, exposed at 40, and developed in Ilfotec LC29, diluted 1+19 for 5m30s at 20ºC. Although short, this looked good enough to develop the 50ft roll of Plus-X with the same time and dilution. I had this roll of 16mm Plus-X professionally scanned, and when the scan was returned, it was immediately clear that there were problems with focus: in the middle of the frame, focus was clearly off, although towards the edges, the images looked sharp enough.


For what I had intended to film, the four framings of the no-longer-extant cattle grid, this wasn't too intrusive, and I imagined if this were even to be shown, that these four scenes could be played on four screens, simultaneously. However, with any more detailed or static scenes, this lack of focus was distracting. One of the curiosities of the design of Kodak's 16mm cameras around this period is their curving film path through the gate–and that this curves away from the lens. With cheap still film cameras, many have a film plane curved towards the lens to make up for distortion inherent in cheap lens designs. In the Ciné-Kodak Model BB Junior, possibly the curve away from the lens may be in part to have a smoother film path from the upper loop to lower loop, but I did wonder if this itself was part of the problem with focus, in particular that the lens-to-film plane distance was just too short in the centre of the frame to achieve infinity focus. I removed the lens to investigate–it comes off fairly easily with undoing the two screws. I had thought that a solution might be to add a shim, fractionally increasing the lens-to-film plane distance, which I did with a thin sheet of metal cut from a drinks can. 

Lens shim cut from thin aluminium placed behind lens mount
Having removed the lens, I could also see that this was very dirty internally, so took this apart, unscrewing the front and rear groups, and cleaning all surfaces before reassembling and fixing the lens back to the camera body.

Ciné-Kodak Anastigmat lens disassembled for cleaning

As can be seen in the image above, the f1.9 Ciné-Kodak Anastigmat lens was provided a lens hood (seen upper right) which slots into the lens housing itself with a pin to orient it correctly (the slot for the pin can be seen inside the lens housing in the image above; with the hood better seen in the image below). This lens hood could be replaced with filters attached to a similar hood, designated by Kodak as 'W' mount, and were also colour-coded with a painted rim: I subsequently acquired a couple of yellow filters, which, naturally enough, have a yellow rim. This came in cases either made from brass or Bakelite. The filters themselves are of the push-fit variety, and simply slip on the inside end of the W-mount hood.

Lens hood removed showing orientation pin
W-mount filter and cases
I also cleaned the film gate, which I should have done before first using the camera, with accumulated dust and dirt being visible along the top edge of the frame in the scanned film. There is a long metal post with a slotted head and knurled grip at the top of its shaft which unscrews, allowing the film gate, consisting of the gate itself and back plate which slot together, and then can be taken apart for cleaning. There is an arrangement of holes–three round holes, with two linked–on one edge of the gate which appear to be some form of identifying edge mark: this can be seen very clearly in the full scan Plus-X test below.

Film gate removed for cleaning
I made a couple of further tests once I'd cleaned the gate (which should probably be done after every roll of film as good practice) and replaced the lens, and this was the camera which I used to film 'Workers Not Leaving The Factory (Once More)'. The tests looked promising, although it's hard to know whether adding the shim or cleaning the lens internally had made more difference.

Ciné-Kodak Model BB Junior test after cleaning & shimming lens
After cleaning the lens, replacing it with the shim, and then filming 'Workers Not Leaving The Factory (Once More)', I bought a second Ciné-Kodak Model BB Junior. I had an idea that I could modify the sprocket and pull-down claw in order to use single-perforated 16mm film in the camera, which would be useful in terms of being able to use a wider range of new film stocks; I also thought that it might be possible to modify the film gate to the Ultra-16 format, especially given how the holes on the left hand side show that the image formed by the lens covers a wider frame. I found a Model BB Junior for £5 online: if either of these modifications made the camera unusable, I hadn't wasted much money (this also came with two 50ft spools inside). However, when the second camera arrived, it was in better condition, cosmetically at least, than the first one, so that was earmarked for modifications instead–which I have yet to attempt. The photographs illustrating this post are a mostly of the newer Model BB Junior; the older camera has paint losses, especially on the winding key, as can be seen in a couple of images, but this was the camera used for all the moving images.

The second Model BB Junior is in such good condition despite being around 90 years old (although introduced in 1930, I've found no date for the Model BB Junior's discontinuation) that I imagine it can never have been used that much (or its owner kept incredibly good care of it). As an amateur movie format, 16mm was soon superseded by the more economic 2x8mm, then the easier-to-use Super-8, before home movies became electronic with video cameras in the 1980s. 16mm drifted from being the format for the home or amateur use which Kodak designed it to be, to that favoured for educational, industrial, and experimental or independent avant-garde uses. The Ciné-Kodak Model BB Junior has many reasons to dissuade its use today, as outlined earlier in this post; in addition, it isn't the most ergonomic of cameras to use hand held, essentially a rectangular box with a lens on the front; without access to home-developing, as well as being able to respool 50ft lengths of film, it is generally an impractical camera. However, as with many of the still cameras I've written about–indeed, much of this blog–there's a sense, partly a form of social history, in gaining an understanding of these technologies of image-making through their use–often, importantly, their limitations–which is a connection, historically, to both how and why images look the way they do.

Sources/further reading
Alan D. Kattle, 'The Evolution of Amateur Motion Picture Equipment 1895-1965', Journal of Film and Video, Summer-Fall 1986, Vol. 38, No. 3/4, pp. 47-57 https://www.jstor.org/stable/20687736
Dwight Swanson, 'Inventing Amateur Film: Marion Norris Gleason, Eastman Kodak and the Rochester Scene, 1921-1932', Film History, 2003, Vol. 15, No. 2, Small-Gauge and Amateur Film (2003), pp. 126-136 https://www.jstor.org/stable/3815505 

Monroe County New York also has an excellent collection of historical records from Kodak, including many issues of Cine-Kodak News

Sunday, 10 May 2020

Eastman Double-X - Part Two

In the three years since my post on Eastman Double-X film, observing interest online, the popularity of this motion picture film stock amongst still photographers has steadily increased. As a motion picture stock Eastman Kodak produce Double-X in 35mm and 16mm in bulk lengths, the minimum length being 100ft/33m in 16mm; since my previous post about Double-X, a number of companies now provide 35mm canisters ready loaded with the films for still photographers (I previously bought a 100ft roll of 35mm to load my own canisters); the film is marketed as CineStill BwXX, Film Photography Project's X2, as Double-X from Camera Film Photo, and Nik & Trick among others. My motivation for revisiting Double-X in this post came about through using the film with a different developer from those I'd used previously - D96. D96 is Kodak's recommended developer for black and white negative motion picture stock - which now comprises of just Double-X; comments on my original blog post recommended that I use D96 after my somewhat ambivalent conclusion to the film from using it in 35mm for the best part of a year. It didn't seem particularly fine-grained for its speed, and the speed itself didn't seem fast enough to make it a good all-round film in comparison with 400 ISO films on one side, or finer grained 100 speed films on the other.

Formulas for making D96 from its raw ingredients are readily available online, and it has also been available as a powder, but recently Bellini have produced a liquid version of D96. Evidently there are many advantages to the convenience of liquid developer, especially as a stock solution; my habitual developers are Rodinal/R09 and Ilfotec LC29, which I have used for a number of years: it makes sense, especially when starting out with developing black and white film, not to change too many variables at any point, one of these obviously being film developer. However, I recently shot two rolls of 2x8mm Double-X (reperforated for the format and repackaged by the Film Photography Project) in a Bolex ciné camera, and, wanting to develop the films myself, it seemed wise to try the manufacturer's recommended developer with the film, especially given the small size of the 8mm frame. The short film below was shot on 2x8mm Double-X and developed in D96; for reasons too complicated to detail here, I pushed the film three stops in development, which does account for the contrast, while the appearance of the grain is mostly down to the degree of enlargement necessary from the tiny 8mm frame.

Having used the D96 for a couple of rolls of 2x8mm Double-X, having a litre of D96, I wanted to test the film in 35mm with the developer and it seemed timely to revisit Double-X for a new blog post. For a first test with 35mm, I shot a roll with in a Canon A-1 SLR for a latitude test, rating the film at successive exposure indexes of 64, 125, 250, 500, 1000, 2000 for two sets of six exposures, as seen in the first and second rows below, and developed the film for 6 minutes in stock D96 at 21ºC.

Eastman Double-X latitude test, developed in D96
Eastman Double-X latitude test, developed in Ilfotec LC29
Comparison with the same film developed in Ilfotec LC29 (above) from my previous tests appears to show greater latitude when developed in D96, although the conditions with the Ilfotec LC29 were higher in contrast; the same film when developed in Ilfotec LC29 looks as though the shadow detail drops away faster. It's also possible that the test film developed in D96 is slightly underdeveloped: Kodak's published time for Double-X is 7 minutes at 21ºC (rather than the more usual 20ºC); my notes indicate I developed the film for just 6 minutes at 21ºC.

Double-X at EI 64 (two stops overexposed)
Double-X at EI 2000 (three stops underexposed)
I was a little surprised at the latitude range which this test demonstrated as evidenced in the two shots from either end of the scale above: scanning the film, I was able to pull out as much detail as possible from the negatives when underexposed. This was easier than the equivalent exposures with Ilfotec LC29. Overexposure did compress the tonal range from mid-tones to highlights, giving the images more of a flat look than the lighting alone. The latitude in this test is no doubt due in part to the diffused, low contrast lighting when I shot the the film to try D96, as well as the developer itself.

When I'd previously used the film, I did try pushing it one, two and three stops, with very uneven results at two and three stops. Published times for Double-X in D96 are very limited, but the Massive Dev Chart and Bellini's own data sheet give a time of 25 minutes at 20ºC when rated at 1600. I shot a roll at 1600 in (mostly) challenging lighting conditions. This test was possibly overdeveloped, using 21ºC for 25 minutes, rather than 20ºC.

Double-X at EI 1600
Most of these shots were taken under artificial light, in a low-lit museum setting, with spot-lit displays creating inherently high contrast subjects, the above image being a good example; the Double-X rated 1600 did give relatively good results in these difficult circumstances. There were only a couple of shots that I took under daylight conditions, and these on a fairly dark day in February, not enough to draw any meaningful conclusions, but the results look good enough, as below; generally, daylight would of course give enough light to rate the film at 250. Although the times for push-processing Double-X in D96 are limited, it would be possible to make reasonable guesses for one and two stops, perhaps around 12 minutes to rate the film at 400 and 18 minutes for 800, although I haven't tested for these times.

Double-X at EI 1600
As well as trying 35mm Double-X with D96, I also wanted to see how it would perform in 16mm for various subminiature cameras, notably the Rollei 16 camera (this has reputedly one of the sharpest lenses on any subminiature camera). The results on this post are scanned from the negatives; printing in the darkroom, it might be possibly to resolve more detail from the 12x17mm negative. The best of the shots from the Rollei 16, such as that below, showed D96 to give fairly fine-grained development: with the negative very nearly a quarter of the size of a standard 35mm frame, at a modest enlargement, the quality does hold up (albeit perhaps suggesting the grain of a faster film, but I think the general point holds true).

Rollei 16 with Eastman Double-X
As a motion-picture negative developer, fine grain is paramount. Grain is inherent to the film's emulsion, but obviously, the appearance of the grain is affected by a number of factors. D96 contains sodium sulfite, which acts as a solvent (as well as a preservative), softening the look of the grain; equally, some of the fineness of the grain in my results may be in part due to the developer's low contrast, particularly on a micro level, smoothing out the look of the grain. This also makes it a good choice of developer for using Double-X in half-frame cameras, as well as subminiature cameras. I did shoot some Double-X in a couple of half-frame cameras for this post, but, again, under fairly poor lighting conditions, which perhaps didn't provide the best conditions for testing the film.

Olympus Pen EE3 (half-frame) with Eastman Double-X
Belomo Agat 18K (half-frame) with Eastman Double-X
I had been fairly ambivalent about Eastman Double-X prior to using it with D96: it almost felt like a different film, testing it again with a more sympathetic developer. The grain appears finer, the film does seem to have better latitude, and, on my limited tests, it pushes better, with more consistent results. However, a few further reflections on using D96 might be apposite here. The developers I have mostly used for black and white films - Rodinal and Ilfotec LC29 - I have treated as 'one-shot' developers, Rodinal, which I've generally used as Compard's R09 One Shot clearly being so, but also Ilfotec LC29, which Ilford recommend using as a one-shot developer when diluted 1+29, or indeed for best results. At lower dilutions, 1+9 or 1+19, I've tended to use it for just one session, but have developed a number of rolls of film, one after the other. Using a stock solution such as D96 does provide some consideration, namely around temperature and exhaustion. With a highly concentrated one-shot solution, I get the water to dilute the film developer up to temperature simply by adding hot and cold together until these reach 20ºC, then add the concentrated developer. Even if this is cold, adding one 30th part at 15ºC for example, 12ml to 300ml, will not significantly alter the temperature. With D96, I found warming the bottle of stock solution took more care, especially when using this early in the year, when the stock solution might be at less than 10ºC off the shelf. Plunging this into a jug of water somewhat warmer than 20 or 21ºC to bring it up to a working temperature more quickly often meant it would get too warm, and then would need to cool before use. The other consideration, exhaustion, was more difficult to calculate. I bought my bottle of Bellini D96 from Nik & Trick; on their website, the suggestion is that a litre of D96 will process "about 100ft". Presumably this is 35mm film. I developed two lengths of 25ft 2x8mm film, 16mm wide, which probably equates to 25ft of 35mm; I also shot four rolls of 27-exposure 35mm film, and some 16mm film with both the Rollei 16 and Mamiya 16 subminiature cameras. In addition, I used the D96 for some Plus-X too, and the FP4 Plus that I'd shot in the Bolex. With the FP4 film, I developed half the film and the negatives were very thin. This might be partly due to user error of course - most of the roll of Double-X I shot with the Agat 18K produced thin negatives, but this was one of the first rolls of film I developed in D96. Returning to comments earlier in this post about not changing too many variables, obviously, using several different cameras, with different metering systems or none, and also developing different emulsions with the same stock solution of D96 made it more difficult to see when the developer was beginning to exhaust: the last films I was developing with the D96, I found myself having to double their published times in order to get good results - clearly, accurate record keeping would have helped here. Comments about developer exhaustion notwithstanding, using Eastman Double-X film with D96 has lead me to reappraise this film stock - and understand the enthusiasm that still photographers do have for it.

Rollei 16 (16mm subminiature) with Eastman Kodak Double-X rated 200
Belomo Agat 18K (half-frame) with Eastman Kodak Double-X rated 250
Olympus Pen EE3 (half-frame) with Eastman Kodak Double-X rated 250
Kodak Retina IIa with Eastman Kodak Double-X, rated 250
Canon A-1 with Eastman Kodak Double-X rated 250
Canon A-1 with Eastman Kodak Double-X rated 1600