Thursday 31 December 2020

Revisiting the 'Wide Pic' Panoramic Camera

Wide Pic Panoramic Camera with Ilford FP4 Plus

After using the Coronet 66 last month for the #shittycamerachallenge, I decided to revisit a camera used previously for the challenge - the Wide Pic Panoramic Camera. I made little concession to the lighting conditions when shooting with it - I only had a couple of part-used rolls of Ilford FP4 Plus, and even shooting on days when it was sunny, on a couple of convalescent walks, the light was still not bright enough. I could have pushed the FP4, although the main issue was lack of shadow detail, so this may not have helped much. When using the camera before, I'd used 400 ISO film in the summer, which was fine for the single speed, single aperture plastic camera; ideally I would have used HP5 Plus perhaps, and developed it in such a way as to try to get as much shadow detail as I could, but, such is the contingent nature of the #shittycamerachallenge that the photographs will have to suffice for the last post of the year.


Monday 14 December 2020

127 Day December 2020

Rolleiflex 4x4 with Fomapan 400
Still recovering from Covid-19, last week's 127 Day coincided with one of the better days when I felt well enough to go for a short walk on a very grey day, but not early enough for the mist to make it interesting. I took the Rolleiflex 4x4, loaded with a roll of cut-down Fomapan 400. Inevitably, or so it felt, the one roll I shot was beset with issues. The start of the roll had some odd spots, visible in areas of the sky, possibly due to some developing problem (although I'm unclear what caused this); then a number of the shots had out-of-focus areas in the frame, which must be due to the film not laying flat inside the camera. This might be down to using cut-down film, possibly cut slightly too wide, and as a result, bowing out in the middle. Then the film got stuck after nine exposures; I couldn't work out why this happened, but after removing the film in a changing bag and developing it, some of the shots have light leaks at the sides, suggestive of a 'fat roll' (although I didn't really notice this at the time): however, if the film was cut just a little wide, this is no surprise. Somehow the unexpected inadequacy of the results feels fitting.


Saturday 5 December 2020

Three Colour 8mm Film

Three-colour process still

In writing a blog about film-based photography, there is always an unacknowledged (or perhaps underacknowledged) implicit understanding that any results are, by the nature of being shared digitally, a hybrid form. For some reason, I find this to be most acute in the moving image: the presence of the sheer physicality involved in projecting moving film becomes utterly absent once transferred into a digital form. The difference between a flat photographic print from a negative, and a screen-based display of that negative (whether scanned direct, or from a darkroom print) is great of course, but there is much recognisably the same about the experience of viewing (which, equally, is not to dismiss the real differences too). With physical moving images, the very apparatus of display plays a part in the viewer's experience; in the cinema, this is hidden from view, but in many other instances, the presence of the projector, screen, the sheer amount of material - reels of film, needed to kept, controlled as reels - impinges, bodily, on the viewer. This physicality has become somewhat fetishised in the visual arts: when shown in art galleries, films projected on 16mm or 35mm usually depend on the projector (and all the mechanisms for looping the film too) being present in the viewer's space.

A different kind of fetish is present when displaying such films in a digital form (something I am not immune from): the signs of the film's materiality, frame edges, perforations, dust and scratches - indeed, the very instability of the image, revealing that the apparent movement is comprised from numerous still images - are there as a guarantor of that materiality. I had been thinking of a way to use this digital hybridity in a playful way, that, in creating a digital version of a physical artefact, there was something more to use this for other than its convenience.  Last year, my interest in the three-colour process had been reawakened after assisting a student in creating images using the method, making colour images from three separate black and white negatives, shot through red, green, and blue process filters. I shot some still images with the Mycro IIIA a year ago using the technique (not posted to this blog), but also shot a short length of 8mm ciné film using the three colour filters.

Canon Cine Zoom 512 - Middlesex Filter Beds; Rollei 16 with Eastman Double-X film

For this, I finished the end of the roll of Orwo UP15 film that I had used for a number of other, very short films (Heatwave, Swinging Light), spooling off the shorter lengths as needed for each of these (I had also used a fair amount of the film for still photographs with subminiature cameras, notably the Mamiya 16 Automatic). This had a 'develop before' date of March 1976; using the film previously, I found an exposure index of 10 provided good results. I shot the film with the Canon Cine Zoom 512. Using a tripod, and a full wind of the motor, I framed the shot, depressed and locked the shutter release, and then held the red, green, and blue three-colour separation filters in front of the lens, for about 8 seconds each as the film ran through the camera continuously. I think that I may have shot the film at 8 frames per second in order to provide a slower shutter speed for the light needed to expose the film through the filters; the digitised footage itself plays at 12 fps. To compensate for the reduction in the transmission of the light through the filters, I metered the scene, then opened the aperture two stops. This meant that the sections of the footage in between the filters is over-exposed, and the section with the blue filter is underexposed, as the process blue filter transmits less light than the red and green filters.

For a subject, I shot the film at the Middlesex Filter Beds (a unintentional reference), with the thought that the three-colour process would record the autumnal colours. This was not entirely successful as I was probably shooting it too early in Autumn, in mid-October - and with the blue-filtered section underexposed, the colour record would not be very accurate (it might have been possible to open the aperture one stop further at this point, but not especially practical, doing the whole operation with one one pair of hands, passing filters one to the other after holding each one up in front of the lens). I then developed the film as negative in Ilfotec LC29 diluted 1+19 for 6m30s at 20ºC. This was over a year ago; only recently did I have the film scanned.

As 2x8mm film is 16mm-wide and run through the camera twice, I shot the sequence twice. However, I didn't use a changing back when removing the film spools and turning them over to shoot the second side (the 2x8mm film format is designed to be daylight loading, but this does mean sacrificing either end of the film on the spool in loading and reloading, not a problem when using a whole roll, and taken into account by the manufacturers of both film and camera; a different matter with a 'short end' such as I was using here). As I result, although I didn't realise it at the time of shooting, the first run of the film through the camera entirely lost the frames with the third filter in being exposed to the light. The second run of the film through the camera was more successful, but the section with the third filter was on the very end of the film, which includes the identification code of the film stock, punched through the film itself. This section of the film would usually have no images on, as it would be exposed on loading and reloading; I unloaded the film from the camera in the changing bag before developing.

In the resulting black and white film (above), on casual viewing the section with the red and green filters do not look especially different, except perhaps in the sky; the blue section is clearly darker, but also much lower in contrast. I composited frames from the scanned film in Photoshop, placing each black and white image into the red, green, and blue channels in the RGB colour mode.

RGB composite from the black and white negative scan
I had the 2x8mm film scanned as 16mm, i.e., the whole width of the film between the perforations, rather than having the film spit into two 8mm widths; as a negative, the film itself would not be projected anyway, so there is no need for it to be split as would be the case with film developed with the reversal process to make a positive transparency. As can be seen from the image above, the first run of the film through the camera, upside down on the right is a composite of incorrectly-filtered sections (the same colour filters do not align on each side of the film, and the blue-filter section on this run is also missing).

In creating a full-colour composite, I could have simply edited the film to a few seconds, aligning the three sections shot through the three different filters. Instead, I wanted to show the process as a set of logical steps, and, as the length of the whole film is just twenty-seven seconds when played back at 12fps, this could be repeated through each step. With the film was scanned as 16mm, as well as the width of image, the height is also over twice that of a standard 8mm frame, meaning that it shows two whole frames on both sides of the film. Repeating the film three times across the frame, I decided to keep the height of the original scan as this avoid making the proportions of the whole frame too long and narrow.

To show the process that achieved the colour image, I wanted to stage a set of logical progressions such as it might be possible to intuit how the colour image is created from a strip of black and white film without it necessarily needing an explanation (this particular post notwithstanding of course). The first repetition shows the film, in black and white, repeated in sync across the width of the screen (I could possibly have begun the series of repetitions as a black and white negative, but this seemed unnecessary); the second repetition, still in sync, shows the film in red, green, and blue. The next repeat then staggers the starting times of the red, green, and blue segments so that the point at which the correct colour filter appears in each coloured section is now aligned temporally. Repeated again staggered in time, the three colours spatially align on the the screen at that point to create the colour image. Remaining overlaid, each staggered coloured section runs to its end. The steps are then repeated in reverse, ending up back at the black and white footage, and in theory this could then be looped in on itself. 

A screen shot of the timeline in Premiere shows the way that the sequence of progressions is arranged. Although created in a digital form, it would be possible to recreate the result using three prints of the film, three projectors and the RGB colour filters in front of the right lenses; some of the earliest colour moving images used a not dissimilar concept, but on a single strip of film, with alternating frames shot through different colour filters, which would then be projected back through those filters to create an optical mix. The film (below) is essentially just an experiment intended to demonstrate - but also disclose - the technique itself.


Tuesday 1 December 2020

Coronet 6-6

Coronet 6-6 camera
The start of the new #shittycamerachallenge's 'holiday apocalypse' last month, running from November to January, almost neatly coincided with the new coronavirus lockdown restrictions coming into force in England on November 2nd. As with the previous period of 'lockdown' from March this year, the restrictions have not been as stringent as in many continental European countries: working in education, moving from the only then recently introduced tiered system to the lockdown had essentially no difference to my daily life, as I was still physically going to work, face-to-face, in the same way I had been since the start of September, while watching the rolling seven-day figures of cases, hospital admissions, and deaths, rise with what felt like inevitability, once schools and colleges opened at the start of term, and stayed open throughout. I was taking my photographs for the #shittycamerachallenge on my way to work, at lunchbreaks, and, on a couple of occasions, during exercise, alone, which was permitted. Despite taking all the precautions that were practical at work, again, with what felt like inevitability, I became ill halfway through the month, and a test confirmed that this was Covid-19. As a result, I finished my last roll of film while isolating at home.

The camera I had picked for the #shittycamerachallenge was the Coronet 6-6. I felt it fitted the spirit of the exercise due to being largely made from plastic, and with the most minimal user controls - and also that the camera had mould inside the body when I first opened it. The camera's name is sometimes written as the Coronet 66; above the lens, the two numerals are separated by the coronet logo, and, taking nominally 6x6cm images, no doubt the name would be said as "six-six" (it's also worth remarking that Coronet made a 127 format camera called the Coronet 4-4 from its negative size, and this is written on the camera as '4-4'). The Coronet 6-6 is a simple point-and-shoot Bakelite-bodied camera from the 1950s, using 120 medium format roll film, taking twelve 6x6cm images. This camera belongs to a class of mid-twentieth century cheap point-and-shoot models which can essentially be considered derivations of the box camera, and, as with the Coronet 6-6, not necessarily as well featured as many of those box cameras. These cameras also tend to reflect the availability of new materials: Kodak's Brownies began with cardboard bodies, before being replaced by metal; by the mid-twentieth century, many of these cameras were made from early plastics. The Coronet 6-6's body is made from Bakelite, one the most popular plastics of the era.

Coronet 6-6 camera
The Coronet 6-6 was manufactured by Coronet, a Birmingham-based company specialising in a broad range of cheap cameras, many of which share very similar features across different models. The Coronet 6-6 is clearly based on the body moulding of the Coronet Cadet and the Coronet Flashmaster, but with a different lens and shutter unit: the wider-angle lens of the Coronet 6-6 allows for a more compact camera. The Coronet 6-6 was also the basis for the Coronet Rapier, which uses an internal mask (and a different position of red window) to achieve sixteen 4x4 exposures on 120 film. (There is also a name variant of the Coronet 6-6 which has 'Flashmaster' on the name plate under the lens, but this is otherwise exactly the same model; there's also a variant of the Coronet Cadet which looks the same as the 6-6).

The Coronet 6-6 has fixed-focus meniscus lens, which looks and feels to be made from plastic. The focal length is reputedly 65mm, which gives a wide-angle image on the 6x6 format frame. Behind the lens and shutter is a metal plate with a smaller aperture punched into it, possibly around f11 or slightly smaller, such as a non-standard setting like f14. The shutter has a single speed, possibly around 1/30th to 1/50th, and is not provided with a bulb or time setting: it does have a flash sync for a proprietary flash, connecting to two metal ports on the side of the lens unit, as seen in the image above (an image of the flash here shows it to be almost as big as the camera). The viewfinder, placed directly above the lens, is of the reverse Galilean type. Frame advance is manual, by turning the large plastic knob to the side of the viewfinder, and using the red window on the back of the camera to follow the frame numbers on the film's backing paper.

Coronet 6-6 opened for loading
The back of the Coronet 6-6 is made from a piece of stamped metal with riveted spool holders and pressure springs. To load the camera, two catches either side of the camera, to which the carrying strap is attached, slide downwards, and the whole back slides off. Inside the camera, the Bakelite behind the lens is painted with a matte black, presumably to cut down on internal reflections from the smooth surface of the Bakelite. Loading film is simple: the take up spool is placed under the advance knob on the sprung spool holder, the new roll of film positioned in the other holder, and the backing paper stretched across to the take up spool. There is a serial number on the inside of the camera back, printed in very blotchy paint, a little hard to read.

I shot one roll of Ilford HP5 Plus with the Coronet 6-6, and two rolls of 
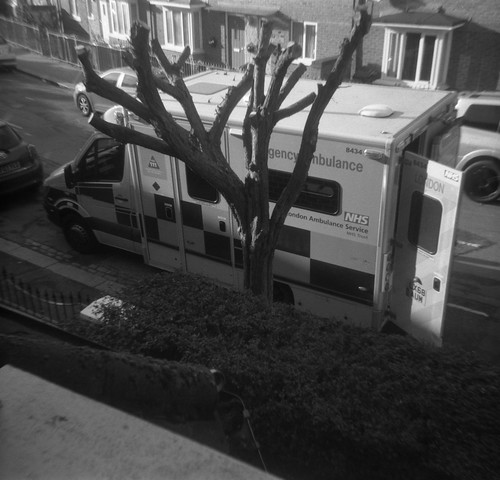
Fomapan 400. Although both are 400 ISO films, even on sunny days, due no doubt to the late time of year, these were not overexposed. I often read opinions online that, in box cameras (and the Coronet 6-6 can be considered a box camera here) one should use a slow film, as this is what these cameras were designed for. Indeed, the cameras 
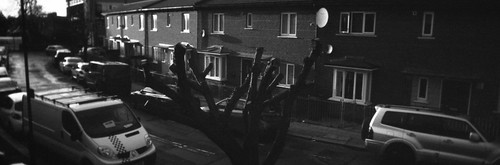
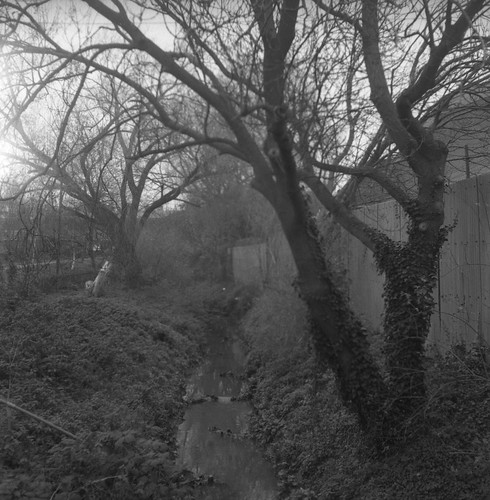
were designed for films which might have been the equivalent of 25 ISO, but they were also intended to only be shot handheld, outside, in sunny weather in the summer months. Using a 400-speed film means being able to use the kind of simple camera that the Coronet 6-6 is in more conditions than those originally intended by the manufacturers, November in the northern hemisphere, with short days, sometimes sunny, sometimes very grey, embodying such conditions. The image below for example, looks like it was shot at dusk (helped, of course, in that interpretation by the lit streetlamp); it was actually taken around noon, but on a very overcast day; with a 100 ISO film it would have been quite underexposed. With a single shutter speed and aperture setting, when using the Coronet 6-6, to get acceptable results in a variety of the lighting conditions relies heavily on the latitude of whichever film is used; far better to use a faster film and potentially overexpose it for some shots, than a slower film and not take a shot because the sun isn't shining.

Coronet 6-6 with Fomapan 400
In use, I found the wideness of the lens occasionally surprised me: I'd see what I thought might make a fitting subject, raised the camera to my eye, then realised I had to get closer for a composition anything like what I had thought I'd get. I also hadn't anticipated how slow the shutter was - after developing the first roll from the Coronet, a number of exposures had camera shake. This is also partly due to the shutter button, a big plastic lever offset from the lens. There is a small amount of travel which evidently tensions the shutter, but then it gets quite stiff just before the shutter actually releases. It is also quite flimsy, and bends backwards, and on occasion got caught on a small protrusion on the moulding behind it, none of which made for a smooth release. I was more conscious of this as I shot more with the camera.

Coronet 6-6 with Ilford HP5 Plus
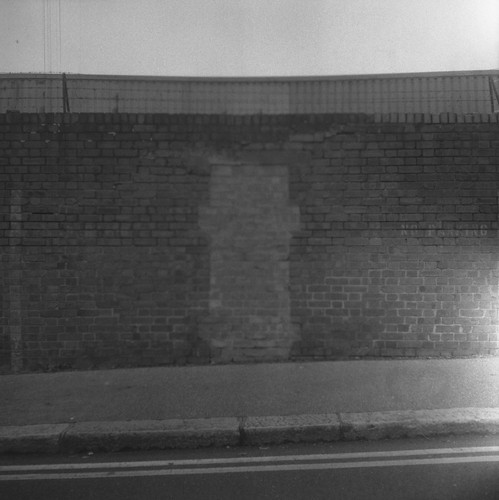
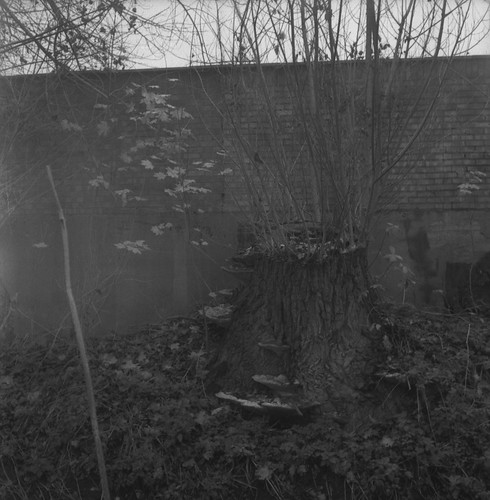
The lens displays all the classic aberrations one would expect from a plastic meniscus: the above image, from my first roll through the camera, does have some camera shake, but also clearly evident is pincushion distortion, seen in the verticals. Without camera shake, the lens is moderately sharp in the centre, but this falls off quickly towards the sides and corners. I haven't used colour film with the camera, but no doubt some chromatic aberration would be seen. Also discernible is astigmatism and coma, flare, and in a few shots what looks like internal reflections, despite the matte paint. Given the limitations of the lens, it's quite understandable that there would be a version of the camera which only used the central portion of the image in the guise of the Coronet Rapier. The fact that the Coronet 6-6 uses medium format film is somewhat negated by the qualities of the lens: unlike a Kodak Brownie (and there are simple box cameras with much better lenses), for example, here the larger negative format is lost on the poor definition of much of the image.

Coronet 6-6 with Fomapan 400
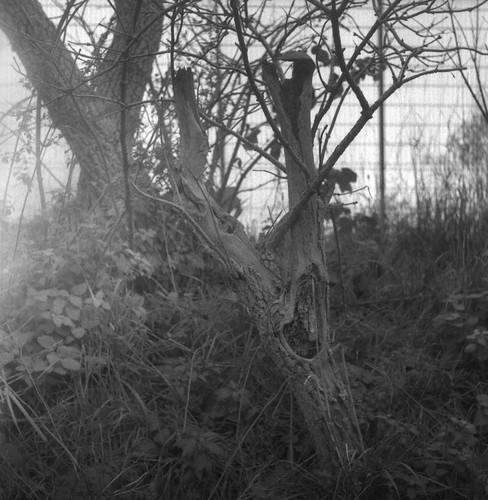
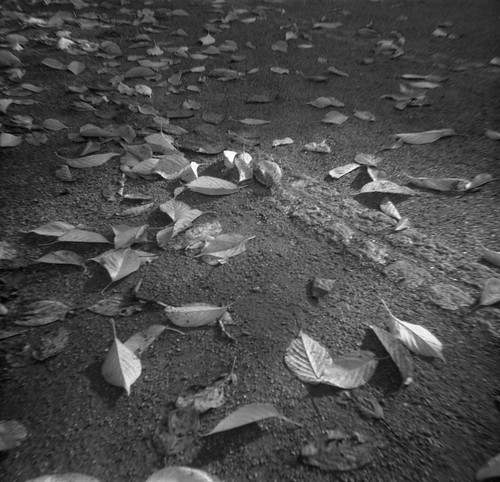
Being aware of the limitations of the Coronet 6-6 meant I sought out subjects and compositions where these limitations either didn't matter, were less obvious, or even added something to the image. With the photograph above, some vignetting, and falling off of definition helps with the sense of depth recession, enhancing the concentration on the lit leaves in the middle of the frame. I also tended to avoid any compositions with clearly rectilinear subjects, choosing more oblique angles where appropriate.

Coronet 6-6 with Fomapan 400
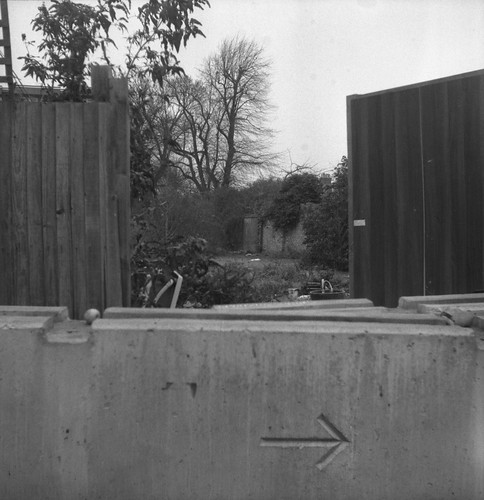
Sometimes none of these approaches really worked, and the photographs that resulted were just unsatisfactory, despite whatever impulses made me press the shutter at the time; frequently, the wide angle of the lens, the lack of definition towards the edges and other aspects just produced images which had a distracting 'busyness' to them. However, the pleasure in using a simple point-and-shoot camera like the Coronet 6-6 largely resides in the fact that the operation of the camera is entirely about the subject and composition with no other concerns in the taking of the photograph.

Coronet 6-6 with Ilford HP5 Plus
Coronet 6-6 with Fomapan 400
Sources/further reading:
Coronet 6-6 on Camera-Wiki