 |
| Three-colour process still |
In writing a blog about film-based photography, there is always an unacknowledged (or perhaps underacknowledged) implicit understanding that any results are, by the nature of being shared digitally, a hybrid form. For some reason, I find this to be most acute in the moving image: the presence of the sheer physicality involved in projecting moving film becomes utterly absent once transferred into a digital form. The difference between a flat photographic print from a negative, and a screen-based display of that negative (whether scanned direct, or from a darkroom print) is great of course, but there is much recognisably the same about the experience of viewing (which, equally, is not to dismiss the real differences too). With physical moving images, the very apparatus of display plays a part in the viewer's experience; in the cinema, this is hidden from view, but in many other instances, the presence of the projector, screen, the sheer amount of material - reels of film, needed to kept, controlled as reels - impinges, bodily, on the viewer. This physicality has become somewhat fetishised in the visual arts: when shown in art galleries, films projected on 16mm or 35mm usually depend on the projector (and all the mechanisms for looping the film too) being present in the viewer's space.
A different kind of fetish is present when displaying such films in a digital form (something I am not immune from): the signs of the film's materiality, frame edges, perforations, dust and scratches - indeed, the very instability of the image, revealing that the apparent movement is comprised from numerous still images - are there as a guarantor of that materiality. I had been thinking of a way to use this digital hybridity in a playful way, that, in creating a digital version of a physical artefact, there was something more to use this for other than its convenience. Last year, my interest in the three-colour process had been reawakened after assisting a student in creating images using the method, making colour images from three separate black and white negatives, shot through red, green, and blue process filters. I shot some still images with the Mycro IIIA a year ago using the technique (not posted to this blog), but also shot a short length of 8mm ciné film using the three colour filters.
 |
| Canon Cine Zoom 512 - Middlesex Filter Beds; Rollei 16 with Eastman Double-X film |
For this, I finished the end of the roll of Orwo UP15 film that I had used for a number of other, very short films (Heatwave, Swinging Light), spooling off the shorter lengths as needed for each of these (I had also used a fair amount of the film for still photographs with subminiature cameras, notably the Mamiya 16 Automatic). This had a 'develop before' date of March 1976; using the film previously, I found an exposure index of 10 provided good results. I shot the film with the Canon Cine Zoom 512. Using a tripod, and a full wind of the motor, I framed the shot, depressed and locked the shutter release, and then held the red, green, and blue three-colour separation filters in front of the lens, for about 8 seconds each as the film ran through the camera continuously. I think that I may have shot the film at 8 frames per second in order to provide a slower shutter speed for the light needed to expose the film through the filters; the digitised footage itself plays at 12 fps. To compensate for the reduction in the transmission of the light through the filters, I metered the scene, then opened the aperture two stops. This meant that the sections of the footage in between the filters is over-exposed, and the section with the blue filter is underexposed, as the process blue filter transmits less light than the red and green filters.
For a subject, I shot the film at the Middlesex Filter Beds (a unintentional reference), with the thought that the three-colour process would record the autumnal colours. This was not entirely successful as I was probably shooting it too early in Autumn, in mid-October - and with the blue-filtered section underexposed, the colour record would not be very accurate (it might have been possible to open the aperture one stop further at this point, but not especially practical, doing the whole operation with one one pair of hands, passing filters one to the other after holding each one up in front of the lens). I then developed the film as negative in Ilfotec LC29 diluted 1+19 for 6m30s at 20ºC. This was over a year ago; only recently did I have the film scanned.
As 2x8mm film is 16mm-wide and run through the camera twice, I shot the sequence twice. However, I didn't use a changing back when removing the film spools and turning them over to shoot the second side (the 2x8mm film format is designed to be daylight loading, but this does mean sacrificing either end of the film on the spool in loading and reloading, not a problem when using a whole roll, and taken into account by the manufacturers of both film and camera; a different matter with a 'short end' such as I was using here). As I result, although I didn't realise it at the time of shooting, the first run of the film through the camera entirely lost the frames with the third filter in being exposed to the light. The second run of the film through the camera was more successful, but the section with the third filter was on the very end of the film, which includes the identification code of the film stock, punched through the film itself. This section of the film would usually have no images on, as it would be exposed on loading and reloading; I unloaded the film from the camera in the changing bag before developing.
 |
| RGB composite from the black and white negative scan |
In creating a full-colour composite, I could have simply edited the film to a few seconds, aligning the three sections shot through the three different filters. Instead, I wanted to show the process as a set of logical steps, and, as the length of the whole film is just twenty-seven seconds when played back at 12fps, this could be repeated through each step. With the film was scanned as 16mm, as well as the width of image, the height is also over twice that of a standard 8mm frame, meaning that it shows two whole frames on both sides of the film. Repeating the film three times across the frame, I decided to keep the height of the original scan as this avoid making the proportions of the whole frame too long and narrow.
To show the process that achieved the colour image, I wanted to stage a set of logical progressions such as it might be possible to intuit how the colour image is created from a strip of black and white film without it necessarily needing an explanation (this particular post notwithstanding of course). The first repetition shows the film, in black and white, repeated in sync across the width of the screen (I could possibly have begun the series of repetitions as a black and white negative, but this seemed unnecessary); the second repetition, still in sync, shows the film in red, green, and blue. The next repeat then staggers the starting times of the red, green, and blue segments so that the point at which the correct colour filter appears in each coloured section is now aligned temporally. Repeated again staggered in time, the three colours spatially align on the the screen at that point to create the colour image. Remaining overlaid, each staggered coloured section runs to its end. The steps are then repeated in reverse, ending up back at the black and white footage, and in theory this could then be looped in on itself.
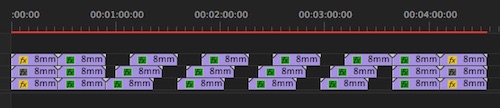
A screen shot of the timeline in Premiere shows the way that the sequence of progressions is arranged. Although created in a digital form, it would be possible to recreate the result using three prints of the film, three projectors and the RGB colour filters in front of the right lenses; some of the earliest colour moving images used a not dissimilar concept, but on a single strip of film, with alternating frames shot through different colour filters, which would then be projected back through those filters to create an optical mix. The film (below) is essentially just an experiment intended to demonstrate - but also disclose - the technique itself.
My grandfather left me 8mm spools labeled with Red, Green, Blue and Lilac. I'm just wondering if they are some early kind of RGB film.
ReplyDeleteThat sounds very intriguing. Have you been able to project any of them?
Delete