Sunday, 31 December 2023

Retracings

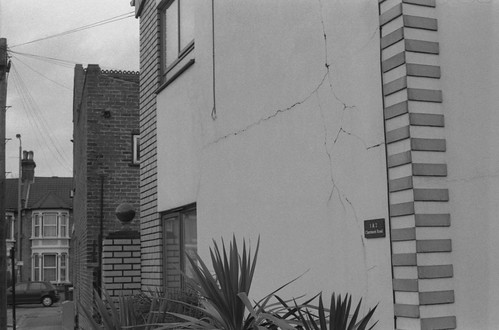
Dyers Hall Road, Leytonstone, 31st December 1993

In a post that I wrote for this blog ten years ago, 'Twenty Years Since', I mentioned–almost in passing–photographs taken of houses being demolished to make way for what was then called the M11 Link Road, now the A12. The few words that described the experience of taking these photographs belies what was, in retrospect, an important formative experience or experiences. The taking of the these photographs was tied up with learning the craft of photography itself, following a basic introduction to photography as part of my Foundation Course in Art & Design a few weeks earlier, then receiving a secondhand Praktica BCA for Christmas in 1993.

I had been aware of the planning blight that accompanied the road scheme years earlier, although I hadn’t known that this was what it was. A journey into central London would involve taking the Central Line from Gants Hill or Redbridge stations; this branch of the Central Line is in a tunnel under Eastern Avenue, resurfacing just before Leytonstone station for a couple of stops, making this brief view from the windows of the tube train a diverting contrast to the darkness of the rest of the way. Houses backing on to the line where it runs above ground here had begun to be demolished or fall into disrepair years earlier: I distinctly remember the graffiti spelling out WHY BOTHER? on the back of a house from the late 1980s, later to provoke the rejoinder WHY NOT? (These were then joined by CRAWLING KING SNAKES KICK YO ASS.)

What had been an occasional journey while I was at school in nearby Wanstead became a daily one when I started college in 1993; I was all the more aware then that the demolitions were something that was actively happening, rather than what might have appeared to be a few streets fallen into desperate disrepair that I’d see whenever travelling into town. The protests around the tree on George Green in the autumn term was the moment that the active resistance to the road scheme made itself felt. (Rather pointlessly, one night after being kicked out of The George with a friend, we pulled down a fence post that had just been put up around the tree–there appeared to be no security at that stage–delaying the construction of the road by what must have been minutes at best, my only attempt at direct action).

The weather around Christmas in 1993 had been largely cold and wet, with some snow; the last day of the year, a Friday, turned fine and sunny, prompting me to decide that it was the perfect opportunity to use my new secondhand camera, with a roll of Ilford HP5 Plus bought for a holiday college project, which was to illustrate a number of words that we had been given. The photos are a record of that change in the weather. I took the tube to Leytonstone, and walked to Leyton, taking photographs along the way. I took some photographs in the British Museum afterwards on the same day; the last two photographs of the M11 Link Road sequence were taken from a moving train. These may have been from Leyton in the direction of Stratford, or I think I may have taken an eastbound train from Leyton back to Leytonstone, before then switching over (or under as the case is at Leytonstone) to take a Westbound train to Tottenham Court Road for the museum.

I returned on a number of occasions in the following months to take more photographs, neither systematic not comprehensive, but with the awareness that this felt like something of which it was worth making a visual record (the one time that I chanced upon evictions happening on Claremont Road in the summer of 1994, I had a part-used roll of film in my camera and no spare). The photographs were printed in the darkroom at college, rather inexpertly, and the images ended up used in artwork then, in collages and paintings, and I drew on these the following year when I’d left London and started a degree in Fine Art.

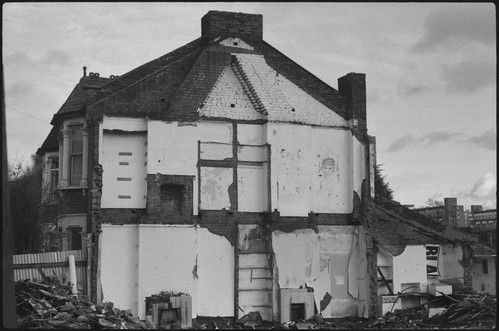
Dyers Hall Road, Leytonstone, 31st December 2013

I had occasion to revisit these photographs earlier this year, and needed to find the original negatives; in doing so I also found a set of negatives from 2013 in which I had attempted to match the locations from the photographs of what was then twenty ago as closely as possible. These negatives weren’t scanned at the time–I had intended a blog post then–and the moment passed. I had scanned the original negatives in 2007, and had posted these online in 2008, and rather over-promised the content of these images by calling this the ‘M11 Link Road Archive’ (an actual archive of material related to the M11 Link Road and the protests resides at the Museum of London). Returning to some of the original files, the quality of these original scans was relatively poor, with scanning artefacts and clipped highlights and shadows in many of the frames. (Scanning issues–software and hardware–partly explain the absence of posts on this blog this year, although the main excuse was the writing up of my PhD). Having found the negatives from both 1993 and 2013, I was able to scan these recently with better results for this post.

What I didn’t know at the time was that many of the houses along the route were or had been inhabited by artists. Acme Studios had been offered a number of the compulsorily-purchased houses by the Department of Transport in the 1980s; by the time I was taking these photographs, the houses along the route were occupied by the few original residents who had not moved away, some of the Acme artists who became involved in resisting the demolitions, and the first wave of anti-roads protestors, some of whom had come from Twyford Down, just outside Winchester–where I was going on to study–and many subsequently moved onto to protest the Newbury Bypass after the M11 campaign.

For a few years I probably didn’t think about this part of my life very much; I happened to cycle over the road on the Quartermile Lane bridge from Hackney just before it opened in 1999. I didn’t have a camera on me at the time, and thought I’d return to take photographs of the empty road, but I never did. Then in 2003, a site-specific sound piece by the artist Graeme Miller called LINKED was installed along the route. This required collecting a radio receiver and headphones, available from local amenities–we got ours from Wanstead Leisure Centre–and walking a route from Wanstead to Hackney Wick, along which one would encounter transmitters that broadcast audio loops consisting of extracts of oral history weaved with music into soundscapes.

Related to Miller’s LINKED, in 2008 I attended a number of seminars at LCC’s Photography and the Archive Research Centre (PARC), part of their research project Road: Artists and the Stop The M11 Link Road Campaign, 1984–1994; the ninth issue of PARC’s journal, Fieldstudy, was devoted to this research project, and featured a few of my photographs from 1993-94. Last year, Graeme Miller revisited LINKED: since its initial installation, with most of the receivers being placed on lamp posts along the road, a slow attrition had reduced these in number over time, some going as the Hackney Wick end of the route was swallowed up by the 2012 Olympic Park, others from the streetlights being knocked over, or the transmitters being unknowingly discarded by contractors. In anticipation of the project’s 20th anniversary, Miller revisited it for Re-LINK last year where the receivers were made available again for 48 hours and a roundtable discussion was hosted by Leytonstone Library; in conjunction with the exhibition Radical Landscapes at the William Morris Gallery, three open days for LINKED were planned, the first was in November, the next on 20th January and 17th February 2024. (In the intermediate years I had other opportunities to revisit Miller’s LINKED a few times, re-walking the route in different groups, thanks to the artwork being used as a PhD case study by Dr. Sarah Wishart.)

In 2013, attempting–as best I could–to find the same viewpoints as the photographs taken in 1993, it wasn’t always clear as to where exactly each picture had been taken then: I hadn’t taken any notes. However, the sequence on the contact sheet, and the linear nature of the route from station to station made this relatively easy in most cases, but for some photographs this would have meant hovering above the A12 itself, as with most of those taken along Claremont Road itself. Some of the photographs in my retracings from 2013 and 2014 were taken with a Zenit 11, some with Praktica MTL3, but for both cameras I used a Prakticar f1.8 50mm lens, the same design lens as I would have had on my Praktica BC1, and then the BCA which replaced it later in 1994 (Edit 25/01/24: Having rediscovered the contact prints from the photographs taken on the 31st December 2013, I had actually used an Olympus OM10 for this set of photographs).

The photographs from 1993 start at Dyers Hall Road. This road formed a shallow loop underneath the Gospel Oak to Barking branch of what was then the North London Line, joining Grove Green Road either end in a slightly more direct route along the Central Line. The A12 reduced Dyers Hall Road into two stubs, the shorter one now with the suffix 'South'.
For the pedestrian, or cyclist, the two ends of Dyers Hall Road are joined by a footpath and cycle lane which runs alongside the brick wall of the A12 here. At the end of Dyers Hall Road South, there is a footbridge that crosses the A12 to Norman Road on the eastern side; there had been a shorter footbridge here in 1993, which afforded a view across cleared ground to the railway bridge, a section of its brick arches already replaced by a long straight steel span.
A second photograph from the bridge looks over back gardens on Dyers Hall Road; the houses in the background face onto Grove Green Road. I took one photograph in 2013 looking across from the far end of the bridge towards the rear of those same houses on Grove Green Road, but a truer position would be on the footbridge itself, just past the line of the railway, where the previous footbridge would have ended–as in the third image below.
The next photographs are from Claremont Road, which became the focus of protest in 1994. The first of these are at the end of the right angle where it comes off Grove Green Road, two houses, one with a gibbet fixed to a chimney and a poster in a window: M11 LINK ROAD/DEVASTATING OUR COMMUNITIES. I’m reasonably sure that these houses were at the northern end of the road: the fence that runs alongside borders the Central Line. Behind would have been the Cathall Road bridge over the railway. In 2013 I took two photographs looking in the same general direction, one from that bridge, which would be somewhat behind the location of these houses, the other from the wide pavement before the bridge, which would be to the west.
A photograph of a house with a front door, curtains and a cat painted on breeze blocks is one of the pictures that would now be entirely where the A12 is now, or above, as the road sits in a cutting here.
There are two photographs at the southern end of Claremont Road where it turns back to Grove Green Road. After the A12 was built a small section of the southern end of Claremont Road remained; there was a little space here to build some houses, facing onto the road, thus ensuring that Claremont Road as a residential address still exists. A photograph looking back from here to Grove Green Road roughly replicates the same view of that from 1993.
The next photographs are from Colville Road. This was set a little further back from the Central Line than Claremont Road: houses which backed onto the railway were all demolished, along with some houses facing those at its northern end, where the angle of Colville Road was changed to accommodate the A12, running behind its brick wall but a stretch of terraced housing on the road’s western side survived.
This change in the course of the road can be clearly seen in the photograph from 2013 which looks along the wall, replicating a picture from 1993 looking over the corrugated iron fence to the end of terrace, side-on to the first photograph of Colville Road.
From here another photograph looks across to the Central Line, showing a 1962 stock Central Line train passing St. Patrick’s Roman Catholic cemetery in the far background (these trains, which I had grown up with, were phased out during that year I spent commuting on the Central Line, going to college, replaced by the current 1992 stock). A photograph of this view would be straight on to the brick wall; I took a picture in 2013 which I think must be looking up and more to the right.
There are two photographs from 1993 that mark the end of the walk from the entrance to the rail yard that lay to the southwest of Leyton Station; this would seem to extend down to Temple Mills, although I haven’t been ably to find whether Leyton Rail Yard was separate from that of Temple Mills, which is now the Eurostar depot. The view from here shows the horizon opening up to take in a skyline in which one can see One Canada Square in Canary Wharf, new in 1993 and the tallest building in the country at that point, past three tower blocks by Bow Church station, the Bryant and May match factory, across what is now the 2012 Olympic Park, marked by the two squat UEL residential towers, to the tower blocks clustered around Wick Lane and Victoria Park. The view now is almost entirely different: trying to locate the exact viewpoint would take one to the edge of the Leyton Mills retail park; slightly to the left, on the bridge over the A12 itself, shows a broadly similar view to that of 1993, with most of the horizon filled with development on the 2012 Olympic site. One Canada Square can still just be seen, as can the tower blocks by Wick Lane.
A second photograph in 1993 was taken at right angles to the first, looking back towards Leyton station, dominated by railway buildings facing the rise in the high road as it passes over the railway line; the current station building’s roof can just be see to their left, mostly obscured. A similar view today looks across the ramp and stairs into the retail park, with the station’s pitched roof in roughly the same position. I didn’t try to replicate the two photographs shot from the moving train in 1993, as I couldn’t be at all sure exactly where they were taken.
Although never directly involved in the campaigns and protests, not knowing about the community of artists there, feeling like an outsider despite it being relatively local, seeing and recording the progress of these demolitions in 1993 and 1994 affected me in part I think as the houses were very much like that I had grown up in, and was something that I could see happening as I took the tube to college every day. There was also an aspect of being confronted by the arbitrary use of the power of the state at this formative age, bound up as it felt at the time with the Criminal Justice Bill, much in the news at the time, passed into law in November 1994, with many of its measures seemingly targeted at the young and politically active, and how this galvanised, pre-internet, before social media, a grassroots opposition (Labour, under Tony Blair–first as shadow home secretary as the bill made its way through parliament, then as leader of the opposition following John Smith’s death–abstained when the bill received its third reading). My awareness of this came through a very different media ecology from today: posters on the streets, what alternative press I happened to come across, like SchNEWS, but mostly how it filtered through into the music of the time and the wider conversations around it in part through the ‘polytextuality’ (as Dean L. Biron describes it) of the music’s physical artefacts–the artwork and liner notes–and how this was reflected in the music press and the conversations that were part of meeting new people, new ideas, starting a college course, anticipating leaving home. When I took the photographs on the last day of 1993, photography was physical (it would be many years before I even saw a digital camera, though I did have my first experiences with Adobe Photoshop then, with a faint intuition that this would be a transformative technology), enabling me to return to the negatives thirty years later and create images anew from their matrices.

Fieldstudy issue 9 (PDF file)
Graeme Miller LINKED
Sarah Wishart, 'A Provenance of Performance'
SchNEWS Issue 3 December 1994
Dean L. Biron, 'Writing and Music: Album Liner Notes'

Monday, 19 June 2023

Earthwise/Hopscotch


I am showing some new and previously unexhibited work in two exhibitions opening in London this week, with openings on Wednesday & on Thursday. For 'Earthwise', an exhibition, event and publication by PhD and MRes students from the Royal College of Arts’ School of Arts and Humanities, opening this Wednesday, I am showing a photographic-text piece, not dissimilar to other recent work.

Earthwise
Wednesday 21st June–Saturday 1st July 12-5pm
Private View: 6-9pm Wednesday 21st June
Beaconsfield Gallery, 22 Newport St, London SE11 6AY
https://beaconsfield.ltd.uk/projects/earthwise/

The other exhibition is 'Hopscotch' and forms the physical iteration of the RCA's Research Biennale, and opens on Thursday, in which I am showing a kind of 'sketch' for a photographic work, intended to be made in the darkroom, but which I never made as planned due to the pandemic.
Hopscotch
Thursday 22nd to Saturday 24th June 10am–6pm
Private View: 6–9.30pm Thursday 22nd June
Closing event: 6-9.00pm, Saturday 24 June
Copeland Gallery, Unit 9, Copeland Park, 133 Copeland Rd, Peckham, London SE15 3SN
www.copelandpark.com

Saturday, 29 April 2023

Ciné-Kodak Model K

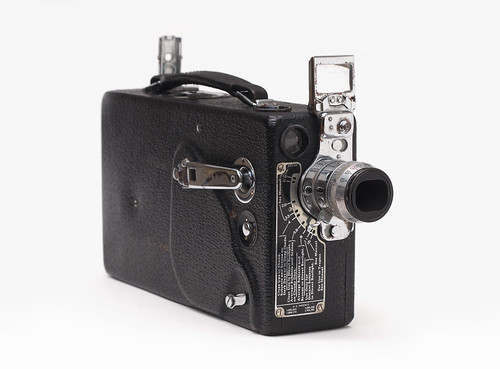
Ciné-Kodak Model K 16mm camera
A leader for years, Ciné-Kodak, Model K, is deservedly still the favorite 16mm. motion picture camera of thousands of home movie fans. Moderately priced, Model K possesses such outstanding features as 100-foot film capacity, Kodak Anastigmat f/1.9 lens–easily interchangeable with a wide selection of accessory lenses, half speed and normal speed, eye-level and waist-height finder, and locking exposure lever.
Cine-Kodak 8mm and 16mm Home Movie Equipment, 1940

In my post on the Ciné-Kodak Model BB Junior, I summarised the evolution of Kodak's range of 16mm cine cameras, from the (retrospectively named) Model A, followed by the Model B, which represents a significant design rethink, and then the BB (and its derivative, the BB Junior), taking the general layout of the Model B, but, by using a smaller capacity spool, making the camera smaller and lighter. The next model, introduced in July 1930, was the Ciné-Kodak Model K. This represented a change in the Kodak ciné cameras' naming conventions, with the previous models named in something approaching a logical sequence. Possibly, the use of the letter 'K' is from Kodak itself, indicating that, when introduced, the Ciné-Kodak Model K was seen as the definitive design iteration of Kodak's 16mm ciné cameras; Kodak manufactured the Model K for 16 years, until 1946, longer than any of the other 16mm models (the next longest production run–15 years–was the Ciné-Kodak Special) and, as a result, ninety years on, the Model K is not a rare camera.

Ciné-Kodak Model BB Junior (front) and Model K (back)
Taking the general design and internal layout from the Ciné-Kodak BB, with a slightly longer and taller body, the Model K was designed for the larger-capacity 100ft daylight-loading spool–used in the first two Kodak 16mm cameras–that the BB had sacrificed for compactness. This would mean around 4 minutes of footage at the camera's normal running at 16 frames per second. With aspects of the BB's design, the Model K is smaller than the Model B, but with comparable specifications. After my initial experiences with the Ciné-Kodak BB Junior, I subsequently had an eye on the Model K for its capacity to take daylight-loading 100ft spools, rather than the BB Junior's 50ft spools; apart from the spool size, most of my caveats about contemporary use of the BB Junior apply to the Model K, particularly that it takes double-perforated 16mm film. However, I saw a Model K offered for sale on a well-known auction website for a starting price of just €3.50–from Germany. With postage this was just over £20 in total and no-one else placed a bid on the camera (this was in late 2020, before the UK left the EU, and before prices when buying from the EU went up considerably as a result). The Model K came with the f1.9 25mm Anastigmat lens, which was the higher-priced variant; it could also be bought with a lower-value f3.5 25mm lens. The camera came in its original case, which has space for a second lens, with mounting pins to secure it, and two rolls of film. It also had the key for the case's lock, attached to the ribbon inside.
 
Ciné-Kodak Model K in original case
Other than taking 100ft spools, the main difference from the BB Junior is that the Model K has interchangeable lenses. My version came with the standard 25mm f1.9 anastigmat lens (the Model K could also be bought cheaper with a f3.5 25mm lens); other lenses do show up from time to time, but seem to be rare. As a viewfinder camera, the interchangeable lenses each had a front viewfinder attached to the mount, so changing a lens also changes the viewfinder (the rear sight on the body remains). The Model K also has a waist-level viewfinder on the body, next to the lens, but the angle of view for this is unaffected by changing lenses. There was a wide range of lenses provided for the Model K: by 1940, there were 7 available in additional to the standard 25mm, from a wide-angle 15mm lens to a 152mm/6 inch lens. Early in 1940, Kodak abandoned the aperture plate guide around the lens with descriptions of lighting conditions and subjects as by then there was a wider range of film stocks available with a range of speeds, thus making too many exceptions; my camera evidently dates from before this, and did not later have its aperture plate replaced, as was offered as a service (it does intriguingly have two marks in the leather on one side which look as though it may had something taped to the side of the camera, which looks as though it could have been the new exposure guide which replaced the aperture plate, consisting of a dial with the aperture numbers and a slot for a card which came with each film, detailing the conditions and subjects particular to its emulsion).

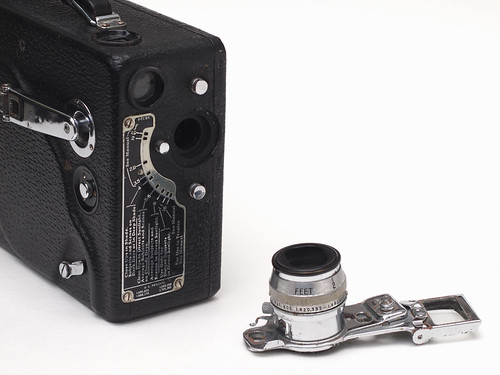
Ciné-Kodak Model K with lens removed
The lenses are removed by a button twist bayonet lugs plate with Each lens came with the front folding viewfinder element attached to the mount, in order that the viewfinder showed the correct angle of view for the corresponding lens. The rear viewfinder remained on the body of the camera: its lens can slide down out of the sighting aperture. This is for when the 15mm wide angle lens is mounted. As with the BB Junior, the viewfinder has parallax marks for the top of the frame at distances of 6ft and 2ft. 

Ciné-Kodak Model K detail of the standard 25mm lens and waist level finder
The Ciné-Kodak Model K also has a waist-level viewfinder built into the body, offset to the right of the lens from the operator's position. This has no parallax indications, and doesn't change with lenses of the different focal lengths. Evidently it was provided to facilitate using the camera held at a lower height, possibly against the body–very much like one might hold a Kodak Brownie. In addition, it's reversed laterally, which makes it less intuitive to use; after explaining laboriously how to follow a moving subject with the waist-level finder, Making the Most of Your Ciné-Kodak does offer the following encouragement: "Bearing this in mind, you will quickly master the trick and be able to keep up with the action. The reflecting finder will be found very convenient when taking pictures of children, pets and all subjects that are at waist level or lower." The waist-level finder does very much feel like it has been transplanted from a contemporary still camera, with Kodak's early ciné cameras being conceived in many of the same terms, functionally at least.

Ciné-Kodak Model K showing winding lever, shutter release and slow speed button
As with the BB Junior, the shutter release lever has two positions: pushed down lightly and the camera runs; push down further and the lever locks in the run position. At 16 frames per second, the effective shutter speed would be 1/32nd of a second, as close as 1/30th as practical. There is also a button on the side of the camera above the shutter lever which, when depressed, reduces the frame rate to 8fps, with an equivalent shutter speed of 1/16th. This has to be kept held down at the same time as the shutter lever, and does not itself lock. The reason for this slow speed is a result of the slow emulsions available at the time–Kodak's first 16mm film stock would have been around 10 ISO–Making the Most of Your Ciné-Kodak advises that "The half-speed feature is not intended for ordinary use, and should be resorted to only when the light is of such extremely poor quality that black and white pictures cannot properly be exposed at normal speed with the largest diaphragm opening (/.1.9 or /.3.5), or when it is desired to make Kodacolor pictures without direct sunlight." (It later states that it can be also used for comedy effects; with the projector only running at 16fps, any footage shot at 8fps would therefore by projected at twice its speed). The motor is wound by a handle which tucks into the body with a recess for its rotating knob when not in use. In comparison to the BB Junior's rather smaller key, the handle allows for the motor to be fully wound very quickly. When fully wound on my camera, the motor runs for about 40 seconds without film, audibly slowing towards the end of this. It runs twice as long at 8fps, as it's the revolutions of the sprocket wheel and pull-down claw–and therefore the number of frames itself–that determines duration.
Ciné-Kodak Model K opened for loading
Most of the description and comments in my post on the loading and use of the BB Junior apply equally to the Model K: the placement of full and empty spools is the same, opening the pull-down claw and sprocket clamps to feed the film through the gate and correctly form loops is exactly the same too, so there's no need to detail that here: one can refer back to the post on the BB Junior for a description of how to load the camera. There are just two differences with respect to loading the Model K to note: first, the lock on the Model K has two steps to open the camera: the button is rotated 180 before sliding into the open position to remove the side of the camera; the BB Junior's lock simply slides. Second, as the Model K accepts both 50ft and 100ft spools, there is a small lever to set a guide for the take up spool of the relevant capacity (one can of course use a 100ft take-up spool for a 50ft supply spool; vice-versa, one would end up with a lot of loose exposed film inside the camera). Opening my particular Model K, there is an engraved inscription "R.H.MACY & CO. INC."; interestingly, the serial number, normally visible on the crank arm when folded out has had the serial number removed with what looks to be the same tool.

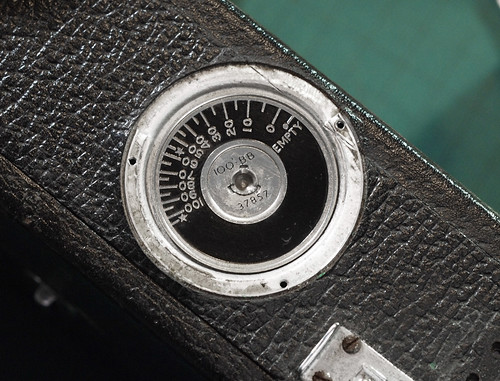
There were a couple of small repairs which I made to the camera. When it arrived, the carrying handle was missing its fixing on one end. I made a replacement from a D-ring (usually used for hanging pictures), drilling two small holes for the screws and then trimming it down to the right size. At this point, I gave the camera a general clean, removing some fixings in the process, including the cover of the footage counter. The footage counter has numerals for every ten feet of film, with marks in between, with stars for loading for both 100ft and 50ft rolls. 

Ciné-Kodak Model K film counter
Underneath the cover, the footage counter has a serial number–possibly matching that removed from the handle–but also "100'-BB": possibly, during its initial production phase, the camera was known as the 100ft BB camera, and only named the Model K when marketed on introduction–which only appears on the footage counter cover itself in relatively small letters. The counter has a movable pointer, moved by the round knob with the milled edge, which should be aligned with the start position when each film is loaded for accuracy, a feature which appears to have been dropped later in the production run.
 
Ciné-Kodak Model K footage counter with cover removed
The other repair was to the rear sight: the mechanism by which it clicks into place, either flat, folded against the body, or upright, in use, is a flat metal tongue the end of which sits under the hinge of the sight. This is fixed to the base of the sight with a small rivet, which sheared off relatively soon after I got the camera (in the BB Junior, this part is fixed by a small screw). To repair the camera, I replaced the rivet with a bolt, drilling out the rivet, then drilling a matching hole in the camera body to fix the bolt through.

My reason for acquiring the Ciné-Kodak Model K was for its 100ft capacity in comparison to the BB Junior, as well as the possibility of using interchangeable lenses; as with the latter camera, there was a notion that I could convert it for single perforated film, which would mean being able to use a wider range of film stocks still available–although most of the 16mm I've shot so far has been old double-perforated stocks of various types. This I have yet to do: for one reason or another, I have used the Model K very little, less than the BB Junior. I have also not found additional lenses at a reasonable price, at least in comparison to the low price I paid for the camera itself. The first short test roll I shot in the camera was Ilford Fast Pan film on an overcast winter's day, shot fairly wide open as a result.

Ciné-Kodak Model K test with Ilford Fast Pan film
Developing the film (above), the pressure plate has a square and round hole, which is some form of identification mark when the film is exposed (the BB Junior has three circular holes, two of which are joined). I did use the Model K to make a very short three-colur process film with the Ilford Fast Pan film again, right at the end of a roll. This was made in the same manner as in my post Three Colour Process 8mm Film, holding each red, green, and blue filter over the lens as the camera ran. I shot two sequences, one inside, with the filter factor, needed the lens wide open at 8fps; the second at the normal 16fps outside.

As with the previous three-colour film, I overlaid three versions of the black and white film and offset each so that the sections with red, green, and blue would synchronise, but without the complicated sequence of separation and repetition in the first film. The RGB colour rendition is less accurate than it might be as the blue filter has a different filter factor, but it was not practical to change the aperture during the exposure to compensate, as I wanted to film the sequence in one, rather than start and stop for each filter instead.

One wonders how the Ciné-Kodak Model K might have looked to a potential buyer looking for a home movie camera towards the end of its production run just post-war. The rate of technological development in just over twenty years since Kodak had introduced the 16mm format had meant that the Model K had begun to lose its purpose, I suspect: it no longer fitted any particular segment of the market. Kodak's introduction of the 8mm format in 1932 provided for a more cost-conscious entry into home-movie making, becoming the new standard; for convenience itself, the 16mm magazine format from 1936 took over from daylight-loading spools; for ambition–the 16mm format's direction after the introduction of 8mm, for the serious amateur, the artist, documentarist or educationalist–the Ciné-Kodak Special of 1933 had many more features than the Model K (in addition of course, Kodak's competitors were also developing numerous cameras for the film formats that Kodak had developed). Regardless, the Ciné-Kodak Model K's long production run attests to it durability and reliability as a design–Kodak had other 16mm cameras, the Model M and Model E, which came and went during that period–and as stated earlier, it's not an uncommon camera nearly eighty years after its production finished. Again, as mentioned at the beginning of this post, there are important caveats about its utility today as a 16mm camera, without modifications, but, given the relatively low prices that it fetches (usually less than a roll of new 16mm film in a typical used condition), it's also one of the more affordable entry point into 16mm.

Saturday, 25 February 2023

Lomography Fantôme 8 - single roll review

Lomography Fantôme 8 35mm film

Approaching two years ago at the time of writing, I posted a short 'single roll' review on the Lomography Berlin Kino 400 film. This had been one of the rolls of film that I had won as part of the #ShittyCameraChallenge prize (sponsored by David Walster - @196photo on Twitter), four different rolls of 35mm black and white film, all of which were new to me. One of the other rolls was Lomography Fantôme 8; like the other Lomomgraphy film, the box has the description '35mm KINO film', but unlike the 'Berlin' film, Fantôme 8's origins are not those of a camera film, used to generate a negative–which its low ISO of 8 indicates. According to Alex Luyckx, Fantôme 8 is Orwo DP31. Orwo's data sheet describes it thus:

ORWO duplicating positive film DP 31 serves as a film for the production of intermediate positives (master positives). Due to is panchromatic sensitisation this film can be used for duplicating from black & white negatives as well as from colour negatives producing well-balanced grey values referring to original colours. Special features of this film are the excellent resolving power and the extraordinary fine grain

As a very low ISO film, I had been anticipating that I'd want to use the roll of Fantôme 8 for something specific which would take advantage of its particular characteristics, rather than 'everyday' film photography. Last week I wanted to make an interpositive to create a print in negative from a negative, and naturally thought of the Fantôme 8 for precisely the qualities the data sheet describes (this, incidentally, was for the Undertow exhibition). I shot half the roll and developed it as needed, then decided that I may well as well find the time to use the remainder of the film. For the purposes of making the interpositive, I used a tripod and my Canon A-1 SLR; at 8 ISO, there are few situations in which hand-holding a camera with Fantôme 8 is practical, but I did expose a couple of frames hand-held, both of which were with the lens wide open at f1.8 and a fairly slow shutter speed. The second image below was at 1/20th, which will have probably introduced a small amount of camera shake, leading it to be less sharp as a result; the first image, silhouetting bare branches against a bright sky at a medium distance was rather easier 

Canon A-1 with Lomography Fantôme 8

Canon A-1 with Lomography Fantôme 8

The first image above was shot on the end of the half of the roll I had used first, and the high contrast of the image was fairly evident. I used Kodak HC-110 at dilution H, 1+63 from concentrate, with a time of 14 minutes at 20ºC (the Orwo data sheet, unsurprisingly for a motion picture film, gives D96 as a developer). The film has probably the clearest base of any I've used–and was also extremely curly once developed. Having used half the film first, and assessing the results, this gave me an idea of how to approach using the remainder of the film. Thanks to its high contrast, in terms of subjects, for most frames I avoided including much or any sky in the composition, concerned it would render almost entirely bright and featureless (as a panchromatic film, it would have been possible to use a yellow filter); the image below was one of the few with a significant area of sky in the frame.

Canon A-1 with Lomography Fantôme 8
I may have been cautious in this, but the few frames with bright sky and bare branches silhouetted against it brought up a different problem in scanning: the clear base introduced a form of halation in the  scanning of the negatives, with the light of the scanner passing through these clear areas and reflecting back inside the scanner. This is an effect I've noticed with a few other films, but this was particularly intrusive here. In the image below it is a rather disruptive artefact of the scanning process; I imagine that darkroom printing would not have the same problem.

Canon A-1 with Lomography Fantôme 8

Close-up crop from scan

Given Fantôme 8's characteristics, I had hoped for overcast weather conditions for photographing, not uncommon here in February, but instead I found it was an afternoon of intermittent, if hazy sunshine. To lessen the high contrast of the film, using the Canon A-1, with its double exposure capability, on a number of frames, I was able to use the technique of pre-exposure to raise the shadow values. To do this, I first shot a frame of a grey card without focussing three and a half stops below the camera's indicated exposure, then pushed in the multiple exposure switch before engaging the film advance, which, with the multiple exposure switch engaged, simply cocks the shutter without moving the film. After development, the frames which had pre-exposure were easily distinguishable on the negatives, although in scanning, with many frames the differences were not as great as I might have expected.

Canon A-1 with Lomography Fantôme 8
Canon A-1 with Lomography Fantôme 8 and pre-exposure
The most successful use of this technique is demonstrated in a pair of frames in which the subject was the low winter sun reflecting of a puddle, with the surroundings otherwise in shadow, which wouldn't be a subject easy to expose for a film with greater latitude: the pre-exposure here opens up the shadow detail just enough to define the landscape which becomes a little lost in the first image, where more exposure would lose detail in the highlights.

Canon A-1 with Lomography Fantôme 8
Canon A-1 with Lomography Fantôme 8 and pre-exposure
A better test would be to print from these negatives in the darkroom, to be able to properly appreciate the difference the pre-exposure has made. However, for some of the images here, it does appear to have benefitted the negatives. As a general preference, longer tonal scales in negatives I find easier to work with (which was, in part, the frustration I felt with Ferrania P30); for many or most subjects it's a general look that I prefer, and, as a technique, using pre-exposure with Fantôme 8 here has softened some of the film's particular qualities. Many of the examples of the film that I've seen online play on these high-contrast qualities, and, had I been wanting that look, and found subjects appropriate for it, Fantôme 8 would have been ideal: I do feel that I found it a bit more flexible than I had anticipated. With the some of the compositions in which I was mindful in not including the sky, I found that there was something–a little–of the 'ungrounded' quality of some of Muybridge's photographs of Yosemite (on a much less grand scale of course) which I had been looking at again recently, in which the lack of a horizon or discernible foreground places the viewer in an uncertain relation to the scene depicted. Having used the film initially for a purpose not dissimilar to its original usage, then, finding the right subject matter and an appropriate technique for the film's limitations, I found myself liking Lomography Fantôme 8 rather more than I had expected to.


Sources/further reading