 |
| Zodel Baldalux–view of top plate |
Anticipating a trip abroad in the near future, the first since the global pandemic, I was considering which medium format camera to take with me, and naturally thought of the
6x9 folding Zodel Baldalux camera. Over the past decade this has accompanied me on many trips, and usually provides fairly good results for its modest specifications. However, since I'd first acquired the camera, I'd always been using it with the double-exposure prevention disabled. I'd done this as it had begun to continually trip to the 'exposed' position, denoted by a red 'E' in the small square window on the camera's top plate. In this position, the shutter release on the body is prevented from being depressed and the only way to release the shutter is either with a cable release attached to the lens or, rather more clumsily, by pulling down the lever on the shutter which connects to the body shutter release linkage, and this is a good way to get one's fingers in front of the lens. I taped a small L-shaped piece of card in place to stop the mechanism from shifting to the 'E' position, which, at the time, seemed like a good–and reversible–intervention. At the time I wrote "I've yet to accidentally double-expose a frame, but I'm sure that this will happen." This did happen subsequently, not too often, but picking up the Baldalux once more, I decided to look at this again.
 |
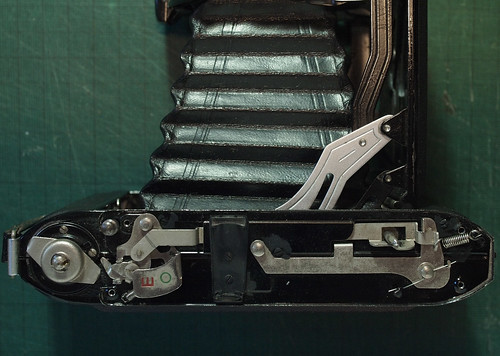
| Double-exposure prevention mechanism disabled with card and tape |
To remove the top plate of the camera, there are four screws, two at each end, which are fairly easily loosed. I found that it was simple enough to keep the top plate level, and not actually take them out from their respective holes. I could lift and pivot the plate on the shutter release (which pops up when the camera is unfolded) and remove the piece of card, which looked a little frayed at the edges after ten years. Before taking the plate off completely, the shutter release button needs to be removed. Opening the camera makes the shutter release stand proud of the top plate, which may make it easier to undo. In the centre of the release is a separate slotted screw cap which once undone, lifts off with the shutter button, itself sitting on the release pin that has a threaded top that the screw cap connects to.
 |
| Shutter release with slotted centre cap. |
With the shutter release removed, the camera's top plate can be taken off, and, as mentioned, kept upright with the screws in their holes at either end. Underneath the top plate, loose, but on the shutter release pin, is a short arm that has the screw fitting for the cable release slot on the top plate. This can be simply lifted off.
 |
| Shutter release pin with cable release arm |
At this point, although separate from the top plate, I removed the film advance knob. This is best seen in the image above showing how I originally disabled the mechanism: slightly off centre in the middle of the knob is a tiny screw–very easy to loose!–which needs to be unscrewed before the advance knob itself can be unscrew: the two images below show it positioned for unexposed ('O') and exposed ('E').
 |
| Double-exposure prevention mechanism in 'unexposed' position 'O'. |
 |
| Double-exposure prevention mechanism in 'exposed' position 'E'. |
The sequence of how the mechanism should work from the unexposed position, through exposed to unexposed again is as follows:
- Having first cocked the shutter, as the shutter release is depressed, the shaft under the button pushes against a detent in a vertical section of the forward arm (seen below the rectangular hole around the shutter release pin in the pictures above). For this to work once the top plate is removed, I placed the shutter release button onto the shutter release pin (this did not need to be fixed with the central screw plate to activate the mechanism).
- This pushes the forward arm down and away from the front of the camera: the right hand end of the arm is held in tension by a spring. This downward movement releases a small angled catch at the end of the arm which can then slip past a vertical section of the lower or rear arm, and is pulled taut past this vertical piece by the spring. A section of the detent on the forward arm is now underneath the shutter release button shaft, preventing its depression, and thus preventing double exposure.
- Simultaneously, the other end of the forward arm travels under the viewfinder to the left side of the mechanism where it pulls on a linkage to move the double-exposure indicator from 'O' to 'E'. This also causes a flat pin to protrude towards the film advance knob.
- To reset the mechanism, the film advance knob needs to be rotated. Under the advance knob (now removed), there is a kind of cap which sits over the shaft of the film advance column (which travels through the top of the camera body to the take-up spool inside). This has two arms either side with downward pointing ends.
- As the advance knob rotates, one of these arms pushes the flat pin of the indicator linkage towards the back of the camera body and in doing so this pulls the forward arm to slip its small catch over the vertical section of the rear arm. This pulls the detent away from the shutter release button shaft. The shutter can now be tripped again.
- Meanwhile the indicator linkage shifts from 'E' back to 'O' and the flat pin of the linkage slips out from the arm of the film advance cap and springs back to a position where the advance can now rotate freely without connecting with the pin.
With the camera top plate removed, turning the cap that would normally be hidden by the advance knob was pushing the flat pin in the indicator linkage, shifting the position from 'E' to 'O', but once released from the pressure of the arm, the mechanism sprang back to 'E', My initial thought was that the spring on the other end of the forward arm no longer held this in sufficient tension–hardly surprising after sixty-odd years–to pull it firmly back into the 'O' position, and the small catch at that end was loose enough to slip back past the upright which should stop it.
 |
| Detail of spring, catch and hook |
I stretched a couple of loops of the spring over the hook to which it is attached to increase the tension, then reduced it to one loop as this felt too much. This did not solve the issue; I wondered whether it was the spring at the other end under the indicator linkage, but this is slightly more difficult to access. Manipulating the whole linkage here by hand, it looked as though the flat pin on the linkage did not travel far enough to lock this into the 'O' position. Removing the cap on the film advance column, I tried to bend the ends of the two arms so that these would flare slightly outwards, as in the picture below (I didn't take a 'before' photo). This seemed to have solved the problem: in this position, they push the flat pin of the indicator linkage further towards the back of the camera as they rotate, and the linkage now locks into the 'O' position until the shutter is released.
 |
| Cap with arms showing adjusted angle |
Reassembly is a case of following the disassembly steps backwards: the cap should sit firmly over the advance column–the hole on top has squared-off ends in order to turn the advance, which correspond with the top of the film advance. Replacing the film advance knob, I found I needed to firmly hold the key inside the camera which sits in the end of the 120 film spool with pliers to screw the knob on tightly enough to get the two halves of the tiny screw hole to match so that the screw can be reinserted. Replacing the top plate merely needs the tiny arm for the cable release positioning correctly before reinserting the screws at both ends, then finally replacing the shutter button on its pin and screwing down the small plate at its centre to secure this. Before reassembly, I also polished the indicator plate, somewhat tarnished, particularly over the letter 'O'.
No comments:
Post a Comment