Thursday 25 December 2014

Dufaycolor

Dufaycolor transparency, 1937
In my posts about making colour images from monochromatic separation negatives, I wrote about one early technological approach to capture colour in photography. Although advanced cameras were produced which could simultaneously expose three plates, the ability to capture a colour image in a single exposure was a highly desirable goal, and one which produced a number of different processes at the end of the 19th and the early 20th century. One of these was Dufaycolor, and the images illustrating this post come from my partner's family when I was given the opportunity to digitize the original photographs.

The Dufaycolor process was introduced as cine-film in 1932, followed by rollfilm for still cameras in 1935 when Ilford acquired an interest in the company. The Dufaycolor system was based on an earlier plate process, Louis Dufay's Dioptichrome plate from 1909, itself preceded by Diopticolore. This was one of many additive colour screen processes that were developed from the end of the 19th century, partly enabled by increases in spectral sensitivity which allowed photographic emulsions to capture a wider range of visible light. These colour processes all worked in essentially the same way: a photographic emulsion is exposed through a screen comprised of minute colour filters (using either a separate screen plate or as an integral plate containing both filter screen and emulsion), and then reversal processed to produce transparencies. The best known of these processes is the Lumière Autochrome, which used a mosaic of dyed potato starch grains coloured red-orange, green and violet. The grains had a tendency to form irregular clumps which gives Autochromes a Pontillist appearance. Most of the other screen processes used mechanically ruled lines, however, either in parallel (as were many of the early and crude attempts) or with the lines crossing at perpendicular angles, which is the case with the Dufaycolor system, where the screen or réseau comprises red lines interspersed with rows of green and blue rectangles. These lines, at 500 to the inch, are fine enough not to be visible by the naked eye, but would be evident when used for cine-film and projected, although many examples of Dufaycolor cine film I've found online are not of sufficient quality to resolve this detail. Dufaycolor, as the last additive screen-film process to appear on the market was durable and popular enough to survive into the late 1950s, although it was unable to compete with the technologically superior subtractive colour Kodachrome and Agfacolor, which essentially set the template for all future colour photographic processes.

Dufaycolor transparency c.1937
Using extension tubes gave enough magnification to create the image below, a detail of the dog which clearly shows the ruled screen. As the transparency above is about 6.5cm tall, the enlarged detail is roughly 5mm square, which demonstrates how fine the lines of the réseau are. This is around double the resolution of earlier screen processes, such as Joly plates, the first to be produced commercially, and the Dioptichrome plates that Dufaycolor itself had evolved from, and also finer than standard commercial printing today. Incidentally, when a point source of light is viewed through a Dufaycolor transparency, the réseau diffuses the light into a series of banded highlights, which may be one way of identifying the process in the absence of other information.

Macrophotograph of Dufaycolor image showing detail of the réseau
The transparencies had been kept in an original envelope. Although the reversal processing needed could have been accomplished by any competent lab or amateur, Dufaycolor films had a dedicated 'processing station' (it's unclear whether this service was included, "process paid", as part of the cost of the film), with the address on the envelope, although the envelope itself shows no evidence of how it had been returned to the customer, either being posted directly, or from a local lab.

Dufaycolor envelope
Dufaycolor transparency in mount
The transparencies were originally supplied in mounts; in the image above, the mount provides a degree of cropping to make the horizon more level, while silvering around the edge of the frame is quite evident, which appears as dark brownish marks on the transparency below. As the photographic emulsion is exposed through the film base and the réseau, the correct orientation is to view the transparency from the emulsion side. The image at the top of this post shows that the exposed emulsion surfaces have suffered more from silvering: it is apparent that the clearer portion of the photograph is due to another picture lying on top at an angle, perhaps for a number of years.

Dufaycolor transparency, 1937
The Dufaycolor transparencies proved to be too dense to scan, so instead I photographed them on a light box. There were two different sizes of transparency, 6x9cm and 6.5x11cm, which relate to 120 and 116 medium format rollfilms. The images all show a lack of sharpness  to a varying degree, which may be from focus problems, or film flatness. The film was rated 10 ISO, and, judging by the tilting horizon lines in many shots, these were all taken hand held, which would have meant slow shutter speeds and relatively wide aperture (by comparison, at the date these photographs were taken, Ilford had introduced the first HP film, at 160 ISO, and Selochrome was rated 100). Dufaycolor was faster than Autochrome, a version of which had been released in rollfilm format, but colour filters always reduce the amount of light reaching the emulsion (according to Colour Photography: The first hundred years 1840-1940, Dufaycolor had a transmission rate of 21%, compared to Autochrome's 7.5%, which meant that 92.5% of the light entering the camera when exposing an Autochrome plate was absorbed by the filter layer before reaching the photographic emulsion). Some of these screen processes struck a compromise between colour saturation and the speed of film or plate: the less intense the colours in the filter screen, the more light would be available to reach the emulsion.

Dufaycolor envelope (back)
Many of the images are underexposed and not very sharp - the back of the envelope has a series of abbreviations (rather in the manner of the stickers that used to come back with photos from Boots and other D&P establishments): on the image of the mounted transparency above, 'S.X.' is marked in the top right hand corner. Although the transparencies had been kept in one envelope, as there are two different sizes, and the Dufaycolor rollfilm came in rolls of six frames, the fifteen photographs must be from at least three rolls of film. Intriguingly, the shot below shows two cameras being held, one appears to be a box camera in a case, the other a folding camera - the white highlight being the brilliant finder rather than the lens. It is just conceivable that both cameras in the picture were also loaded with Dufaycolor and that all the transparencies in the envelope were shot simultaneously, on two occasions, one with all the family in Cornwall where they stayed in New Polzeath in summer 1937, the other possibly by the Thames, where the family had a house near Henley, which appears in some of the other photographs.

Dufaycolor transparency c.1937
In photographing the transparencies, I attempted to keep the colours as close to the original values from camera to screen, while bringing out more detail from the underexposed shots. The colours do have a distinct look quite unlike modern films, due to the dyes used in the process, but these colours have proved very durable.

Dufaycolor transparency 1937
Dufaycolor transparency c.1937

Sources/further reading:
Colour Photography: The first hundred years 1840-1940, Brian Coe, 1978
Dufaycolor on Photomemorabilia
Dufay entry on Camera-wiki 
Early colour photography PDF from the National Media Museum

Monday 8 December 2014

127 Day - Winter 2014

Studio window, Baby Ikonta with Ilford Selochrome
One aspect of taking photographs on certain annual recurring days, such as the '127 Days', is that repetition can become an archive when photographing the same scenes as time (and the seasons) passes, such as the shot of Dagenham Brook below, which I had shot in July; in December last year, I took a walk along the same route I'd taken the year before. For yesterday's 127 Day I had one roll of Ilford Selochrome with a develop before date of January 1970 which I hadn't shot on this year's 127 Day in July. I also shot two rolls of Kodak Verichrome Pan in 828 format with a develop before date of August 1974 which I'd rolled with 127 backing paper, and similarly, a roll of 35mm Rollei ATO 2.1 Supergraphic. All films were shot with my Zeiss Ikon Ikonta 520/18 - otherwise known as the 'Baby Ikonta'. I shot half the roll of Selochrome around the house, which allowed me to make a couple of diptychs shooting through windows, and, although the skies briefly cleared, by the time I went out to take some more photographs, it was a typically grey December afternoon (the weather being one reason I tend not to shoot on 27th January, the other 1/27 in the calendar when written in the form used commonly in the US).

Dagenham Brook, Kodak Verichrome Pan
Both rolls of Verichrome Pan exhibited very pronounced texturing from the backing paper. The Ilford Selochrome also showed a trace of this effect, but having retained more sensitivity, with a denser negative this was much less apparent and only really showed up in shots which were underexposed. The lighting conditions weren't sympathetic to shooting the Verichrome Pan film with a slower rating than 50 EI which may have helped. The film also had a very strong curl which caused problems with film flatness: it seems this was enough to force back the camera's pressure plate in a number of shots.

Kodak Verichrome Pan, showing a lack of film flatness
The poor lighting conditions were less than ideal for using Rollei ATO 2.1, which has a nominal rating of 25 ISO, but performs better at lower exposure indexes, and, unlike July this year, I did not have a tripod with me for longer exposures (most of the shots illustrating this post were at fairly wide apertures and at shutter speeds of either 1/50th or 1/25th). The image below was the best shot from the roll of ATO; I attempted some shots at 1/10th, but the Baby Ikonta's shutter was beginning to stick at that speed.

Leyton Sign, Rollei ATO 2.1
All films were stand developed in Ilfotec LC29 for one hour, at 1:100, except for the ATO 2.1, for which I used a dilution of 1:200. As I was developing the first couple of rolls of film, the clouds began to break up again in time for the sun to set and I shot the second roll of Verichrome Pan.

Winter Afternoon, Kodak Verichrome Pan
Sunset, Kodak Verichrome Pan

Tuesday 2 December 2014

Old Lenses

"Now, of course, the most important parts of cameras are lenses."
"Ooh no, you can't say that, old boy, you can't say that."
"Why not?"
"That's not grammatical. You should say lends. Lends. I lends, he lends, or he borrows, or he scrounges, that's you. You can't say lendses." 
"Yes you can, you don't understand me, the lens, the lens is in front of the camera and it is through this that the light gets to the plate or film."
"Sounds like a little dental outfit, doesn't it?"

Clapham & Dwyer, 'On Photography'

Not to be confused with Susan Sontag, the above exchange from a 1930s 78rpm record of a variety act works better aloud than being read on the screen, and, in titling this post 'Old Lenses', for some reason, I thought of them. In the post I wrote about the MPP Micro-Technical camera, I didn't put enough emphasis on one attraction of large format cameras: the ability to use a very great variety of lenses. As long as the lens can actually be mounted on the camera, which in practice means fitting to a lens board, the only considerations as to suitability are, firstly, bellows draw, whether the bellows can be extended (or retracted) enough to focus the lens and, secondly, the image circle the lens projects, whether this is wide enough to cover the film format and if it is large enough to also allow movements (a chief attraction in most large format camera designs itself).

When I bought my MPP Micro-Technical Mk VI camera, it came with a 150mm Schneider Kreuznach f4.5 Xenar lens. On the 4x5 inch format, a 'normal' angle of view, based on the diagonal measurement of the image sizes would be 150mm. However, the angle of view for a normal lens is not directly comparable with a 50mm lens on a 35mm camera (for example), as 4x5 has different, squarer, frame proportions and the 150mm lens sometimes felt a little wide for many shots (I also bought a wide angle 90mm Schneider Kreuznach Angulon lens, although I've rarely used it). Although I've been shooting large format for around four years, it does feel like I still have much to learn (more so than with other formats), and still making mistakes. Considering the options for longer focal length lenses, these can be very expensive, and while it would be ideal to use the best equipment available, an initial outlay of hundred of pounds in lenses that might not be used very often, although an investment, may not be the best way to start shooting large format. Close to the Xenar's 150mm focal length, I found a very cheap (under £40) 
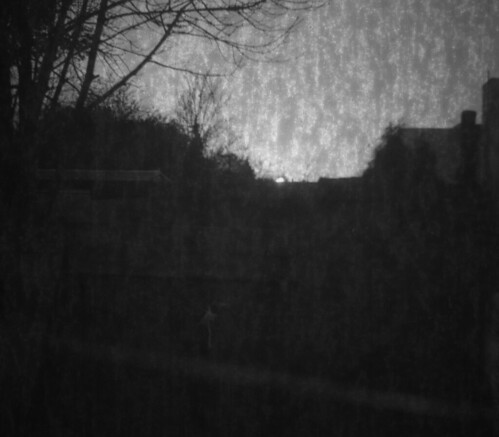
f5.3 Zeiss Tessar 16.5cm lens in a dial-set Compur shutter, which I've used for many of the large format glass plate night shots (I've written elsewhere about my preference for dial-set shutters over the rim-set versions).

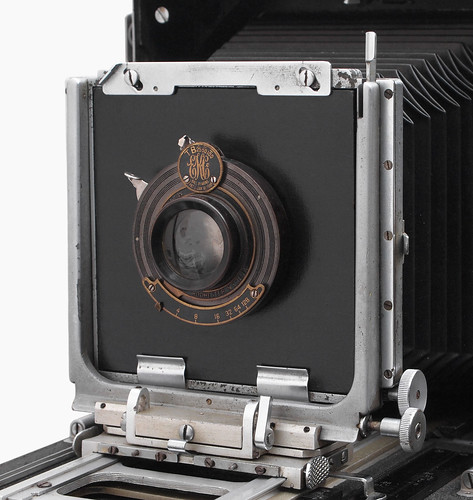
Carl Zeiss Tessar 16.5cm f5.3 lens
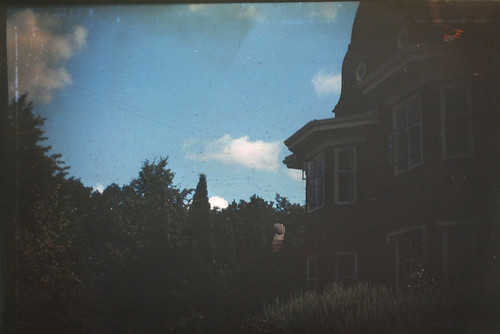
There isn't much to add about the Tessar lens here, except perhaps that it may be slightly lower in contrast to the Xenar due to being a pre-war uncoated lens. This may work better for situations such as in the image above, shot with Kodagraph Ortho Negative film, a high-contrast repro film (the Xenar, not a recent lens by any means, is a Tessar-type design, but my lens, from the 1950s, is at least coated, and perhaps better suited to colour work than an uncoated lens). Given the age of the Tessar lens (the serial numbers on the lens and shutter date it to 1926) and the focal length, it possibly came from a camera such as the Ica Lloyd or Nixe, a camera using 'postcard' format 122 rollfilm with an optional plate back.

Bausch & Lomb Rapid Rectilinear lens in Kodak Ball Bearing shutter
Kodak's 122 format was made for their No 3A Folding Pocket Kodak. The 122 rollfilm gave negatives of 3¼×5½ inches (8.25x14cm), a sufficient size when most photographic prints were made by contact printing. The No 3A Folding Pocket Kodak was provided with a number of lens/shutter combinations: I had one with a Bausch & Lomb Rapid Rectilinear lens in a Kodak Ball Bearing shutter, and had intended to convert the camera for (cropped) panoramic shots on medium format film. However, having languished in a drawer for a number of years, I decide to mount the lens and try it with the MPP camera. The Rapid Rectilinear lens design dates back to 1866; this one has a patent date of 'Jan 18 1910' on the shutter. The lens itself doesn't provide very much information: there's no serial number and no indication of focal length. The apertures are marked in U.S. stops: 4, 8, 16, 32, 64, 128. These equate to the standard f-stop system of f8, f11, and so on; the U.S. stop of 16 is the same as f16, which is useful to work out how the two systems match up (although U.S. stands for Universal System, it was not widely adopted, and went out of use around 1920). The ball bearing shutter has speeds of 1/25th, 1/50th, 1/100th and T and B settings. I tested the shutter speeds by making an audio recording and found that all speeds were the same, around 1/40th. Mounted on the MPP camera, the focal length of the lens appears to be around 180mm, although this would probably have been expressed in inches originally. As the Rapid Rectilinear lens is made from two sets of cemented symmetrical elements, I'd read somewhere that it should be convertible: both front and rear sets of lens elements are sufficiently well corrected to form an image alone, and this aspect of the lens I wanted to try for myself.

Bausch & Lomb Rapid Rectilinear lens with yellow filter
Bausch & Lomb Rapid Rectilinear lens - rear lens elements only
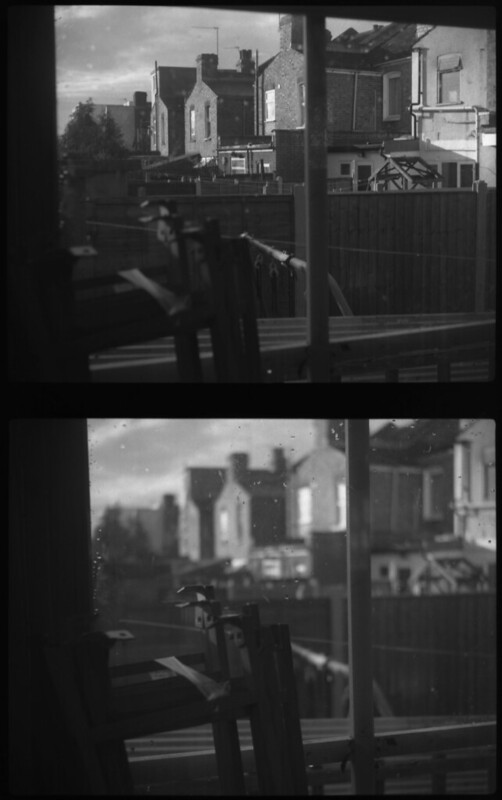
When shooting with the Rapid Rectilinear, there were a number of calculations to work out the exposures required. To begin with, I used an exposure index of 250 with the Fomapan 400 film and factored in a deep yellow filter for the first of the two images above; the US stops had to be converted; and with only the rear elements in the lower image, I also had to calculate the bellows factor, which I've written about in my last post on Distars and Proxars.

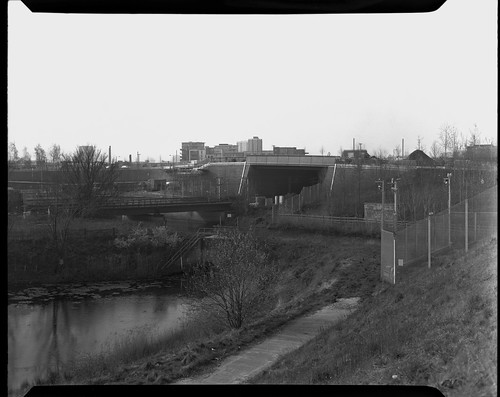
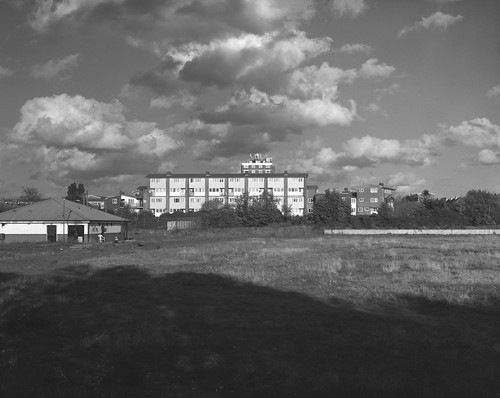
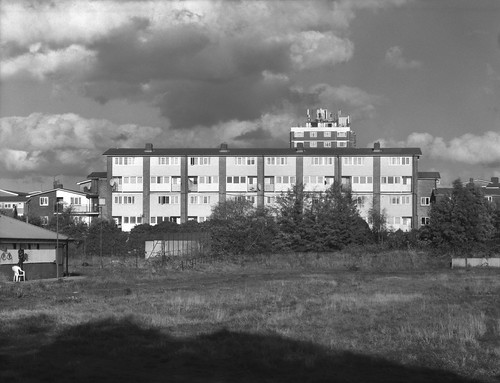
I also shot the same scene with the Xenar lens for comparison: the Xenar clearly is much better for edge to edge sharpness, and it is in the out of focus areas where the difference between the two lenses is clearest: the Rapid Rectilinear's characteristics are most noticeable in the long grass in the foreground. In both shots it's possible to discern the astigmatism in these out-of-focus parts, which the Rapid Rectilinear is not corrected for, especially in the second photograph, which was shot with just the rear lens elements at the widest aperture, which would have been equivalent to f16 at a focal length of around 360mm. This was also shot without the deep yellow filter, which reduces the contrast further. However, the Rapid Rectilinear is still good stopped down and large format is very forgiving at a relatively small scale of reproduction; in a large print it may be a different matter.

Left: Xenar; right: Rapid Rectilinear (rear elements only)
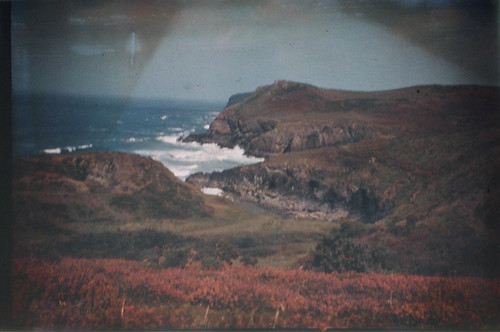
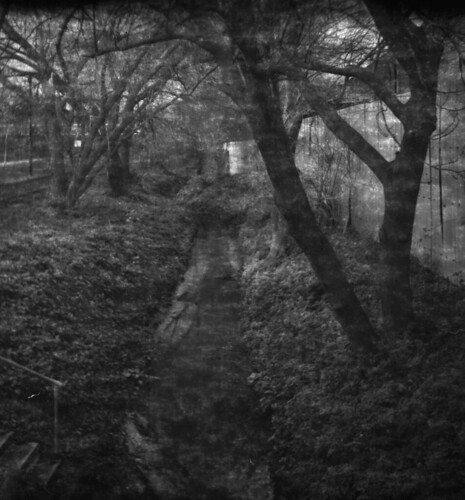
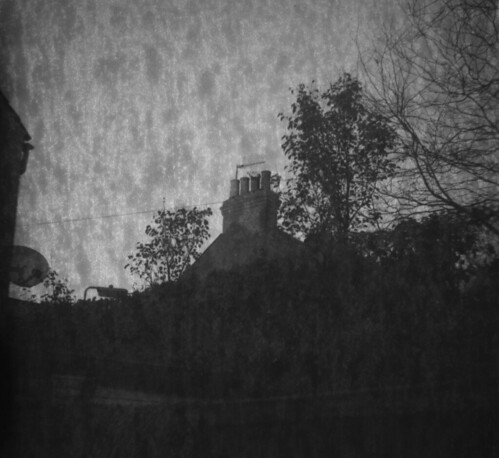
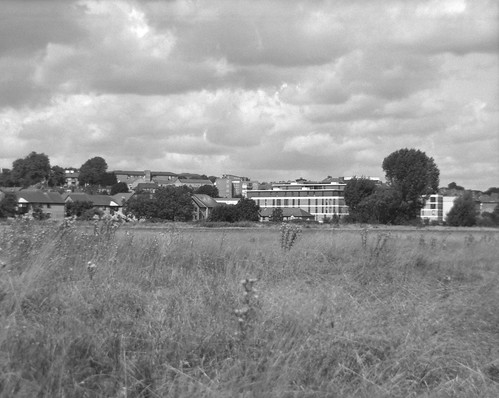
The images below, starting with a photograph using the 16.5cm Tessar, were all shot at smaller apertures. These were also shot on Fomapan 400, this time rated 320. I also used the deep yellow filter on the shot without the front lens elements, as the shutter's screw mount protrudes enough for the push-fit filter. With the ball bearing shutter only firing at around 1/40th, by necessity the exposure with just the rear elements of the Rapid Rectilinear was two seconds on the 'T' setting, allowing me to stop the aperture down to the equivalent of f64. As the clouds were moving away from the lens, rather than across the field of view, the length of exposure did not result in blurred clouds, but movement shows up in some of the trees.

Carl Zeiss Tessar 16.5cm lens with yellow filter
Bausch & Lomb Rapid Rectilinear lens with yellow filter
Bausch & Lomb Rapid Rectilinear lens - rear lens elements only with yellow filter
As the results show, these lenses do have their own character and quirks, and although many better lenses have been designed since the Rapid Rectilinear (and, indeed, the Tessar), and the results will not be as good, older lenses represent a possibility, if also a compromise, of cheaply expanding a range of focal lengths available (especially with convertible lenses) for view and large format cameras. 

Sources/further reading:
Through A Vintage Lens on the Rapid Rectilinear
Rapid Rectilinear on Camera-Wiki