Showing posts with label stand development. Show all posts

Monday, 19 July 2021

127 Day July 2021

Vest Pocket Kodak Autographic with Ilford Selochrome
127 Day is one of the film-themed calendar days which I endeavour to observe, especially in its July iteration. This year I had two rolls of Ilford Selochrome 127 film, both dated September 1970, and I chose to use the Vest Pocket Kodak Autographic camera, having not used this for a few years (had I thought about it, perhaps I should have used it last year, to mark a hundred years since my particular model had been made). I'd previously realised that the camera didn't quite focus on infinity (the camera itself is fixed-focus, but the lens seemed to be set much closer than infinity), and prior to using it last Monday, I had thought to attempt to work out how far from the film plane the lens should be positioned to achieve infinity focus. As the lens is erected on scissor struts, it might be possible to not fully pull out the lens and achieve this. I roughly calculated this to be around 4-5mm. I cut a piece of card to the length of the distance between the camera body and the front standard, so that, in theory, I could pull the lens board out from the body, then push it back in to the piece of card as a guide.

127 format Ilford Selochrome

In practice, this wasn't so easy. It was difficult to push the lens board back in toward the body equally on both sides and keep it parallel to the film plane; it also had a tendency to work itself back towards being closer to fully pulled out, due, I imagine, to the spring of the struts. Nevertheless, I persevered with this approach. The Ilford Selochrome film was originally rated 160 ASA; I generally shot it at 1/25th 'wide' open at f11, or used it for longer exposures stopped down to f22 balancing on walls or railings where I could. Conditions on Monday were heavily overcast, not ideal for using such an old film in a camera with a slow lens. The weather had been a little brighter earlier in the day, but by the time I left the house a mass of dark clouds was looming, and this was the weather front that caused flash flooding later that day in London, the same weather system which caused catastrophic floods in Europe a few days later.

Vest Pocket Kodak Autographic with Ilford Selochrome

I shot both rolls and semi-stand developed these in Ars Imago #9 for an hour at a dilution of 1+100. When I took the films out of the wash, it was immediately evident that on top of the focus issues, the negatives clearly showed that the bellows had light leaks. When I first used the Vest Pocket Kodak I had more or less repaired these with applications of acrylic ink to the rather worn corners of the bellows. Although I'd hardly used the camera since then, clearly this hadn't been a permanent fix and had deteriorated over the years. The length of time the bellows were extended was the main factor as to how intrusive these light leaks were, the image below being the worst; obviously, the time taken with fiddling around with the distance of the extension of the struts to try to get the lens in focus meant that this longer than using the camera 'normally'. Only a couple of frames seemed to largely escape the light leaks. Some frames also had a few losses of emulsion (seen in the image above), not entirely surprising given the age of the film, and the negatives had a pronounced curl, making scanning less easy than it might be, as well as an added difficulty in loading the tank for developing.

Vest Pocket Kodak Autographic with Ilford Selochrome

Once scanned, it was clear that my attempts correct the focus with the Vest Pocket Kodak had not been that successful. In the image below, a stray tip of grass at the bottom of the frame is the only part of the image in focus. I think this was where the lens board had worked itself back towards being more or less fully extended; I probably would not have been able to get this result if I'd tried, and despite the light leaks in the frame, the result wasn't entirely unsatisfactory.

Vest Pocket Kodak Autographic with Ilford Selochrome

Overall, the best frames were those where I stopped the lens down, and used the B or T settings, placing the camera on a wall or railing for exposures ranging from 1 second to something like 12 seconds for the image at the top of the post, probably the best from the two rolls of film, which has just a hint of shake given how difficult it was to keep the camera completely still. Using the Vest Pocket Kodak meant that I got eight frames on a roll, and I did try two or three frames for a couple of the subjects, given all the problems with the camera. In retrospect, perhaps I should have used the films in a different 127 camera, such as the Baby Ikonta, which would have given me twice as many shots; the film itself was an unknown quantity, I had no idea how this had been stored in the decades since it had been manufactured, but the near-pristine condition of the boxes was a hint that the Selochrome might still give good results, as it did, despite all the problems with the Vest Pocket Kodak.


Thursday, 17 June 2021

116 Day June 2021

Zeiss Ikon Cocarette 519/15 with Kodak Verichrome Pan
Having not taken many photographs recently and having posted even less, last Friday, 11th June, was my prompt to shoot a roll of film in my Zeiss Ikon Cocarette 519/15 for '116 Day'. I had intentions of shooting more, but I'd been working all day on the day itself, so only went out in the early evening, which had become overcast, and took a walk, following a route familiar from earlier in the year, my allowed daily exercise during lockdown and recovery. I shot a roll of Verichrome Pan, usually quite reliable for a fairly out-of-date film, and with no new film in the 116 format for decades, expired film is the only alternative to some form of conversion to use 120 medium format film or rolling film (120 or 65mm) with 116 backing paper; using an expired roll of 116 provides a spool and backing paper in order to be able to do this.

The Verichrome Pan had a 'develop before' date of June 1972, and I rated it at 24 against its original speed of 125 ISO. As a result, I took all the photographs using a tripod, with speeds varying from 1/5th through to 6 seconds; although I could have used smaller apertures and longer exposures, the camera did not feel especially sturdy on the tripod I was using and there was a bit of wind when I was taking the photographs to contend with too.

Kodak Verichrome Pan, process before date of June 1972
I stand developed the film in Ars-Imago #9, diluted 1+100, a developer replicating the original Agfa Rodinal formula (earlier in the year, when I bought this developer, it seemed very hard to find Rodinal in the UK, and I did wonder whether this might have been due to the UK leaving the EU, given that all the versions of Rodinal I've used come from manufacturers in the EU: Adox Rodinal/Adonal, Compard R09 One Shot, Fomadon R09). In terms of exposure, the results were acceptable enough in the main: with only eight frames on the roll, I didn't want to bracket any shots; I had one accidental light leak due to not properly aligning the shutter to the T setting and the shutter didn't close properly. There were some scratches on most frames, more prominent in some than others. On a couple, the focus was off, a problem I've realised that the Cocarette suffers from. I've ascertained that infinity is closer to the 30ft mark on the focus lever than the infinity stop, and I've assumed that each focus mark was offset the same, although I haven't properly checked this with measuring each focus mark. Focus issues besides, six frames felt worth posting; perhaps the best shot from the roll is the one at the top of this post, the last frame on the roll, just as the clouds began to lift.


Wednesday, 15 March 2017

Expired Film Day 2017


For last year's Expired Film Day, I shot some large format photographs that I used for a piece that I made featuring a long roll of contact prints on transparency film for an exhibition. This year I wanted to do something different for the day: shoot a short film on expired film. I've recently been using a fifty-year old 8mm camera, the Canon Cine Zoom 512, and so it seemed fitting to attempt to shoot something with it today.

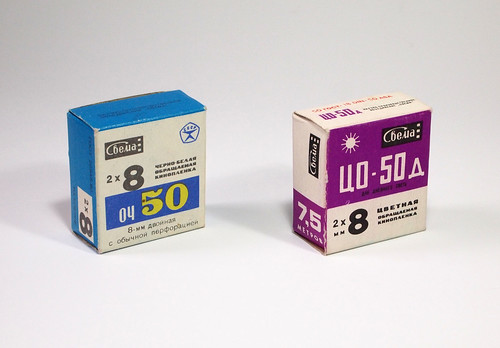
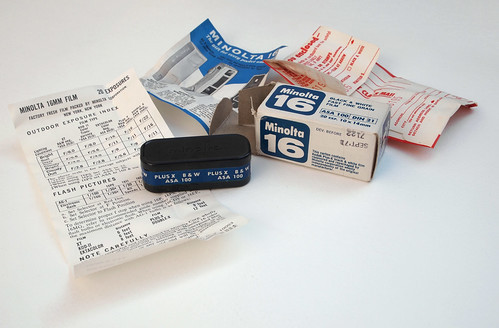
Svema Och 50 black & white and CO-50D colour reversal films
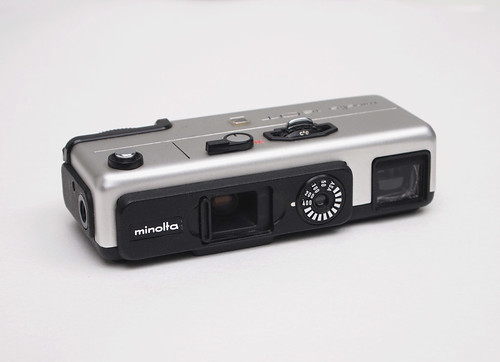
I'd previously bought a couple of rolls of Svema 8mm film from a well-known auction site, OCh-50 black and white reversal film and CO-50D daylight colour reversal film, with develop before dates of 04/91 and 05/91 respectively. I tested these films with the Mamiya-16 Automatic: as 'regular' or 'double' 8mm film is 16mm and only split to 8mm after processing, this would fit in the subminiature camera like any other 16mm film. I shot both films at a range of exposure indices to see how much compensation I might need to make for the film's loss of sensitivity with age. Both black and white and colour films were stand developed in RO9 One Shot for one hour.

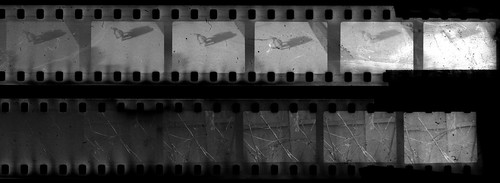
Svema CO-50D (top) and Och 50 (bottom) exposure tests
As both films are designed for reversal processing, they both feature a colloidal silver anti-halation layer. This means that they cannot be fixed as negatives: the anti-halation layer would normally be removed in the bleaching stage. After developing to the negative stage, attempts to fix the film result in it darkening a great deal without the base becoming clear. Without the necessary chemicals for reversal processing, instead I developed to the negative stage, and then scanned the unfixed negatives.

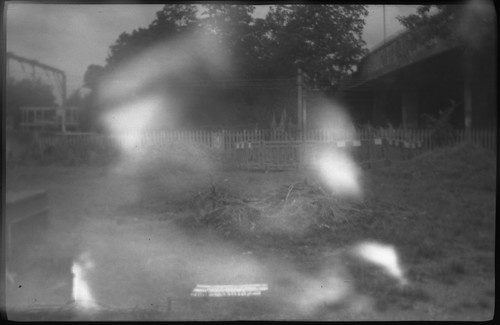
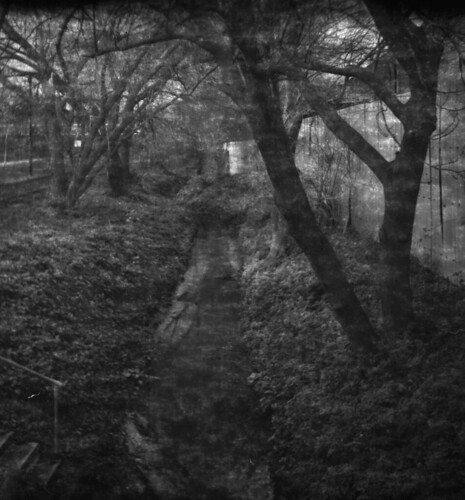
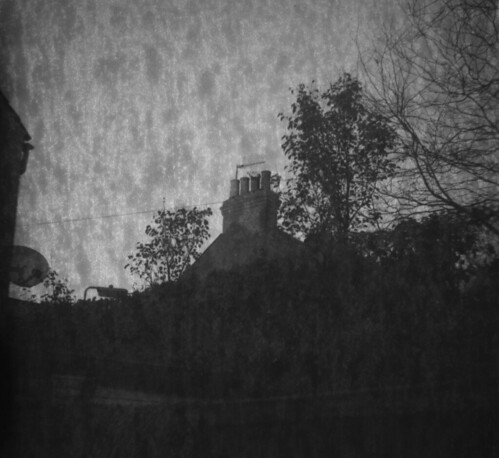
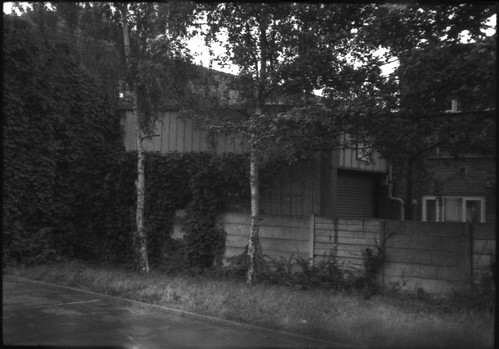
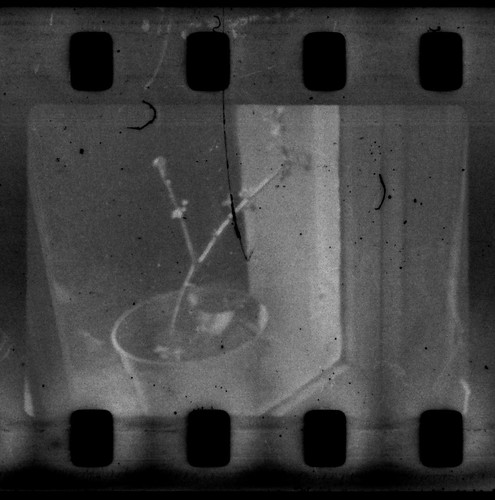
Svema Och 50 shot with Mamiya-16 Automatic at 3EI
The black and white film, Och 50 did not produce as good results as the colour film as it had seemingly lost more sensitivity with the passing of time; in addition, the CO-50D as a negative had a fairly uniform yellow cast, which, when removed in Photoshop, gave a better tonal range. Regardless, both films were fogged and showed typical degradation, and the small size of the negatives enhanced these qualities far more than a large format would.

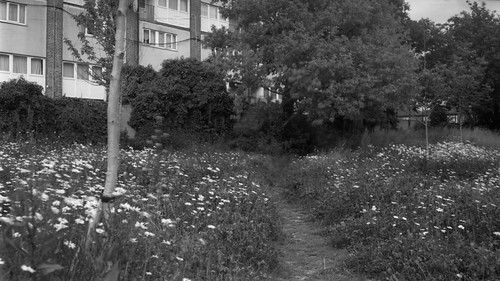
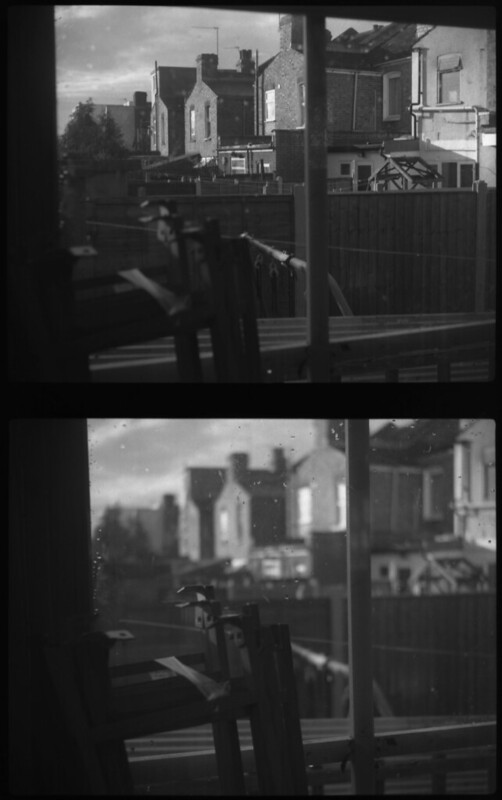
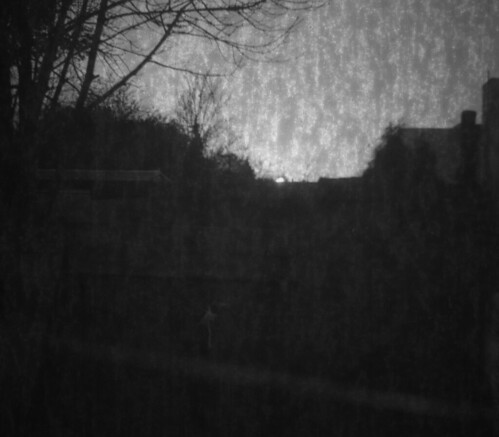
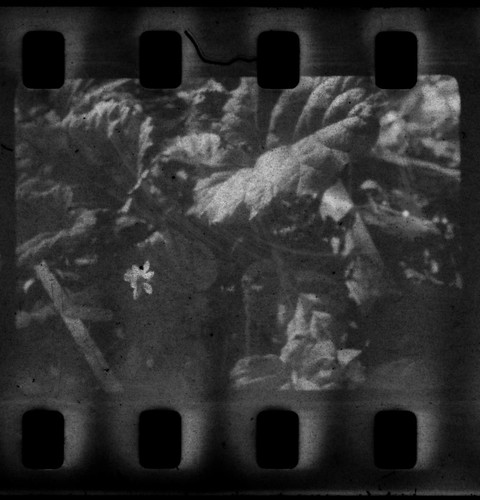
Svema CO-50D shot with Mamiya-16 Automatic at 12EI
Having tested both films, I cut two five-foot lengths from each, for the practical reason that this is as much film as I can develop in my universal tank at a time. To get as long a film as possible from a five foot length of film, I shot at a low rate of 8 frames a second, meaning that, at 80 frames a foot, I'd have about fifty seconds for each side of each length of film. As well as providing a longer running time, the lower frame rate also has a slower shutter speed, critical for ensuring the film had sufficient exposure. Normally double 8mm film would be daylight loaded, and the start and end of the reel would be exposed in loading, and this would be taken into account when shooting. I denied myself the luxury of doing this, so had to thread the film through the camera's film gate in the dark, and, given the way the film has to pass through the camera twice, reload the film in the dark too.

For the content of the film, I wanted something which would reflect the nature of the double-8 format in a structural manner. From using the film previously, I was struck by the rotational symmetry of the unsplit, full width of the 16mm film, with two sets of frames running in different directions, but didn't feel it was appropriate to show the full width of the film in its final presentation. In addition, the end of one set of frames on one side of the film becomes the beginning of the second set of frames on the other side; I imagined that it might theoretically be possible to loop unsplit double 8 film in such a way that it might run through a 16mm projector, showing both sets of frames, one upside down and running in reverse, but at the join of the film into a loop, this would flip over and run the right way around and continuously do so. This notional film loop that could flip from backwards to forwards might take the form of a Möbius strip.

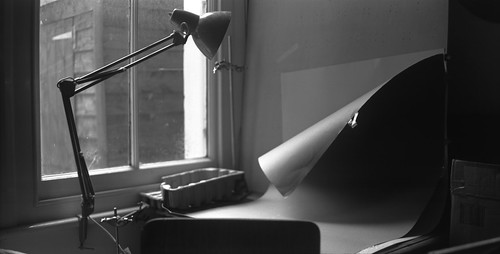
Moving from imaginary, theoretical loops to the film I made, I chose to shoot myself making a Möbius strip from a sheet of paper printed with a gradient from black to white, printed in different directions on each side, as a way of conveying the idea of one continuous surface: connected in a straight loop, the paper would have an abrupt transition from dark to light at the join, but twisted around, this join would be at the end of a gradient, dark on one side of the paper, light on the other, but continually shading from one to the other.

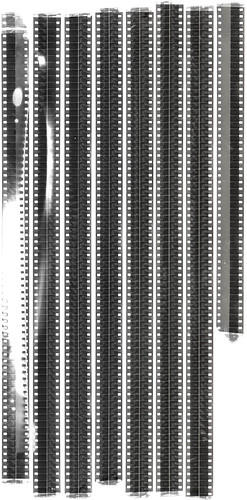
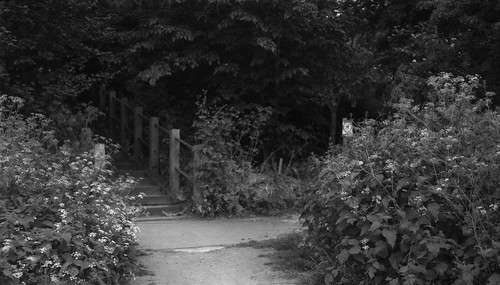
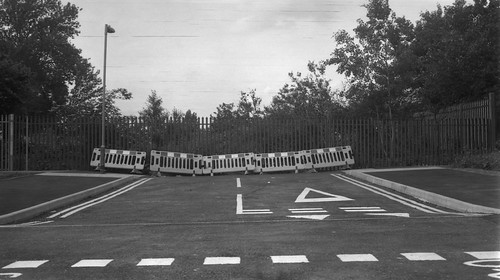
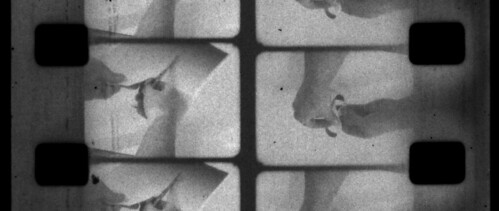
Double 8 unfixed negative scan
I filmed myself cutting and joining the printed paper twice, once on the Och 50 film, the second time using the CO-50D; for both, on the first run of the film through the camera, I cut the strip out, then flipping the film over in the camera in a dark bag, I shot the second side and joined the cut strip into the Möbius band. I stand-developed both films in RO9 One Shot for one hour at a dilution of 1+100; the second take I knew to be the better one, and exposing at an exposure index of 12 rather than 3 meant I was able to stop down the Canon Cine Zoom lens a small amount. However, I'd given myself nearer to 6 feet rather than 5 with the CO-50D, and it would not all fit on the developing reel: the white patches on the scan above are where the loose end of the film wrapped around itself on the outside of the reel. Once washed and dried, I scanned the unfixed negative by cutting it into strips and taping it to a sheet of paper. Inverted to a positive, the film was animated in Photoshop in individual sections, with each section also rotated through 180º and the frames reversed so that the upside down and backwards running right hand frames would then be on the left and running in the right direction; each section was then edited together so that when animated, the whole width of the film would fill the frame and it would flip over in the middle, and, in theory, loop and play all over again.

Sunday, 19 June 2016

'116 Day'

Zeiss Ikon Cocarette with HP5 Plus
Last weekend, on the day before 126 Day, I shot film in my two 116 format cameras. I'd had a Zeiss Ikon Cocarette for some time with which I'd previously used some 120 film, and had intended to write about, but taking photographs on the date of 11/6 this year was prompted by acquiring a Kodak No.2A Brownie in the format a few weeks ago. 116 was a paper-backed rollfilm, very much like 120, but the film was 70mm wide (compared to 120's 62mm), and the typical frame size for the format is nominally 6.5x11cm. Kodak discontinued manufacture of 116 film in the mid-1980s, but there are many 116 cameras still around, and to use them can be done with essentially three strategies: using original, expired 116 film; using other 70mm film stock in the cameras; or adapting the cameras to use 120 film.

Kodacolor colour negative films
Fortunately, both 116 cameras had the original metal spools in left in the supply side chamber when I bought them, and, online, I found a couple of rolls of Kodacolor negative film to shoot on the day. These dated back to the late 1950s and early 1960s with 'process before' dates of July 1961 and November 1964. Originally 32 ASA, I rated the films using a rough approximation at around 6 to compensate for loss of sensitivity with age. I shot one roll in the Cocarette, handheld, as this had a much faster lens than the Brownie, and, although I mostly shot at f4.5 with 1/50th, these negatives were predictably underexposed.

Zeiss Ikon Cocarette with expired Kodacolor film
With the No.2A Brownie, with a maximum aperture of around f11, and an 'instant' setting around 1/30th, I shot all the frames of the Kodacolor film on the T setting. As the camera does not have tripod mounts, I also had to find flat surfaces to place the camera for these exposures, stopping down the Brownie's meniscus lens to f16 or f22, and using times in seconds up to about a minute. The Kodacolor films were meant for C22 processing, a precursor to the current C41, but I used stand development in R09 One Shot to produce a monochrome negative. The orange mask on the negatives appears darker than current colour negative film, and as a result of the size of the images, I had to resort to photographing the negatives on a light box rather than scanning.

Kodak No.2A Brownie with expired Kodacolor film
The images from the Brownie camera were much clearer than those from the Cocarette, thanks to having received sufficient exposure to compensate for age; I also had problems with the focus of the Cocarette. As well as the Kodacolor film, I also shot a couple of 120 film with the camera, adapting it to take the smaller spools. With the lens positioned at infinity, the focus is notably soft. I suspect that this is just behind infinity, as the whole image has a softness, not just in the far distance, but this was something I had failed to check before shooting with the camera on the day, although earlier tests had suggested a problem. The image below demonstrates this, though it's only clear when zoomed in. It may also be due to a lack of film flatness, evident at the top and bottom of some of the images on 120 film with a further loss of focus and straight lines beginning to curl.

Zeiss Ikon Cocarette with Agfa Superpan
As the Kodacolor shots with the Cocarette were all at wider apertures, this would no doubt have been worse, however, on shots which were not focussed at infinity, the sharpness is much better, even in the underexposed image below of the daisies.

Zeiss Ikon Cocarette with expired Kodacolor
With the 120 film shot in the Cocarette, those images in better focus were those that were again not set at infinity: in the first image below, I estimated the focus to be around 30 feet to the detritus in the middle distance, and used a small enough aperture for depth of field to encompass most of the scene; the following two images were shot with much closer focus, but equally are better than those at infinity.

Zeiss Ikon Cocarette with HP5 Plus
Zeiss Ikon Cocarette with Agfa Superpan
Using 120 film in a 116 camera does make for an attractively proportioned image in landscape orientation; beyond the scope of this post, there's a fair amount on the net from others about how to do this but it's something that deserves a separate post in itself for a future date.

Zeiss Ikon Cocarette with Ilford HP5 Plus


Monday, 8 December 2014

127 Day - Winter 2014

Studio window, Baby Ikonta with Ilford Selochrome
One aspect of taking photographs on certain annual recurring days, such as the '127 Days', is that repetition can become an archive when photographing the same scenes as time (and the seasons) passes, such as the shot of Dagenham Brook below, which I had shot in July; in December last year, I took a walk along the same route I'd taken the year before. For yesterday's 127 Day I had one roll of Ilford Selochrome with a develop before date of January 1970 which I hadn't shot on this year's 127 Day in July. I also shot two rolls of Kodak Verichrome Pan in 828 format with a develop before date of August 1974 which I'd rolled with 127 backing paper, and similarly, a roll of 35mm Rollei ATO 2.1 Supergraphic. All films were shot with my Zeiss Ikon Ikonta 520/18 - otherwise known as the 'Baby Ikonta'. I shot half the roll of Selochrome around the house, which allowed me to make a couple of diptychs shooting through windows, and, although the skies briefly cleared, by the time I went out to take some more photographs, it was a typically grey December afternoon (the weather being one reason I tend not to shoot on 27th January, the other 1/27 in the calendar when written in the form used commonly in the US).

Dagenham Brook, Kodak Verichrome Pan
Both rolls of Verichrome Pan exhibited very pronounced texturing from the backing paper. The Ilford Selochrome also showed a trace of this effect, but having retained more sensitivity, with a denser negative this was much less apparent and only really showed up in shots which were underexposed. The lighting conditions weren't sympathetic to shooting the Verichrome Pan film with a slower rating than 50 EI which may have helped. The film also had a very strong curl which caused problems with film flatness: it seems this was enough to force back the camera's pressure plate in a number of shots.

Kodak Verichrome Pan, showing a lack of film flatness
The poor lighting conditions were less than ideal for using Rollei ATO 2.1, which has a nominal rating of 25 ISO, but performs better at lower exposure indexes, and, unlike July this year, I did not have a tripod with me for longer exposures (most of the shots illustrating this post were at fairly wide apertures and at shutter speeds of either 1/50th or 1/25th). The image below was the best shot from the roll of ATO; I attempted some shots at 1/10th, but the Baby Ikonta's shutter was beginning to stick at that speed.

Leyton Sign, Rollei ATO 2.1
All films were stand developed in Ilfotec LC29 for one hour, at 1:100, except for the ATO 2.1, for which I used a dilution of 1:200. As I was developing the first couple of rolls of film, the clouds began to break up again in time for the sun to set and I shot the second roll of Verichrome Pan.

Winter Afternoon, Kodak Verichrome Pan
Sunset, Kodak Verichrome Pan

Sunday, 17 August 2014

Minolta 16 QT

Minolta 16 QT
The Minolta 16 QT was the last of Minolta's 16mm subminiature cameras, a series that began with the Konan-16 Automat in 1947. Introduced in 1972, the QT coincided with the launch of Kodak's 110 format, which was the end for 16mm subminature cameras with proprietary cassettes (with a few exceptions). The following year, 1973, Minolta brought out the Pocket Autopak 50 for 110, while production of the Minolta 16 QT was discontinued a year later. The camera features more plastic in its construction than previous Minolta subminiature models, making for a lighter camera, and the design isn't dissimilar to that of contemporary 110 format cameras. The QT is notable for being the only Minolta 16mm camera that had a focussing lens: previous cameras had fixed focus lenses, and while some had built-in 'portrait' filters, clip-on filters were also provided for distance focus - some cameras would not provide sufficient depth of field at wide apertures to focus on infinity. Incidentally, the Minolta 16 QT can use close up filters initially designed for copy stand work with the Minolta-16 MG-S. The appeal of subminiature cameras is primarily their compact size: if the camera then needs accessories such as additional filters to focus on near and far objects, part of that appeal is diminished.

Minolta 16 QT with lens cover open
The lens is a Rokkor 23mm f3.5 with a sliding lens cover that also locks the shutter. Apertures are contiunously adjustable from f3.5 down to f22, this last aperture setting being smaller than most on subminiature cameras providing the QT with excellent depth of field - from 0.8m to infinity when set at the 2m or half-length figure mark. The aperture ring on top of the camera body accessed by pushing down the 'electric eye' button which activates the light meter. This shows 'O' when overexposed, 'K' for under, and both light at the correct exposure. The CDS light meter, with ASA settings from 50 to 400, is powered by a PX30 battery, accessed by opening the bottom plate for film loading. However, as battery only powers the meter, the shutter being mechanical, the camera itself will work without a battery and can be used manually. Operation of the camera is simplified by the use of just two shutter speeds: a switch on top of the camera selects either 1/250th or (picked out in red) 1/30th.

Minolta 16 QT bottom plate
The focus slider is located underneath the lens on the bottom plate with a series of pictograms: a mountain for infinity; full length figure (highlighted with a click stop for hyperfocal distance); half length figure; and head and shoulders. During the QT's production run this was changed to a distance scale in feet and metres (the settings are: 30ft/10m; 13ft/3.5m; 7ft/2m; 4ft/1.2m). The pictograms are also shown in the viewfinder with the selection highlighted. The viewfinder also has an outline for framing with crop marks for parallax and a red tab slides in at the top of the viewfinder to indicate when the shutter switch is set to 1/30th.

Minolta abandoned push-pull film advance after the Minolta 16 II. The QT's advance wheel is large enough to advance a frame without needing a large turn, being the subminiature equivalent of a single-stroke advance lever. The frame counter counts down 20 exposures after the 'S' mark for Start, to 'E' for empty, and although it is possible to shoot more than 20 frames, the counter remains at 'E' until the camera is opened, which resets the counter. The frame size was 12x17mm, just small enough to enable the use of single perforated 16mm film. The Minolta 16 QT also features a PC socket for flash with adjacent screw thread for its dedicated flash unit; and on the other side of the camera body is another screw thread for either hand strap or tripod. The camera case with belt loop has a rigid padded top to protect the electric eye button so as to prevent accidentally draining the battery.

Top: Kiev submminiature cassette
Bottom: Minolta 16 cassette
As described in my post about the Kiev-30M, the Kiev cameras were initially based on the Minolta 16 II, whereas Minolta continued to use the same cassette for all their cameras. Both cassettes have the same external dimensions, but the Kiev cassette was redesigned with a smaller take up spool to allow a greater length of film in the chamber. This means that Minolta cassettes will fit in Kiev subminature cameras, but not the other way around. With my recent interest in subminiature cameras, I picked up the QT at a low price in an online auction, but the camera did not come with a cassette.  Searching for one to use the camera, the cheapest I found was a box loaded with Kodak Plus-X with a 'develop before' date of September 1971. Incidentally, this film is older than the camera itself: in the box alongside the exposure instructions and process-paid envelope, there was also a sheet detailing the three models of Minolta 16 cameras then available: the Minolta 16 II, the MG and the PS (interestingly, the Minolta 16 II had a long producation run from 1957 to the early 1970s and was offered alongside the models that Minolta subsequently developed).

Kodak 16mm Plus-X repackaged in Minolta 16 cassette
As the film was well over forty years old, I assumed the Plus-X, originally 100 ISO, to have lost a fair amount of sensitivity. Without a battery, I used the 'sunny 16' to roughly calculate exposure, with  bracketing. Most of the shots were at 1/30th using wider apertures; when I developed the film I realised that some of the frames were out of focus because the hyperfocal click stop at 3.5m (or full length figure) only gives a depth of field at f8 and above, and many frames were shot at f5.6. I used stand development with Ilfotec LC29 for one hour diluted 1:100. With plenty of exposure to compensate for age, the Plus-X film performed well. The images below are scans from the negatives; doubtless prints from the negatives would provide better quality.

Minolta 16 QT with expired Kodak Plus-X
I subsequently reloaded the cassette with 16mm Kodak WL Surveillance 2210 film, which is also single perforated. Processed in the same manner, the images below are also scanned from the negatives. The old Plus-X film appears to show finer grain than the WL Surveillance, but again a better test would be printing from the negatives in the darkroom.

Minolta 16 QT with Kodak WL Surveillance Film 2210
Sources/further reading:
Minolta Subminiature Variations on Submin.com
Minolta 16 QT on Camerawiki.com
Minolta Subminiature cameras at SubClub.org