Showing posts with label MPP Micro Technical. Show all posts

Sunday, 3 May 2020

Worldwide Pinhole Photography Day 2020

Paper negative on Adox MCP 310 RC paper, inverted and flipped in Photoshop
Last Sunday was Worldwide Pinhole Photography Day. Being unable to go out to take photographs as in other years (although carrying around a large format camera, tripod and film holders could arguably be defined as exercise), I did want to mark the day and made four exposures in the garden using the MPP Micro-Technical Mk VIII camera with the 0.3mm pinhole lensboard I'd made for it. As the camera's focus moves the lensboard, the focal length can be changed: in the past I've shot pinhole photographs at a 'normal' angle of view for the 4x5 inch large format; here, I used approximately 100mm for the focal length, moderately wide. At longer focal lengths, exposure times start to get frustratingly long; the four photographs were taken successively over about an hour.

Having been working with paper negatives recently, I thought that I'd shoot a negative and a positive on photographic paper rather than use film or plates as on other years. The negative was shot on Adox MCP 310 RC paper, which I've used for some of the recent paper negatives and which, for variable contrast paper, has a certain amount of latitude. I did flash this to reduce contrast further, and used a light green filter.  I rated the paper at an exposure index of 12, and doubled the exposure time for the filter factor. Shooting on variable contrast paper, green is useful as a minus-magenta filter: the high contrast layer(s) in the paper are sensitive towards magenta. This seems to make sense to me; a similar result could probably be achieved by using a low-number Multigrade filter when shooting. The subject, raspberry canes, were lit with sun coming through the leaves of a tree, so this made for high-contrast subject to begin with. The positive was shot on Harman Direct Positive Paper. This is around ten years old, and the result wasn't as good as I had hoped. I rated this at 6, and flashed the paper. The highlights look overexposed, but the paper hasn't developed anywhere near dark enough. The shadows are all a mid grey, and there's the kind of texture running through it that one sometimes get when backing paper reacts with the emulsion on medium format film. The Harman Direct Positive Paper hasn't been stored with any care since I bought it a decade ago, so this might not be surprising, but I have had good results with other kinds of photographic papers of much older vintages. The image at the top of the post is the inverted paper negative, which worked well enough on its own.

Harman Direct Positive RC paper
Paper negative on Adox MCP 310 RC paper
I developed the paper in Ilford Multigrade paper developer diluted 1+20; the dilution of the developer doesn't seem to affect the contrast that much, but diluting it further than usual does make it easier to control the degree of development as it extends the time, although both papers in this case were left to develop to completion. This may not have helped the Harman Direct Positive Paper, but this doesn't explain the texture. I also shot two sheets of Rollei ATO 2.1 Supergraphic film, one of which was fogged, and developed these at the same time in the same paper developer; the negatives are high contrast, as one might expect. Currently without access to scanning for large format negatives, I made a contact print on Silverprint Solar Print paper - a form of ready-sensitised cyanotype paper, for which the contrast of the negative worked well.

Rollei ATO 2.1 Supergraphic film contact print on Solar Print paper

Monday, 29 April 2019

Worldwide Pinhole Photography Day 2019

Flights of Fancy pinhole camera with variable contrast paper
A couple of weeks prior to yesterday's Worldwide Pinhole Photography Day, I was given a Flights of Fancy pinhole photography kit, as well as an already constructed camera, which must have come from a second kit. The box itself contains everything necessary to build the camera and shoot and develop paper negatives: six sides of fibreboard that slot together to make the camera, a cover for the pinhole, a cardboard insert that the user pierces for the pinhole and which also holds the photographic paper, included, against the back of the camera for exposure. The kit contains three plastic trays, tongs, developer, fix, red gel to make a safelight and a booklet with a potted history of photography and full instructions. Although it's possible to use the camera simply held together with rubber bands, the constructed one had been glued. For the photographs, I used an already opened packet of 3x3-inch variable contrast paper which must have come with the kit of the already-constructed camera.

Flights of Fancy pinhole photography kit
I hadn't made any tests before using the camera yesterday; I also did not measure the pinhole to ascertain its f-stop, and simply made exposures based on the guidelines in the instruction booklet; the weather was mostly overcast and the recommendations given were for 60 seconds 'overcast', or two minutes for 'dull daylight'. Rather than use the trays and chemicals provided (the developer bottle rattled when shaken, indicating that some of the chemical constituents had crystallised), I stand developed the paper in Ilfotec LC29 diluted 1+100, for one hour. The instructions with the kit suggest making contact prints on the paper provided; I scanned the paper negatives instead, and these scans were inverted with Photoshop to create positives.

Flights of Fancy pinhole camera with variable contrast paper
For a beginner, within its limitations, the Flights of Fancy pinhole kit might be a worthwhile introduction to pinhole photography. Although the exposures I'd estimated were not all that accurate,  I've posted the images here as I was following the guidelines provided with the kit, rather than relying on experience, partly to test the instructions. I can also envision a few ways in which the kit could also be modified - a metal pinhole rather than black card, better seals to prevent light leaks, and a tripod fitting, for example (I rested the camera on any flat surface available during exposure, and the rubber band, around the whole body to keep the top secure meant that it did not sit entirely flat, leading to the camera shake seen in the second to last image above).

MPP Micro-Technical camera with Ilford HP5 Plus
However, needing to unload and reload the Flights of Fancy box camera in a changing bag for each shot meant that I only exposed four sheets of paper with it over the course of the day; I also used a pinhole lensboard on my MPP Micro-Technical Mark VIII to shoot some paper negatives and a roll of medium format Ilford HP5 Plus. With HP5 Plus, the exposures were metered and measured out in seconds rather than minutes, the paper needed considerably longer. The weather was mostly overcast, with some very brief sunshine, at the tail end of a storm that had passed over the UK; for some shots I was concerned about wind shaking the tripod, although the softness of the pinhole images probably disguises this more than adequately.

MPP Micro-Technical camera with grade 2 Ilfospeed paper
For the paper negatives with the MPP, I used a home-made 9x12cm-to-4x5 inch adaptor; I had originally made this to use the Rada rollfilm back on the MPP with a 6x6 mask, but 9x12cm plate would also fit. Shooting long exposures outside showed that this was not especially light-tight when the darkslides of the holders were removed, and some of the paper negatives were spoiled with light leaks, present on the two images shown here to a greater or lesser degree. The paper I used for these was from an old box of grade 2 Ilfospeed resin coated paper which has a label dating to 1977; I also flashed the paper in the darkroom. As with the Flights of Fancy camera, the 9x12cm paper negatives were stand developed in Ilfotec LC29 diluted 1+100, for one hour, as a means to reduce contrast further.

MPP Micro-Technical camera with grade 2 Ilfospeed paper
In the past when using a pinhole with the MPP Micro-Technical camera, I have tended to position the lensboard at a 'normal' focal length (150mm-180mm); when shooting yesterday, I used 50mm-75mm, partly to facilitate shorter exposure times. Although both the 9x12cm paper negatives and the rollfilm represented some cropping on the 4x5-inch format, the 6x9cm frames of the latter considerably so, at these focal lengths, all the shots could firmly be defined as wide angle. I very rarely use wide angle lenses in any format, and I did find it hard to compose the shots with this in mind; however, with the relatively short exposures provided by using HP5 Plus - in comparison to the paper negatives - that the skies have relatively good definition (which in retrospect could have been improved using a yellow filter with little effect on exposure times) almost certainly adds structurally to what the compositions are lacking in the subject matter, the one exception from these considerations being the shot, immediately below, of a tree, where the wide angle emphasises the splaying of both roots and branches.

MPP Micro-Technical camera with Ilford HP5 Plus

Tuesday, 31 January 2017

The Image Circle

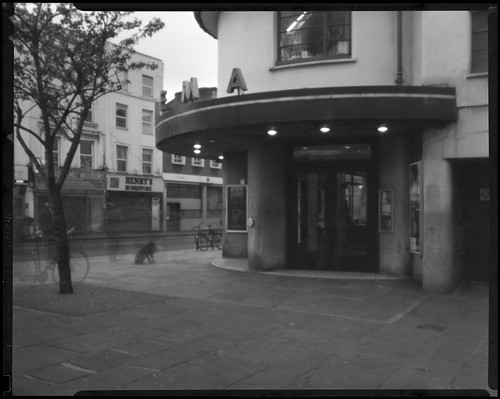
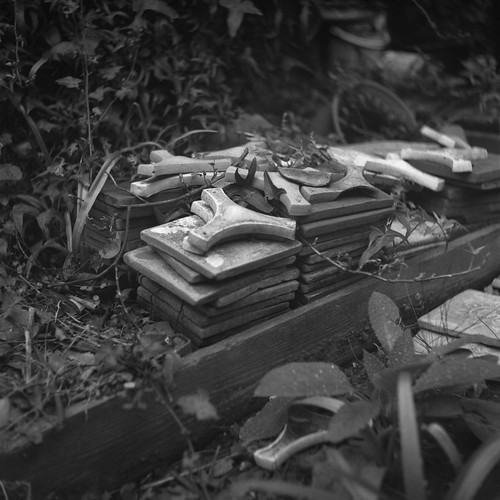
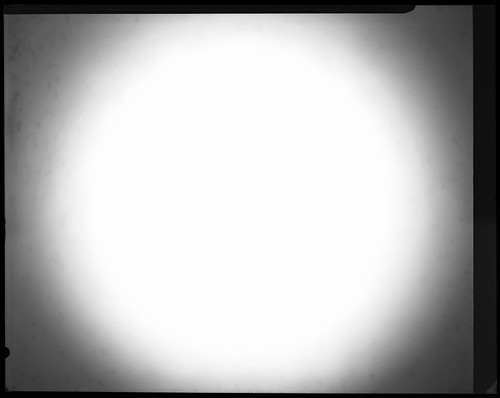
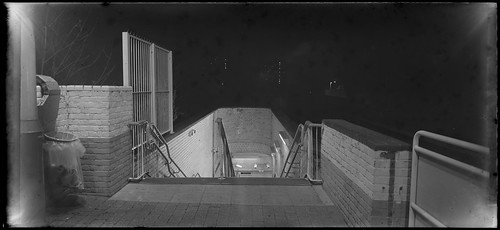
Jupiter-8 50mm lens with Ilford FP4
“All lenses, regardless of format, project a circular image, and the rectangular film format must fit within this image-circle. With a small camera, a high-quality image is required within the film area, and the remainder of the image circle is disregarded. A view camera, on the other hand, requires an image-circle considerably larger than the film area, to allow freedom to use the camera adjustments. A lens’s covering power or coverage refers to the total image-circle; it is a fixed quantity, regardless of the film format, and is not a function of focal length.”
Ansel Adams, The Camera
The rectangular photographic image is a convention derived by the historically existing relationship to painting and other graphic arts (note, for example, the use of the term ‘print’ for the photographic image on paper), and this frame is built in to the technology itself. The rectangle has much to recommend it, but it is not inherent to the photographic image. The image that a lens forms is circular; the rectangular frame is ultimately a legacy of architecture via the portable easel painting (tracing this legacy further back, cave paintings and rock art do not have definable edges: organic surfaces and surface decoration are essentially integrated). Of course, many photographs have been framed in a circular fashion - the first Kodak camera used a circular mask to make round images, and for Polaroid cameras, the Impossible Project make an instant film with a round frame - but these are a vestigial reminder of the fact that an image produced by a lens is circular - again, it is as likely that this alternative convention of the round frame is derived from painting (the portrait miniature, as many daguerreotypes were originally presented) and architecture, and perhaps also the experience of viewing images produced by other lens-based technologies such as telescopes and microscopes, around long before photography. Given the construction of the eye, specifically that the eye has a lens analogous to the photographic lens, there is a direct relationship to human vision, in which one can never really perceive its edges; with binocular vision this becomes an awareness of a squashed oval visual field, where beyond the edge is simply an infinitude of nothing.

In Ansel Adams' quote above, the must in "the rectangular film format must fit within this image-circle" was something I wanted to challenge. In photography, the circular image is only generally seen in extreme wide angles, such as the fish eye lens, and begins to announce its presence in the vignetting that accompanies simple lenses on cheap cameras (as with the Diana and the V. P. Twin). I wanted to achieve something other than a distorted image, which would obscure the object of this exercise: the distorted image would be remarkable for those qualities, not merely for being circular.

Demaria-Lapierre 75mm Manar Anastigmat lens
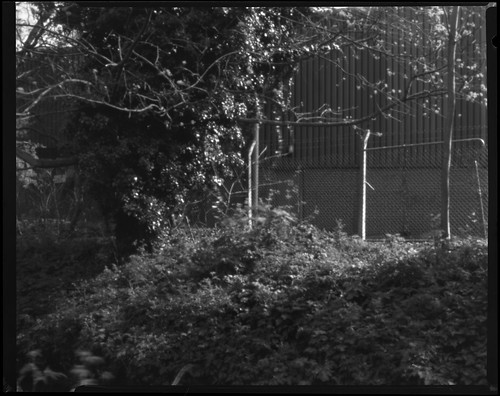
The first photographs used a 75mm f3.5 Manar Anastigmat lens, which originally came from a Dehel medium format folding camera, of which I converted the body to make my 
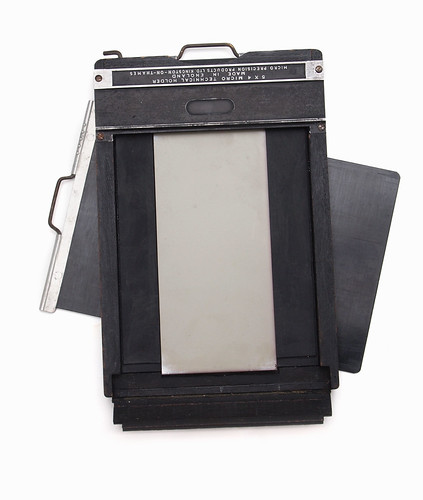
127 format film cutter. Although the Dehel camera was 6x4.5, a 75mm focal length lens would equally be used for a square 6x6 format; the lens itself just happened to be the right size to fit on a conical lens board for the Micro-Technical Mk VIII. I used the Mk VIII as the folding bed can be dropped to two different positions, an important factor if this is not to intrude into the picture itself with such a wide angle lens (the angle of view itself being a relationship of focal length to image size - on the 6x4.5 negative format, 75mm represents a 'normal' angle of view). Although the edges of the image circle can be seen with the 75mm lens, the whole circle is too large to fit on the 4x5 negative. I had assumed that, as a fairly cheap triplet lens, the Manar's coverage would not be very good, but this was better than expected.

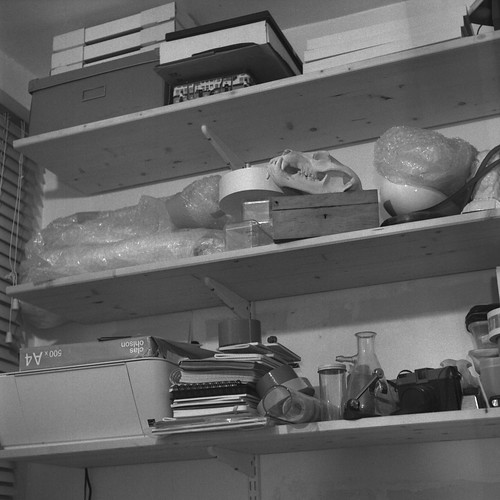
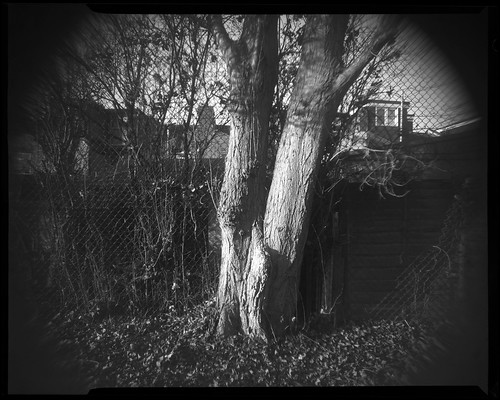
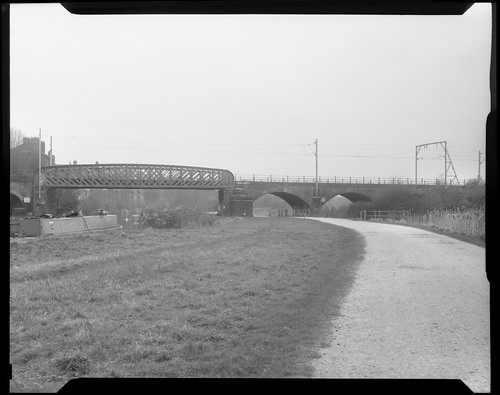
75mm Manar Anastigmat on Kodak Plus-X
75mm Manar Anastigmat with Ilford FP4
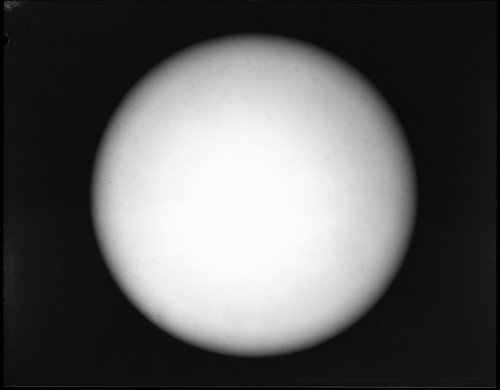
As part of this exercise, I did also photograph a white wall, unfocussed, in order to see the effect more clearly. I began with the assumption that a small aperture would provide better coverage but found that this was not the case (this was something I'd read about coverage in relation to using camera movements in large format; I wanted as small an image circle as was possible, hence using wide apertures); in the shots taken with the Manar lens, the clearest circle is that taken at f32, fairly obvious in the two comparisons below - although it is true to say that the definition at the edges is better and therefore a smaller aperture may describe a larger usable image circle, without the circle itself being any larger - indeed, the circle appears slightly smaller.

75mm Manar Anastigmat at f5.6 on Ilford FP4 film
75mm Manar Anastigmat st f32 on Ilford FP4 film
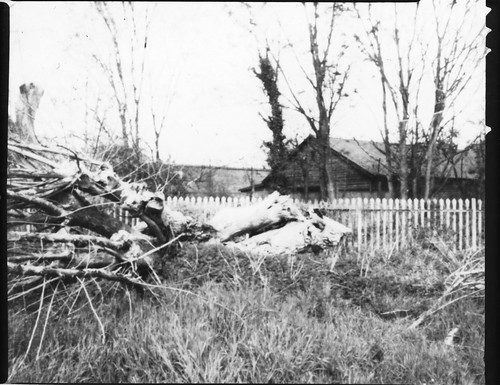
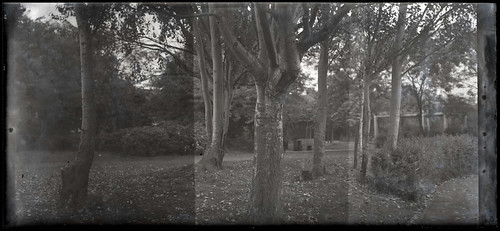
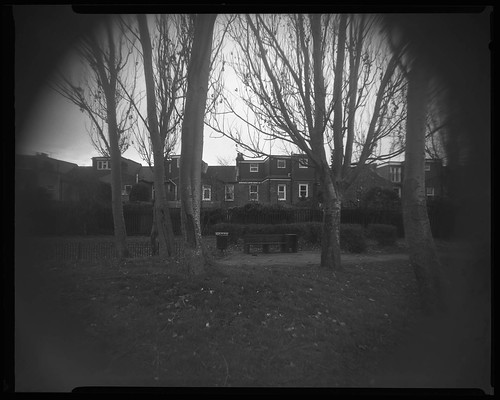
When extending the lens to close focus, the image circle expands to fill whole film area, as below, with only very little distortion visible in the corners; focussing even closer could have made this distortion fall outside the area of the film completely.

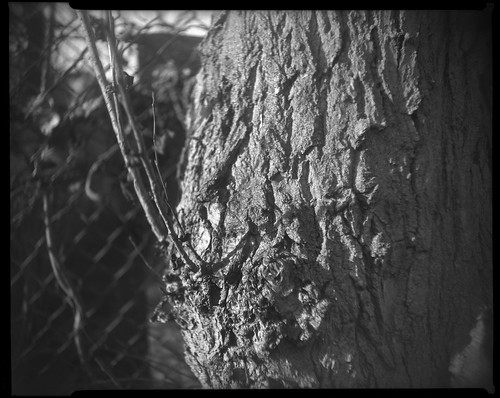
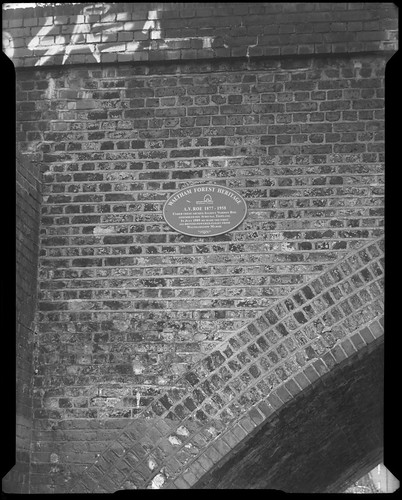
74mm Manar Anastigmat with Ilford FP4
Although the photographs shot at small apertures produced a fairly clear circle, it was larger than the 4x5-inch film format; to produce a 
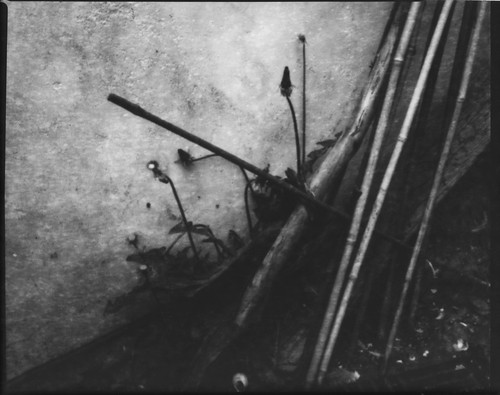
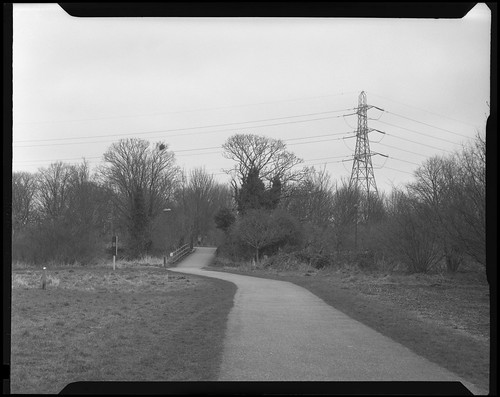
complete circle, with a sharp image and clean edge, I used the Jupiter-8 f2 50mm lens from my Kiev-4, as this has a protruding, narrow rear element - a function of it not having a focussing helical built into the lens. This meant that it was relatively easy to fix it into a lensboard, improvised with card retaining rings (holding the red infinity tab) and rubber bands. Unlike the Manar lens, the Jupiter-8 does not have a shutter, which meant that exposures had to be made by the simple expedient of removing then replacing the lens cap. This created some problems in terms of exposure: I was still working on the assumption that smaller apertures would give better coverage.
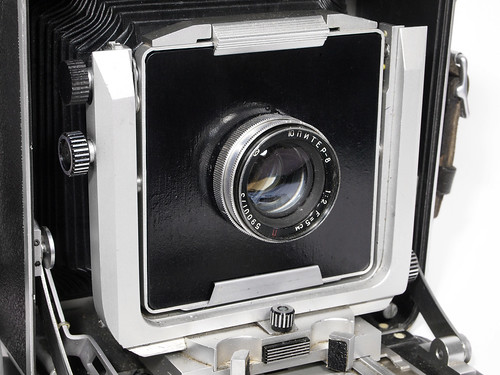
Jupiter-8 50mm lens
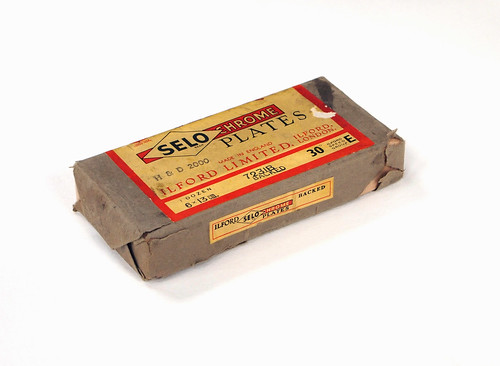
The first photographs with both lenses I shot on Ilford FP4, which, even rating at 64 to compensate for age (the film has a date hand written on the box 11/4/78, with the label printing dating to June 1976), made it difficult to attempt exposures of less than 1/2 a second by hand, and, in addition, the weather was sunny and bright. I did also take some photographs on Rollei ATO 2.1, rated at 6, which did provide long enough exposure times, but the high contrast images did not really convey the effect I wanted to achieve clearly: again, I wanted the circular image to be the distinct feature of the photographs. I shot a second set of images on 
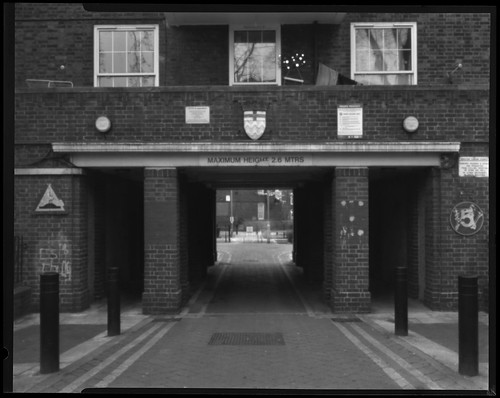
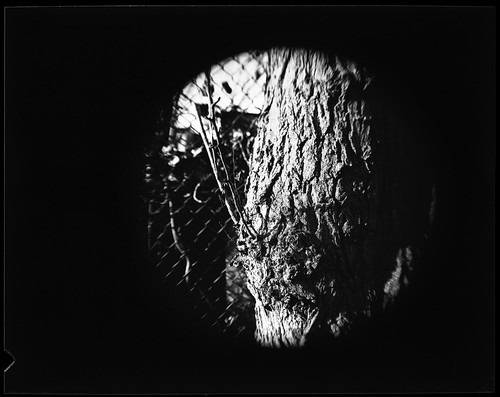
Kodak Plus-X rated 25, on an overcast day, which made it easier to shoot with the Jupiter-8 lens relatively wide open. As well as not having a shutter, the 50mm lens also had a problem in that it could not be placed far back enough into the camera to achieve infinity focus, which is the reason for the images below being close focused: with the front standard racked back into the camera body as far as possible, I moved the camera and tripod forward until the image came into focus. In order to place the lens further back, a recessed lens board would be required (this should also, in theory, make the image circle smaller).


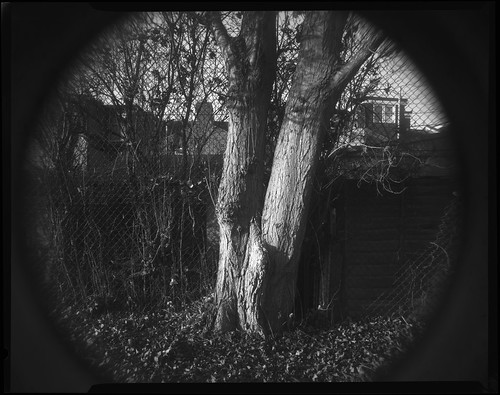
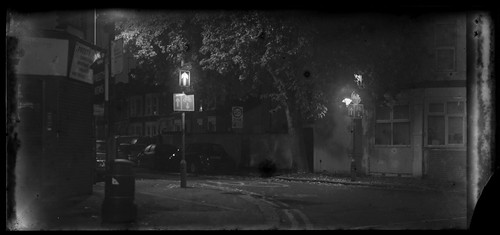
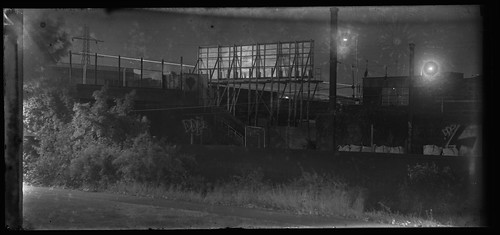
50mm Jupiter-8 lens with Rollei ATO 2.1
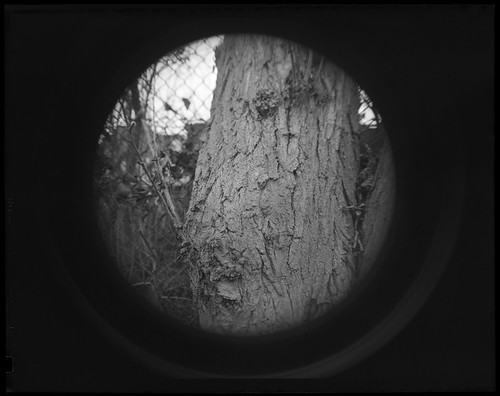
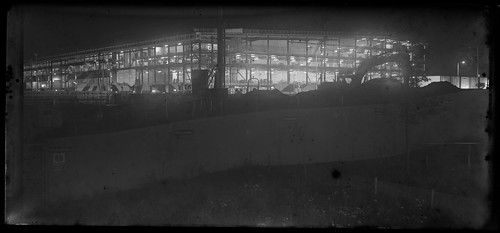
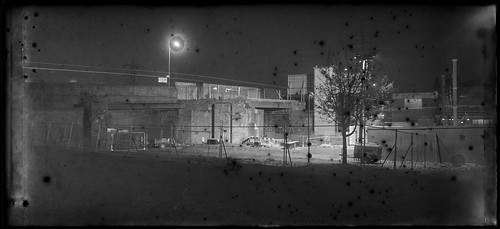
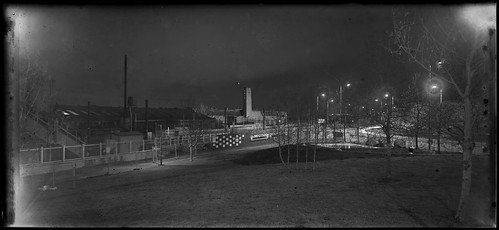
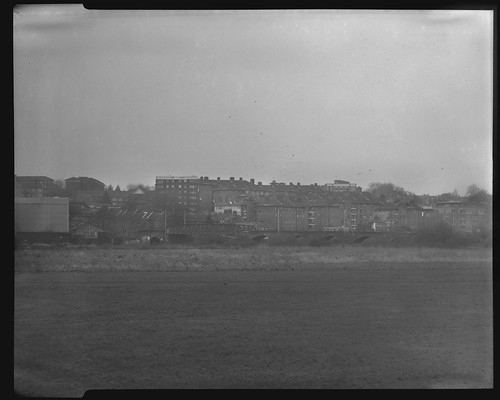
Jupiter-8 50mm lens with Kodak Plus-X
The Jupiter-8 lens made a circular image onto the film with surprisingly little distortion, except at the very edges (a side effect of using smaller apertures is that both lenses appear to show some form of internal reflections in the camera, visible as rings around the image circle itself). With edge distortion being affected by aperture, further tests at smaller apertures with a recessed lensboard might provide even crisper, clearer circular images. Although this was simply an exercise to work through - in practical terms - some ideas about the intrinsic edge of the photographic image, I do think that there is something remarkable about the idea that, in almost every photograph you have ever seen, the image formed by the lens has been cropped by the camera.

References
Ansel Adams, The Camera, Little, Brown and Company, New York 1980, twelfth paperback printing, 2005.
Alan Horder (editor), The Manual of Photography, sixth edition, Focal Press Limited 1971

Saturday, 30 April 2016

Worldwide Pinhole Photography Day 2016

Harman Direct Positive Paper
Last weekend, for Worldwide Pinhole Photography Day, I shot exclusively large format film and paper. Using a pinhole lensboard with my MPP Micro-Technical camera provided more flexibility than the cardboard cameras I'd made two years ago to shoot glass plates, four cameras constructed in two different sizes. In order to shoot more than just four pinhole photographs, I had taken boxes of plates and a changing bag with me to reload the cameras; the limit to using large format was how many 4x5 film holders I had. I made a pinhole using a piece of metal from a drinks can and rotating a needle to pierce it, fitting it behind a home-made lensboard. Measuring the hole by scanning it at maximum resolution gave a measurement of 0.2mm, although as I could only measure this down to one decimal place, it provided a margin of error to all other calculations. At a focal length of 150mm, this provides an aperture of f750. I shot some test photographs with this pinhole to find the resulting images less sharp than anticipated, realising afterwards this was due to the diffraction effect provided by small apertures.

MPP Micro-Technical Mk VI with pinhole lensboard
The website Mr Pinhole has a useful table to help calculate an optimum pinhole size for a given focal length. At 150mm this was given as 0.5mm. Carefully enlarging the pinhole and measuring it a few steps at a time, produced a pinhole of 0.6mm. At 150mm, this would be f250; extending the bellows to 180mm would mean f300, both convenient round numbers. The lensboard could be placed anywhere on the triple extension of the MPP, but short focal lengths would mean a loss of detail due to too wide an f-stop (as well as showing the folding bed in the frame), and long focal lengths a loss of resolution due to diffraction again, as well as increasingly long exposure times. Ideally, one could make a number of pinholes with optimum sizes for a number of focal lengths, but I used one, mostly at a focal length of 150mm, with only a couple of shots at 180mm; it was easier to conceptualise each picture at a 'standard' angle of view as the ground glass couldn't be used.

Ilford FP4 with handwritten date '11/4/78', shot with 180mm focal length
Initially, I had considered only using Harman Direct Positive Paper, but after testing the paper the day before with rather mixed results, I decided to shoot film as well, using the FP4 and Plus-X from the 1970s that I'd shot on the recent Expired Film Day (I did also shoot a handful of glass plates but found these harder than the Direct Positive Paper to get a decent image with the pinhole I had made). The Direct Positive Paper I shot was over five years old, and the developer I used, PQ Universal, was probably as old, if not older, an unopened bottle having been given to me some years ago. I developed the paper in a tank like film rather than in trays, so I wasn't able to inspect the process, but even with developing times around ten minutes, the darkest tones never quite got dark enough. In addition, getting the exposure right with Direct Positive Paper is difficult enough given its high contrast, compounded by rapidly changing lighting conditions in the morning, with broken clouds moving quickly across the sky, as seen in this shot on FP4 with an eight second exposure.

Harman Direct Positive Paper
With relatively long exposures at an aperture around f250 and shooting the paper with an exposure index of 3, a number of shots were complicated by the light changing during the exposure itself: with exposure times in full sun calculated at around 90 seconds, I had a more than one shot when part-way through an exposure, the sun would disappear behind a cloud, and I had to try to re-calculate how much to extend the exposure with the light levels dropping three or four stops, as in the image above, and mostly erred on overexposure, with which the paper very quickly loses all highlight detail.

Harman Direct Positive Paper
Later in the day, conditions became overcast, which made using the Direct Positive Paper easier, not only with more consistent lighting, but also being inherently lower contrast. The images above, and at the top of this post, were taken in such lighting. The Direct Positive Paper does give a reversed image, which might mean avoiding shots with lettering being prominent; I shot the exterior of Doomed Gallery as I had an exhibit in the London Alternative Photography Collective exhibition over the weekend as part of the London Pinhole Festival - glass plate positives of the negatives shot on Worldwide Pinhole Photography Day two years ago. I also made another exposure on FP4 film as a comparison. As well as exposures in seconds rather than minutes, using film, even out of date film rated 64 and 25 for the FP4 and Plus-X respectively, both film's latitude and reciprocity failure helped achieve more consistent results.

Ilford FP4 with handwritten date on the box '11/4/78'
Kodak Plus-X, develop date before July 1972
See the whole set of pinhole photographs here.

Friday, 15 April 2016

Ilford Selochrome stereo plates

Ilford Selochrome Plates
Although my ongoing project of shooting old, previously unexposed photographic glass plates at night had become more sporadic in recent months (and I had been shooting plates in other situations such as the LAPC Photo Walk), a period of unseasonably warm nights last Autumn into December encouraged me to shoot more. Of the plates shot recently, a box of previously unopened Selochrome 6x13cm plates provided some interesting results due in part to the unusual format: the 6x13cm plate size is a stereo format; the box is the same size as the HP3 plates written about in the post 'Some odd sized glass plates', but those plates had been cut down by hand to a quarterplate length. The outer wrapping of the plates was torn and tatty, and the outer label itself isn't designed for the box: it's the same size as those used on 4x5 inch boxes, such that the label wraps around the box. The inner label under the wrapping is dated to February 1948.

As the plates are just a few millimetres too long to fit into 4x5 inch plates holders (5 inches being 127mm, although actual plate sizes vary a small amount), I converted two MPP holders which needed reconditioning. I made a cut in the bottom edge of the holders, which, being made from wood, was fairly easy to do, and removed enough material to sit the glass plates flush once loaded. These alterations were then painted matt black.

Detail of cut in bottom of holder
Interestingly, when removing the metal covers on the plateholders to access the felt light traps, I discovered that they had a similar slot already cut into the top edge of the holder, normally invisible. This was almost exactly the right size for the stereo plates.

Detail of slot in top of holder
I also found that some printed matter had been used to shim the metal covers to the right clearance for the darkslides, intriguing evidence of the hand-made nature of these wooden plateholders. To make sure the stereo plates sat securely in place, I also made card inserts in the manner detailed in my post on 'Glass plate adaptors'; I sacrificed one of the plates from the box as a template to ensure a good fit with both the alterations to the holders and the adaptors I'd made.

Completed conversion with plate loaded
Having used some 4x5 Selochrome plates before, of a similar age, I was hopeful that the box would contain usable plates; I shot a test plate with a starting exposure index of 50, and with three successive exposures on the plate, giving effective exposure indices of 50, 25, 12 from left to right,

Ilford Selochrome stereo plate test
The plates do show a number of features of age-related deterioration (aside from a broken corner) to the emulsion, although this was not consistent across the plates: some have a large amount of pinholing, while a couple have what appears to be 'star-burst' shapes of the emulsion lifting around a central point of stress. Most of the plates have strips along the edges where there's been a reaction to the cardboard runners holding the plates in pairs, although this is within the width of the rebate from the plateholders.

Ilford Selochrome plate shot with 16.5cm Tessar
Ilford Selochrome plate shot with 150mm Xenar
Ilford Selochrome plate shot with 90mm Angulon
Given that the stereo plate dimensions appear somewhat panoramic, I shot some of the plates with a 90mm Angulon lens - a lens I've hardly ever used for large format - which seemed more appropriate with the format (some stereo plate cameras, such as the Jumelle StĂ©reo-panoramique were designed to shoot both stereo pairs or single, panoramic images). I also used these plates to shoot three photographs of the rebuilding of a local station which has been disused for over thirty years.

Ilford Selochrome plate shot with 16.5cm Tessar
Ilford Selochrome plate shot with 90mm Angulon

Friday, 18 March 2016

Expired Film Day 2016

Kodak Plus-X, develop before date of July 1972
Having missed the last couple of 127 Days for a variety of reasons, on the 15th this week I participated in the new Expired Film Day ('Take Your Box Camera To Play Day' also happens to be this weekend, 18th-20th March). I frequently use decades-old photographic emulsions, notably in glass plate night photography. I did consider shooting some glass plates on the day, but instead, as part of an unrelated ongoing project of large format photographs around Walthamstow Marshes, I used the opportunity of Expired Film Day to shoot some 4x5 sheet film with the MPP Micro-Technical Mk VI: a box of Ilford FP4 with a hand written date of 11/4/78; Kodak Plus-X with a develop before date of July 1972; and Kodak Panchro-Royal, not dated, but the box looks older than the Plus-X, possibly 1960s. I had previously tested all three films to get a usable exposure index: the FP4 was rated half box speed, while the other two were shot at an exposure index of 25.

Ilford FP4, with handwritten date 11/4/78
Both the FP4 and Plus-X provided results which do not look like forty-year old film (and as such wouldn't win the Expired Film Day prize categories 'Most Obviously Expired Film' or 'Best Use of Overexposure'), but the Panchro-Royal clearly shows characteristic deterioration with age. I used both the 16.5cm Tessar and the Bausch & Lomb Rapid Rectilinear which I've written about in the post Old Lenses; the Rapid Rectilinear is the oldest lens I have, and so it seemed appropriate to use it for the day.

Kodak Plus-X, develop before date July 1972
Kodak Panchro-Royal sheet film, possibly 1960s
There's very little information on Kodak Panchro-Royal online, and this gave the worst performance of the three films I shot (the FP4 and Panchro-Royal came from the same collection of photographic material, and may - or may not - have been stored in the same conditions). As well as having much more obvious fog, it also suffered from a good deal of cusping, the film being far from flat, and this made scanning more difficult. Some of the shots were taken using only the rear elements of the Rapid Rectilinear lens, as described in Old Lenses, as the Panchro-Royal image above, and the shot below on Plus-X. All the sheet film was stand developed in R09 One Shot diluted 1+100 for one hour, partly due to developing all the films together, but some unevenness was evident in the development discernible in the featureless skies of most of the negatives.

Kodak Plus-X, develop before date July 1972
In addition to the sheet film I also finished a part-used roll of medium format Kodak Plus-X, which had a develop before date of 03/2006 - a neat ten years out of date. This was exposed at box speed and developed in R09 One Shot diluted 1+29 for 9 minutes at 20ÂșC. Incidentally, I had intended to use this time and dilution with Ilfotec LC29, and only realised my mistake when the wrong developer was mixed and in the tank. However, the times and dilutions being relatively similar, I stuck with the time for Ilfotec LC29, which resulted in perfectly usable negatives.

Medium format Kodak Plus-X, develop before March 2006