Showing posts with label box camera. Show all posts

Sunday, 4 February 2024

127 Day January 2024

Kodak Baby Brownie with Fomapan 200

Last weekend's 127 Day provided an excuse to use the Kodak Baby Brownie, the subject of my previous post. I had cut down two rolls of medium format film to 127 size and rolled these with the appropriate backing paper and spools: one roll of Kentmere Pan 400 and one of Fomapan 200. I shot the Kentmere Pan 400 first, then the Fomapan 200, but developed them in the reverse order. The lighting conditions had been light cloud giving way to hazy sunshine. When I took the roll of Fomapan 200 from the tank, the negatives looked very thin, something that I had noticed with the film shot in the Baby Brownie last summer. With hazy sunshine, and a nominal exposure of 1/50th at f16 (or however close to this the Baby Brownie's aperture and shutter speed are), a 200 ISO film should have given adequate results. Although a stop faster, given that the lighting was perhaps a little less bright for the Kentmere Pan 400, I extended development time to push it another stop. 

Kodak Baby Brownie with Kentmere Pan 400

The results from the Kentmere Pan 400 were much denser, and this push was probably unnecessary. I had used Kodak HC-110 for both films; a little research online reveals lots of comments about Fomapan 200 and HC-110 not being a good combination. I had used the times from the Massive Dev Chart, and when subsequently developing another roll of Fomapan 200 (not from the 127 Day), I pushed this a stop, and the results were much better (it would probably be preferable to rate the film a stop lower instead however).

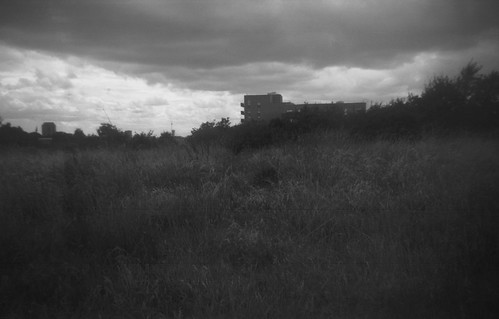
Another aspect of using the camera again was checking the lens' angle of view.I had suspected that this was wider than the viewfinder–probably to give the casual user a margin of error not to lose heads from the top of the frame–and took a couple of photographs with this in mind, particularly the one below. Here the shot was framed with the second pillars from the centre at the edge of the viewfinder, demonstrating that the actual shot is notably wider than what the viewfinder does show, although one wouldn't chose a Bakelite box camera from the 1930s or 40s if accuracy was really important, but worth bearing in mind.

Kodak Baby Brownie with Kentmere Pan 400

I had a few problems with development thanks to the slightly uneven cut edge of the film: the Kentmere Pan roll was a little taller once cut to fit well into the developing spiral, causing a little buckling and a few section of negatives not processing properly due to contact while developing. This also created a bit of a 'fat roll' with some light leaks as a result. By contrast the Fomapan cut much more smoothly, but scratched more easily in the process of being cut down, due I think to the emulsion being softer, and possibly the film substrate too. The thin negatives of the Fomapan film in combination with the choice of subject–as in the image at the top of this post–was vaguely reminiscent of Pictorialist landscape work, something not entirely unsympathetic in the use of a camera such as the Kodak Baby Brownie.

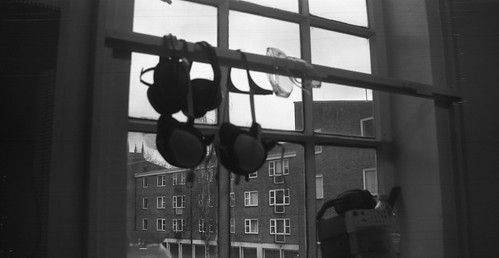
Kodak Baby Brownie with Kentmere Pan 400

Kodak Baby Brownie with Kentmere Pan 400

Kodak Baby Brownie with Kentmere Pan 400

Kodak Baby Brownie with Fomapan 200

Kodak Baby Brownie with Fomapan 200

Kodak Baby Brownie with Fomapan 200

Saturday, 27 January 2024

Kodak Baby Brownie

Kodak Baby Brownie

The emergence of plastic in the manufacture of cameras from the late 1920s into the 1930s allowed for the typical shape of the snapshot camera to radically change. The Kodak Baby Brownie with its Bakelite body, updates the simple, entry-level box camera. One imagines that it looked very modern when first produced, in comparison to Kodak's typical box camera, which only recently would have been made with a cardboard body. The Kodak Baby Brownie owes its distinctive styling to Walter Dorwin Teague who designed many cameras for Kodak: the vertical ribbed designs that run around the camera with the central roundel of the lens makes it a little reminiscent of an Art Deco radio set, while the curves and scalloped edges evoke light wooden furniture, a bureau or a cabinet perhaps. It was not Kodak's first plastic camera–according to Art Deco Cameras, Kodak Ltd in the UK had that honour with the No. 2 Hawkette–the Hawkette however was made for promotional purposes, not for general retail; according to numerous sources, 4 million Kodak Baby Brownies were produced over the two phases of its production either side of the Second World War.

It appears that the rationale behind the design of the Kodak Baby Brownie was Kodak's desire to return to the $1 price point of the original Brownie camera of 1900 (it's worth mentioning that this does not of course account for the effect of inflation over the thirty-odd years–a single dollar must have bought a lot more in 1900 compared to 1934, when the Baby Brownie appeared; the low price of the camera presumably reflects the economies of scale possible with Kodak's manufacturing in the mid-thirties). The Kodak Baby Brownie is simpler than the original Brownie too, partly due to the plastic construction. The meniscus lens is fixed-focus, with a fixed-aperture, and the rotary shutter has a single speed. Most sites profiling the camera do not usually provide lens and shutter specifications: Art Deco Cameras lists the lens' focal length as being 60mm, its aperture as f16 and the shutter speed at 1/50th; the manual states that "everything about five feet and beyond will be photographed sharply". It takes 127 format rollfilm, smaller and cheaper than 120, appropriately for a cheap camera appearing during the Depression, although it does use the 'full-frame' of the 127 format, nominally 4x6cm, giving eight exposures on a roll of 127 film–other cameras had already created the 'half-frame' 3x4cm negative size, which provides sixteen frames on a roll.

The Kodak Baby Brownie had two distinct periods of production. Kodak manufactured the Baby Brownie in the US until 1941; subsequently, Kodak Ltd in the UK made the camera between 1948-52. Given that there appears to be no observable differences between the US and UK made Baby Brownies, one wonders whether the dies and moulds were shipped out to the UK after the Second World War to boost the Kodak Ltd's postwar production, with the Baby Brownie, coming of the Depression, now a fitting camera for Austerity Britain, still in rationing. There was a slight variant model Kodak Baby Brownie for export, distinguished by a metal stud or pin above the lens. This is a 'time' setting: pull the stud out, and the shutter stays open when the shutter lever is pressed. The Brownie Camera Page states that this export version was made in the UK during the camera's second production run; my camera has the time setting, although the lettering on the bottom of the camera clearly reads "MADE IN USA". If exactly the same moulds were used for the UK-made camera (the time setting requiring a single small hole to be drilled through the front), this might explain this discrepancy, although I would have thought that any camera made in the UK would have to be marked as such. As well as the 'export variant' there was also a commemorative version made for the 1939 New York's World Fair, which has a rectangular name plate around the lens with this lettering: the camera itself has 'BABY BROWNIE' embossed around the lens.

Kodak Baby Brownie with viewfinder raised

I bought my Kodak Baby Brownie at the Place du Jeu de Balle flea market in Brussels in late spring last year for €10, haggled down from €15 (there were many other cameras there, but I was on a tight budget after a week abroad, and knowing that there's usually very little that can go wrong with a simple box camera, the Brownie seemed a safe investment). I used it last year on the 127 Day in July, but did not scan the negatives at the time, a couple of which illustrate this post below. When I bought the camera I wasn't aware of the export variant, but was pleased that was what I had, a small difference which does increase the conditions in which the camera can be used–although with some caveats, mentioned below. The modest size of the camera, with its curved and ribbed shape, as well as the Bakelite itself, does feel good in the hand, perhaps rather like an over-sized netsuke.

To open the camera for loading and unloading film, on the camera's base is a metal lever which pivots between OPEN/CLOSE (and sweeps over lettering stating the camera was made in the USA). The top slides out from the body with the film carrier attached. Opening the camera shows how simply it is constructed despite its Art Deco stylings: the camera is made from three pieces of Bakelite, the body, top plate, and film carrier, with a few metal fixings.

Kodak Baby Brownie - opened for loading

The the camera has a curved film plane, a common strategy to compensate for the limitations of a simple meniscus lens. The inside moulding is ribbed behind the lens inside counter reflections on the smooth Bakelite surface. One can also see that there's a metal stop behind the lens to reduce its aperture and increase definition, another frequent compensation for the limitations of a simple lens. The film spools are held either side of the lens opening on the film carrier by a sprung metal clip, with an additional piece of sprung curved metal on the supple-side to prevent the film from unspooling. Manual frame advance uses the red window in the middle of the camera back.

Kodak Baby Brownie - opened for loading

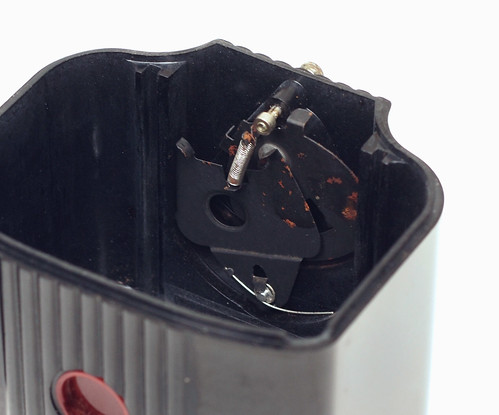
The rotary shutter on my camera has some rust as can be seen in the image below. To trip the shutter, the lever has to be pulled to the left from the user's position; it springs back into position with a self-capping function. The time setting works by simply blocking the shutter from completing its swing when the pin or stud is pulled out. The shutter lever needs constant pressure for the shutter to remain open: it will close when the shutter lever is released, or if the time pin is pushed back in. Framing is achieved by a fold-up open frame finder on the top of the camera body.

Kodak Baby Brownie - detail of shutter mechanism

My camera had some damage to two opposite corners, showing the fragility of the Bakelite: the chip on the inside rear corner I thought might possibly cause a light leak, which can be seen in the image above. To counter this, I added a small strip of black tape on the inside of the body. Using the camera for July 2023's 127 Day, the few frames from the Kodak Baby Brownie show that the lens has fairly good definition in the centre of the image, but this does fall off considerably towards the edges. When the camera was produced, most photographs for the typical user would probably have been made as contact prints and the limitations of the lens less apparent.

Kodak Baby Brownie with Fomapan 200

I used Fomapan 200 for the images on this post. Despite the photographs being taken in July, the weather was heavily overcast on the day, and a 400 speed film (or pushing a stop in development) would have been a better choice. The manual states for best results "outdoor exposures should be made with the subjects in bright sunlight", the usual conditions for a typical box camera when these were made; using a faster emulsion allows for a broader range of subject conditions for these cameras than would have been the case when first in use.

Kodak Baby Brownie with Fomapan 200

The one aspect of the Kodak Baby Brownie in use that feels to me not sufficiently thought-through is the position of the shutter lever: placed directly below the lens, this keeps the camera's design symmetrical, with the exception of the winding knob. Here, it feels as though it should naturally be used by the left hand (an illustration in the manual confirms this), and the action of tripping the shutter is to pull it away from the camera's centre of gravity (which must increase the chance of some camera shake). There was a successor to the Kodak Baby Brownie, also designed by Walter Dorwin Teague, though rather less beautiful, in the Kodak Baby Brownie Special. It is notable that the shutter button of the Special is on the user's right, and it pushes in to trip the shutter. The position of the shutter lever on the Kodak Baby Brownie being directly under the lens is also inconvenient when using the time function: the camera does not have a tripod fixing, but the camera's based is fairly flush, allowing for it to be placed on a level surface for long exposures–which makes reaching for the shutter lever less easy–almost any other placement on the camera would be better for this. However, this additional function of the export variant of the Baby Brownie, must make it a little more desirable over the standard model.

Sources/further reading
The Kodak Baby Brownie on Camera-wiki
Baby Brownie on The Brownie Camera Page
On Art Deco Cameras with manual (PDF)
Kodak Baby Brownie on Retro Film Camera
Kodak Baby Brownie on Down the Road
A Camera Worth a Thousand Words Cooper Hewitt

Friday, 2 April 2021

Thornton-Pickard Stereo Puck

Thornton-Pickard Stereo Puck
"It is often said in praise of a particularly good print that it is “almost stereoscopic.’’ With the Stereo Puck every good exposure is given full stereoscopic effect by dual lenses—and the cost of the outfit is now within everyone's reach." 
Thornton-Pickard advertisment
"...the New Wonder Camera The STEREO PUCK MAKES YOUR PICTURES LIVE"
Thornton-Pickard advertisment, BJP Almanac 1932
The prominent legend announcing the fact of the Thornton-Pickard Stereo Puck being "British Made" on the front plate above its lenses, much clearer than the faintly embossed name itself beneath them, brings to mind a scene from the sitcom The I.T. Crowd: in attempting to fight a fire, the character Moss points an extinguisher towards the fire, which promptly bursts into flame itself. Asking "Why's it done that?", Moss looks intently at the extinguisher, and there's a cut to a close up of a label: "Made in Britain", which provokes a knowing sigh from Moss. Intended, on the Stereo Puck, one imagines, to imply a mark of quality, this "British Made" assertion (as indeed for many a product) is at the very least an injunction for the consumer to patriotically 'buy British'. Something about this–the injunction and its instinctive reaction, as exemplified by Moss's sigh–as a general attitude, has an undercurrent of anxiety, of Britain's contemporary place in the world in relation to its long history, a history here of manufacture, but, by broader implication, its imperial history, a notion of a once-held 'greatness' (such a notion untroubled by any deeper examination), although Britain never seriously challenged the German, and then later, Japanese camera industries, and the Stereo Puck, "British made", was of course produced many decades ago. The association I've drawn with the example of the scene from The IT Crowd may be, perhaps, an unfair reaction, a knee-jerk attitude that itself needs examining, but in the case of the Stereo Puck, it's not entirely unwarranted.

I've long had an (occasional) interest in stereo photography, and when I saw the Stereo Puck come up in an online auction for not very much, I bought it on a whim; I used the camera for the first time two years ago for 'Take Your Box Camera To Play Day'; the film I shot then came out with scratches running through all the negatives, which was a little disheartening, and it had sat on a shelf since then, awaiting some remedial action. I was prompted to pick it up again by the #filmweekender box camera challenge from Twitter user Jason Avery: with a number of box cameras to choose from, I thought that the Thornton-Pickard Stereo Puck was sufficiently niche to warrant using it for this challenge.

Apart from its ability to take stereo pairs, the Stereo Puck is quite typical of the box camera form: it uses 120 medium-format rollfilm (itself introduced for the Kodak No.2 Brownie, the archetypal box camera); it has a fixed-focus simple lens; a single shutter speed; and a small reflecting finder for framing. It's wooden bodied, at a time when many box cameras were being made from metal (and early plastics like Bakelite were beginning to be used; the Stereo Puck's advance knob seems to be made from Bakelite) and the build quality suggests a certain cheapness: as an example, in the image below, the shutter lever on my camera can be seen to be not fixed entirely square-on to the camera body.
Thornton-Pickard Stereo Puck - top view

Thornton-Pickard did produce some fairly high quality cameras from the last decades of the nineteenth century, field and studio cameras, and, in particular, their reflex cameras and roller blind shutters. The Stereo Puck dates from the 1930s, by which time the company was in decline: it ceased manufacture in 1939 (it was preceded by the Puck, a more conventional box camera). In one of the advertisements quoted at the top of this post, three models are described, enumerated as the No.1, No.2, and No.3, all of which appear to have been available concurrently (at the time of the advert; when researching the Stereo Puck online, these numbers aren't usually used to differentiate its different variants). Sources online date the first version to around 1930, although the given dates vary. I've also observed that there were two versions of the model described as 'No.1': some show the metal tab in front of the handle which provides three different aperture settings, while some do not and presumably have just the one aperture setting. My version of the Stereo Puck is the No.2 and has the most commonly noted difference: this has the 'portrait' supplementary lenses, filters which swing in front of the lenses, easy to identify from the small lever next to the viewfinder, absent from the No.1. Finally, the advertisement describes the No.3 Stereo Puck, which has the ability to photograph either stereo pairs or single images (it's not clear how this works, and, from images of the camera online, I can't tell what might differentiate the No.3 in external appearance; it would be possible to shoot single images with the other models of the Stereo Puck by using a lens cap on one lens at a time–not easy to do due to the recessed lens fittings, with the 'cap' needing to be more like a plug–and not advancing the film until each side of the pair has been exposed).

The Stereo Puck takes (nominally) 6x4.5cm stereo pairs on medium format film, giving eight pairs on a roll of film; by necessity this image format creates a compromise in that the lens separation is noticeably narrower than that of human binocular vision. This is, apparently, a remarkably consistent physiological trait, with a distance of 6.5cm. Ideally, each lens then would be separated by this same distance to simulate stereo vision, but with the Stereo Puck, the lenses are separated by 4.2cm (I've read other distances online, but measuring my camera gives 4.2cm). There are circumstances in which lenses for stereoscopy would need to differ from that of the human eye, but these would be for extreme distances, both near and far, for microscopy or for imaging at distant ranges (to achieve a stereo image of a distant landscape, for example, it helps to have a much greater lens separation, otherwise both images appear too similar to create the illusion of depth). In the 35mm format, in order to construct a camera with a sufficient lens separation, the images have to be recorded on the film in a discontinuous series (i.e., the stereo pairs are not adjacent on the film), the most common method is to have the frame advance periodically 'jump' already exposed frames on the film, such as with the Stereocrafters Videon, where each pair is separated by two images of subsequent pairs on the film, which means that, as a sequence, after a first exposure, the film advances one frame twice in a row, then has to advance three whole frames to avoid double exposing one half of each stereo pair; other methods include exposing the film diagonally to avoid double exposure, as with the Meopta Stereo 35 and the Sawyers View Master. In medium format, the 6x6 image size is more typically used for stereo cameras as the wider image format means that the lens separation is greater; however, at the time that the Stereo Puck was produced, 120 medium format film only had numbers on the backing paper for the 6x9 frame size, which no doubt accounts for the Stereo Puck's design and use of the 6x4.5 stereo pairs, with the understandable compromise on lens separation (roughly concurrent with the Stereo Puck, the Rolleiflex popularised the 6x6 frame size on 120 film; while the Rolleiflex did not depend on frame numbers printed on the film's backing paper, evidently the format was attractive to manufacturers of cameras and film, and 6x6 frame numbers were introduced for less high-end 6x6 format cameras).

The user controls on the Stereo Puck are simple and limited. The shutter, tripped by a lever on the top right of the body from the user's position, has a single speed, reported between 1/20th-1/50th online, and a 'time' mode, with a small metal tab that pulls out to keep the shutter open until either pushed in or the shutter lever is flipped back to its original position: the shutter lever does not spring back to its original position, and so, like many older box cameras, this lever trips the shutter in either direction (on most single-lens box cameras of course, this lever runs up and down, rather than side-to-side), left-to-right or vice-versa. The lenses are fixed-focus four-inch f12.5 achromats; absent on some 'No.1' Stereo Pucks, there are three aperture settings with a metal tab in front of the handle that pulls out a strip of metal with holes punched behind the lens with click stops to provide smaller apertures. The aperture settings aren't marked, but logically these two smaller apertures are one stop successively smaller than the maximum aperture, giving approximately f18 and f25. The 'portrait' auxiliary close-up filters are hidden behind the front panel and pivot between the lenses. These can be swung in to position using the smaller lever next to the viewfinder. This lever is sprung, so the close-up filters return out of the way behind the front panel as soon as the lever is let go.
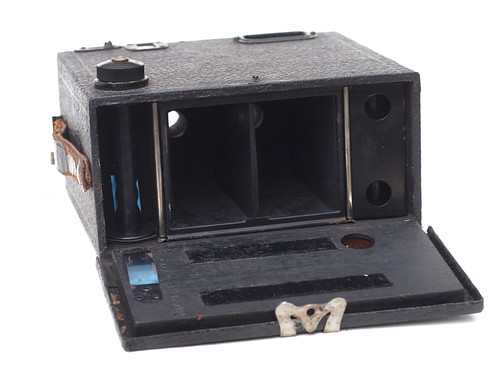
Thornton-Pickard Stereo Puck opened for loading

Loading the camera, the back is hinged on its leatherette covering; the back is made from wood, like the rest of the camera body, but has a metal outer rim that acts as a light trap with a clasp to secure it to the body. On one side, a curved spring attached to the back acts to provide pressure on the take-up spool. The two strips of felt inside the camera back appear to function as a pressure plate on the film behind the lenses; film advance it by red window using the 6x9 numbers. The supply side spool has a removable metal holder rather than the spring attached to the back; it's hard to see exactly what the design of this achieves, other than perhaps avoiding adding a knob on the supply side to secure the toll of fresh film. There is also a standard trip fitting in the base of the camera, but, for some reason, not centred either side-to-side or front to back.

Thornton-Pickard Stereo Puck with supply-side spool holder removed
When I first used the Stereo Puck a couple of years ago, its limitations were apparent. Some of these are an unavoidable part of the design, such as the narrow lens separation, but other issues are a result of the camera's construction, largely due to a lack of care in the manufacturing tolerances of the Stereo Puck. One of the first things I noticed is the disparity between the two sides of the stereo pair: the images are not well aligned in their vertical dimension, and, in addition, the focus on each side is different. These two aspects together might matter less in an inexpensive box camera with a single lens, but with two lenses, especially with a narrow stereo base, a good stereo image would be approved by the focus and alignment being better.

Thornton-Pickard Stereo Puck with Ilford HP5 Plus
In the image above, the left hand image is lower than the right; the left hand image also has better focus at the bottom of the frame, with the right hand image better at the top. The disparity in focus can be mitigated a little with using the smaller aperture settings, if lighting conditions allow when using the shutter on 'instant'. When creating stereo anaglyphs, the vertical alignment can easily be overcome simply by lining up the two images better, with a small amount of cropping. The ergonomics of the Stereo Puck take a little getting used to, especially if one is familiar with the more typical box camera form, as the shutter release and close-up filter lever are on top of the camera rather than at the sides; as with many a box camera, the viewfinder is merely an adequate indication of what direction the camera is facing and what might be generally in the centre of the frame.

Thornton-Pickard Stereo Puck (close-up filter) with Ilford HP5 Plus at 800
Picking up the Stereo Puck again to use it for the #filmweekender challenge, I carefully rubbed down the rollers at either side of the inside of the camera, which had some spots of corrosion, then polished these in an attempt to prevent the scratches that I had with my first roll of film and which can be clearly seen in the image above. I wasn't entirely successful, but the rather obvious gouges have become thin hairlines, much less obtrusive–in the image above, one has to enlarge it a fair bit to discern these lines. Possibly more polishing might remove these completely. I had a roll of Ilford HP5 Plus, and some Rollei Superpan 200; shooting on the afternoon of the 21st March, the weather was heavily overcast, with the result that I chose to push the HP5 Plus one stop in development, giving an effective exposure index of 800 (as I have remarked before, the idea that one should use a low ISO film in box cameras as these were the films available at the time such cameras were designed only holds true if one uses box cameras in the same way as they would have been used at the time: only taking photographs hand-held outside in bright weather conditions; in addition, possibly tray developing the film by inspection to make up for shortcomings in exposure, and possibly using intensification on the negatives as well). Most of the shots with HP5 Plus were hand-held although I did brace the camera against railings in at least one shot, and some used the close-up filter, supposedly for subjects of 1-3 metres, such as the image above. For comparison, I also took a couple of stereo pairs with and without the close-up filters, as below. Comparing the two pairs, the discrepancy in focus without the close up filter is as described above, with the focus better on the lower part of the left hand frame (although this is also closer to the lens), while focus it better towards the top of the right hand frame. Oddly, the close-up filter appears to reverse this trend, or at least, focus is better closer to the camera on the right, while on the left, the middle distance appears better.
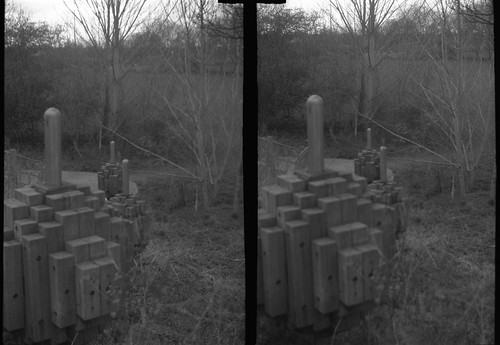
Thornton-Pickard Stereo Puck with HP5 Plus at 800 (without close-up filter)
Thornton-Pickard Stereo Puck with HP5 Plus at 800 (with close-up filter)
Opening the camera to remove the HP5 Plus, I was faced with something of a 'fat roll', and before loading the camera again, I bent all the springs forward in order to apply more pressure to the film; the HP5 had some light leaks at the edges of the last couple of stereo pairs, but not as bad as I had feared. When using Rollei Superpan, with an ISO of 200, this was too slow to use the camera hand-held; I could have attempted to push the film a couple of stops, but I've found Superpan to have relatively low latitude and pushing the film would be far from ideal. Instead, I used the odd wooden sculptures I had been photographing to place the camera on in lieu of a tripod and use the time setting on the shutter, generally stopping the lens down and exposing for around a second.
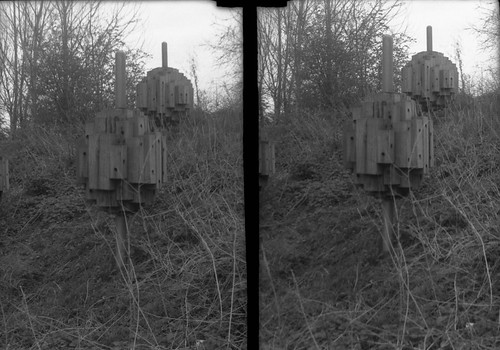
Thornton-Pickard Stereo Puck with Rollei Superpan (without close-up filter)
Thornton-Pickard Stereo Puck with Rollei Superpan (with close-up filter)
For the last couple of stereo pairs, I had inadvertently pushed in the tab for the shutter, so, without realising it, these were shot on the 'instant' setting, and, as a result, almost nothing registered on the negative. I developed both rolls of film in Rodinal, diluted 1+50 for 19 minutes at 19ºC, the time, temperature, and dilution that I'd settled on in my previous testing of Superpan, and close enough to the published times for HP5 Plus at 800 (16 minutes at 20ºC).

The Stereo Puck was sold with a stereo viewer, which my camera came without, but for which the negatives from the camera would be contacted for a print to fit the viewer. This should perhaps be also taken into consideration with the camera: at the scale of a contact print, the discrepancy in focus and alignment would be less obtrusive than in a larger print, or indeed a high resolution scan viewed on a screen. Instead of contact prints for physical viewing, I have been making red-cyan anaglyphs from the stereo pairs as the easiest iteration of the images, particularly online, correcting the alignment images while doing so.


One doesn't use a box camera for accuracy and precision, so perhaps the limitations and compromises of the Stereo Puck that I've outlined should be expected and accepted, particularly within its historical context. One imagines that, before the boom in 35mm stereo cameras during the 1950s, it made the taking of stereo photographs an affordable novelty at the time it was produced. For contemporary use, all these factors are hardly likely to make it a stereo camera of choice but, using it again for the #filmweekender challenge, after cleaning it up to prevent it scratching the film, perhaps it shouldn't have sat on a shelf for a couple of years.

Sources/further reading:
Stereo Puck on Camera-Wiki
Stereo Puck on Early Photography
Stereo Puck variants on Red Belllows
Model 1 without close-up filters or aperture stops on Welt Der Stereoskopie
Model 1 on Wood and Brass


Saturday, 29 February 2020

'Take Your Box Camera To Work Day' 2020


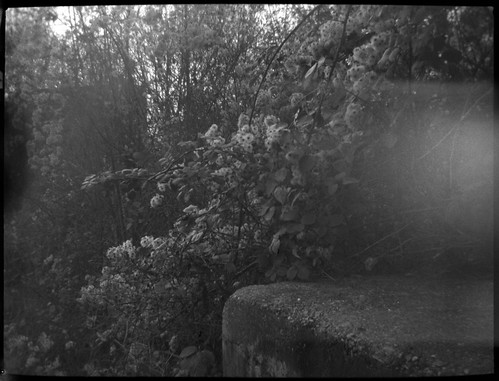
Yesterday's Take Your Box Camera To Work Day was mostly overcast and rainy throughout; appropriate to the lighting conditions, I shot two rolls of cut-down medium format Ilford HP5 Plus. I used my Baby Box Tengor again, both for its portability and that the 'half-frame' 127 format gives 16 frames on a roll. I pushed the film one stop in development in an attempt to compensate for the low, diffused light of the overcast day; given the lighting conditions, shots taken on the instantaneous setting were still a little thin, while many of the frames shot on the 'B' setting were somewhat overexposed, rather different from my results on last year's equivalent day with much better light. I was more daring than I tend to be with long exposures: without using a tripod, I balanced the camera on available (horizontal) surfaces, but also braced it against windows, and, in the last shot below, the side of a bus stop; some of these results are not especially sharp, but extended the possibilities for shooting with the limitations of a simple box camera.


Friday, 31 January 2020

Friday February 28th is 'Take Your Box Camera To Work Day' 2020

Having not participated for a couple of years, and with four weeks to go, Friday 28th February is this year's 'Take Your Box Camera To Work Day'. Having previously defined it as the last week day in February, that is falls on a Friday this year may be an additional inducement to take part. As ever, there are a number of considerations around shooting a box camera in a work environment: not all work situations are amenable to such behaviour; and, with most work generally being inside, the fact that box cameras are designed for exterior daylight shots, one needs to adopt strategies for achieving a decent exposure, often involving either using fast film (or push processing), or 'B' settings for long exposures, or both (and, additionally, the weather in February -at least in the Northern hemisphere- might also provide rather low light levels for exterior shots).

For those posting on Flickr, in the Box Camera Revolution Group or elsewhere, including Twitter, using the tags 'TYBCTWD' and 'TYBCTWD20' will help identify shots from the day. Having taken it upon myself to promote the day, I won't adjudicate if photographs were shot at work, or on the day itself, still less to define what precisely constitutes a box camera (or, indeed, even 'work'): the spirit of the day is what counts for anyone willing to participate.

'Take Your Box Camera To Work Day' 2017

Thursday, 12 December 2019

127 Day December 2019

Baby Box Tengor with Ilford HP5 Plus
For last weekend's 127 Day I chose to shoot with the Baby Box Tengor, a choice partly influenced I think by also taking photographs for the current #shittycamerachallenge. The Baby Box Tengor is capable of reasonable results, but it is just a simple small box camera with no adjustable aperture, focus or shutter, other than the choice between instant or time exposures. I used just two offcut ends of Ilford HP5 Plus: when cutting down a roll of medium format to 127 size, after rolling the right length for the format, there's always some film left over, around five 4x3cm frames, although it's hard to be exact when cutting the film in a dark bag (this operation would be easier if the film was unrolled on a worktop in the dark and some form of jig made to get the correct length). There were a few light leaks, but also one roll could have been better developed, more attention paid to agitation, with air getting trapped between the film and plastic spool; I wound up with ten shots in total, a couple of instances where I'd taken two shots of the same subject from similar positions, and two where the frame partly overlapped the end of the film - one of which was too slight to be worth scanning.

Baby Box Tengor with Ilford HP5 Plus